You’ve been to a few gigs, you’ve put the photos online and were treated to a whole host of lovely comments from your Mum and friends. Bands have started to ask you along to shoot their gigs and maybe some promo shots too. This is the time you’re considering perhaps advancing your skills. You’re no longer just shooting the gigs for your own enjoyment, but for others, too. Here’s a few pointers to help you along.
This article is part of a two-part series about concert photography. Check out the first article in the series: 9 Very Basic Tips for Newbie Music Photographers.
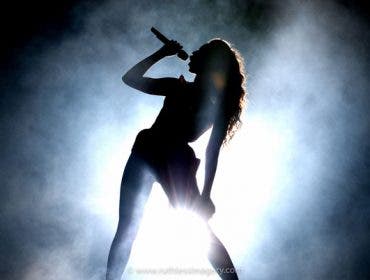
Look for interesting angles
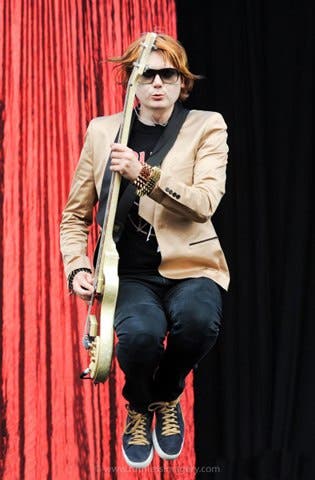
MOVE! The pit can be a big place and 3 songs can be long enough to move around. Go high, go low. I once asked a bouncer to lift me on his shoulders. The stage was over 10 feet tall and the band Blur was standing way back due to the rain, so I needed the boost. Sometimes the most interesting element of the concert is the crowd, so dive right in with them and use them as props! The back of the room or the balcony can show some great scale. Think outside the pit! If you’re not completely exhausted by the end of the set then you’re doing it wrong.

Shot with a Nikon 14-24mm f/2.8G ED-IF AF-S Zoom Nikkor Lens
Build your portfolio
Working for free (or for your “portfolio”) is popular debate that is fraught with conflicting opinions. I’ll share my experience. I sometimes worked for free when in college (I did a 4 year bachelor’s degree in Photography). I’d do the odd job here and there that I knew I’d learn something on, but never for a label or a corporate gig. My view is that if someone has money to pay the sound engineer, the bus driver or the bar staff, then they can pay you. People need to start valuing the arts and the only way they’ll do that is if the artists value themselves. So set yourself a limit. Get 10 shots in your portfolio that you’re truly proud of and then no longer work for free. That’s what I did and it’s working out well. Even if you only get a few quid, or the band want to pay you in booze, or maybe you can use a barter system and have your logo/website designed in return. Value what you do!
Nifty Fifty
Many people come to me when they’re thinking of advancing their photography skills and their first thought is to upgrade their entry level DSLR. Don’t. Leave the camera, upgrade your lens. I always recommend that any new music photographer upgrade their kit lens (the one that came with the camera) to a 50mm f1.4 lens. Whether you’re a Canon or Nikon shooter, just upgrade accordingly. My parents bought me my 50mm lens many, many years ago for my 16th birthday and I STILL shoot on it. How amazing is that? Good lenses will last a lifetime. A 50mm f1.4 will allow you to get close to the action without being on top of the band and they’re fast enough so that you can soak up all of that low light.
Shot with a Nikon 50mm f/1.4D AF Nikkor Lens
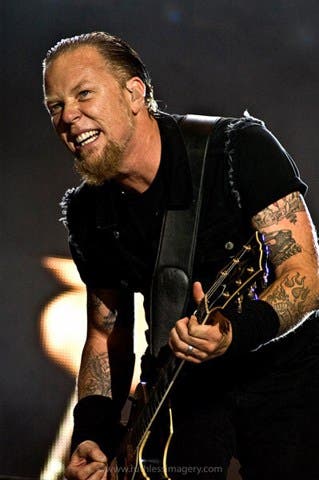
Sharpness
Most of the times when people send images to me for feedback, 90 percent of the time they have a sharpness issue. Shooting concerts is HARD. The venues are dark and sweaty. The mosh pit makes it impossible to stand still and you can forget about setting up a tripod. Therefore, to combat motion blur you really shouldn’t be shooting at anything less than a 60th of a second. I’d stay at a 100th of a second just to be safe, anything less than that and you’ll notice that the guitarist’s strumming hand is a total blur. Another issue that could be to blame for out of focus photos is the incorrect use of your AF system.
Unless you’re doing something completely artsy, you should be focused on the musician’s nose or eyes, that’s what the magazines want to print. I’d stick the camera on a Continuous AF mode, focus on their nose and move with your subject as well. I’ve been known to sway in time with the music because you’ll find that the singer is swaying too! Whatever the best option your camera offers for a fast AF shot is what you should be using. I personally don’t use 3D tracking, but you might prefer it. Get to know your camera by testing each function and then choose which is sharpest for your own shooting style.
Shot with a Nikon 80-200mm f/2.8D ED AF Zoom Lens
Get a Faster Card
So you’ve stuck the camera in a continuous shooting mode, you’re snapping away at 11 frames per second with your super fast camera. The lead singer is climbing the amp stack and you just know he’s about to jump into the crowd…but what’s this? Oh no! You’re card is struggling to write all the information and it won’t allow you to take any more photos! Don’t let buffer speeds slow you down. If you’re at the level where you’re quick enough to catch the action then upgrade your card. Look for the best write speed and capacity to suit you. I would never skimp on my cards- if they fail you’ll get a pang of regret in your tummy like no other. Trust me. Invest in a good, fast, reliable card.
Shot with a Nikon 80-200mm f/2.8D ED AF Zoom Lens
Post Production
Filters and clarity sliders are all great for the amateur eye but if you rely on them too much you’ll never learn how to shoot better. Don’t count on post production to rescue your bad photography. Always try and shoot the perfect exposure in the camera. A magazine editor will be able to spot your dodgy Photoshop trickery a mile away, and so can the rest of us. Use your internal light meter when you’re shooting to get a balanced exposure. It’ll take a bit of practice but once you get your head around it your photography will improve vastly. Once you know how to handle the light you can then start to play with it in creative ways. My Nikon 24-70mm creates some incredible lens flare so I find myself shooting into the light to capture it.
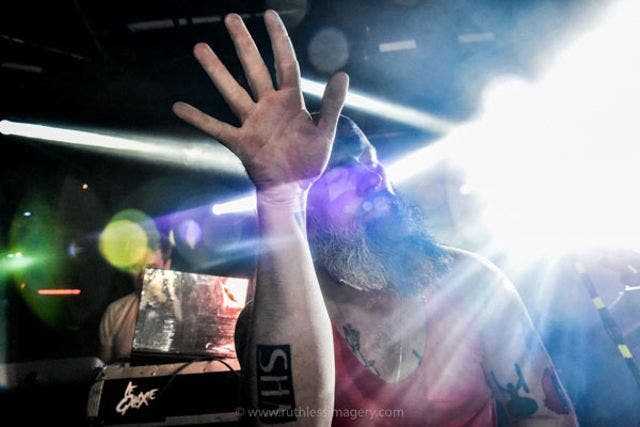
Shot with a Nikon 24-70mm f/2.8G ED-IF AF-S Zoom Nikkor Lens
I’ll be back with some more music photography tips and industry secrets soon!