
A reader recently wrote to ask why I didn’t include information about zooming the lens in my article on moving the camera. Zooming the lens is such an effective technique, that produces such distinctive results, it deserves to be talked about in an article all its own. It’s a classic.
 To zoom during an exposure, you need two features on your camera: a zoom lens with a range of at least 3:1, and the ability to manually control the shutter speed. Also, if you’re shooting on a bright day, you may need to restrict the amount of light coming into the camera by using a neutral-density or polarizing filter and/or a low ISO film, or a low ISO setting if you’re shooting digitally.
The classic zoom effect
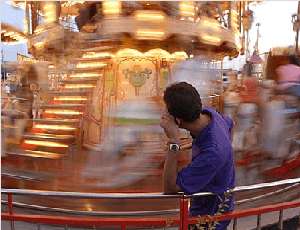
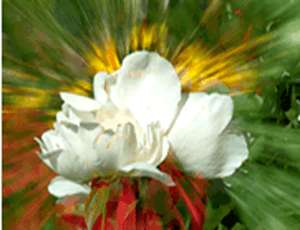
One classic technique is to zoom the lens slowly during an exposure time of about one second. Do this and you can surround your subject with radiating streaks. It’s a great way to change a bland scene into one that fairly explodes with color.
 But the classic zoom effect can do a lot more than that. If you center the viewfinder on a subject that’s moving toward you, the zooming streaks will accentuate its action. Do this with sports action scenes and the implied movement of the central figure will be more intense. Or you can use the zoom effect to create a feeling of tension, as it does in the somber-tones of the buildings shown at right.
Break the rules
The basic zooming technique seems deceptively simple– just move the zoom control while you make the exposure. No, no! Don’t just aim and zoom. There are some nuances to the technique if you want to do it well, and some of them break the rules for conventional photography.
For most of the photographs you take, you usually look for a relatively plain background and foreground. Simplify, simplify, simplify.
But when you’re trying to create streaks, you need a busy background. No detail, no streaks. So zooming your lens while a skier is coming down a snowy slope won’t add much drama to the scene unless the ski trail is flanked by trees.
The other rule that differs from ordinary photography is that when zooming, you must center the subject. While the composition of most photographs is more pleasing when the subject is not centered, a zoom effect always radiates from the center. That’s how the picture works optically, so go ahead and center the subject.
Be a smooth operator
You’ll probably want those colorful streaks to be nice and smooth, without a jerk at the beginning or end. The way to achieve fluid streaks is to start zooming the lens before you press the shutter release, then continue zooming after the shutter closes. You can handhold the camera, but the image will be sharper if your camera is mounted on a tripod.
Rehearse your movement so you can be sure that no unwanted objects sneak into the frame when you zoom to the wide-angle setting. Rehearsal is especially important with an SLR camera since you won’t be able to see the scene while the shutter is open.
Speaking of wide-angle settings, you can start your zoom at either the telephoto or wide-angle end–the results will look the same. And since it’s a good idea to shoot several zoom photos of your chosen subject to make sure you get results you like, you may want to make one shot starting at telephoto and zoom to wide angle; then for the n shot, start at wide angle. It’s an efficient way of operating.
Variations
 Once you’ve mastered the knack of doing a smooth, continuous zoom, it’s time to forget what you’ve learned and do it differently. Special effects photography is all about breaking the rules.
One dynamic technique is to start with the lens at the telephoto position and pause there for an instant before you start zooming. Use a tripod here. This will give you a sharp central image surrounded by those colorful streaks.
 Another variation is called a “step zoom.” It’s really not a zoom at all but a series of multiple exposures that give the effect of a zoom. (See photograph above, left) Put your camera on a tripod, center your subject in the viewfinder, and make eight or nine exposures without advancing the film, changing the lens focal length between each shot. Try to make the focal-length increments as similar as possible.
To avoid overexposing the film, you must underexpose each shot so the total adds up to the correct exposure. The easiest way to arrive at the correct exposure is to change the ISO setting on your camera so that it is the product of multiplying the film’s ISO by the number of exposures you will make. That is, suppose you are using ISO 100 film and intend to make ten exposures. Then set the ISO setting to 1000, and the in-camera meter will give you the proper exposure.
You can do something similar to a step zoom without having to make multiple exposures. If you zoom. . . pause . . . zoom . . . pause. . . zoom . . . pause . . . during a three-second exposure, you can get something like the picture shown above right. It’s worth a try.
 You also might want to try combining the zoom movement with a camera movement. While you’re zooming, slowly move the camera in an arc, up and down, back and forth, or whatever way you like. Don’t bother to choose a specific subject since it will not be identifiable in the picture. Rather, find a colorful scene and try turning it into a vibrant abstraction. It may look nice by itself or you can sandwich it with another image.
 Speaking of sandwiching, you can make a traditional zoom shot of a scene on slide film, then sandwich it with a silhouette that’s on another piece of slide film, as I did to create the sandwiched image of the seated people.
Another variation is to make a simple double exposure: one where you zoom the lens, and one of another, lighter-colored subject. Remember, in double exposing, each shot should be one stop underexposed.
Or…you can just press a button in Photoshop
Creating the zoom effect in Photoshop is as easy as clicking a button. You can change the amount, which is similar in effect to how fast or slow you zoom with the camera. But a great advantage is that you can place the center of the zoom wherever you want it– something you can’t do in the camera. To do the zoom effect, click Filter > Blur > Radial Blur > Zoom.