There are many ways to approach travel photography: You can use a documentary approach to capture the reality of a destination with photojournalistic authenticity or use digital manipulation techniques to enhance that reality and produce an idealized version of your personal experience.
You can also take that image one step beyond and, using Adobe Photoshop and a few of its well-chosen imagination-enhancing tools, create a fanciful version of what you originally saw through the viewfinder. In fact, there’s no reason why you can’t do all of these things—just read on.
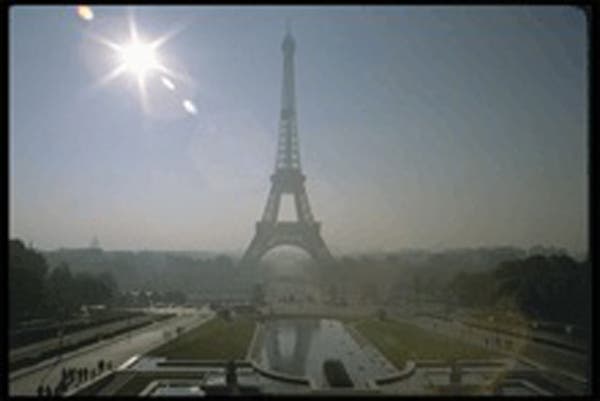
Step 1: This photograph of the Eiffel Tower in Paris is a cliché image if ever there was one. I tried to get fancy by using an ultra-wide-angle lens on a Canon EOS-1n to make lens flare part of the composition, but the image, taken from a Kodak Photo CD scan from the original Ektachrome slide, still lacked something. Before starting any manipulations it’s a good idea to make an image look as good as it possibly can. In fact, if you do this, you may discover that you don’t need to make as many changes as you originally thought
Step 2: I opened the file using Adobe Photoshop CS and applied the kind of minimal tweaking I do with any digital image, such as adjusting Levels (Image > Adjustments > Levels) and cleaning up film grain, in this case, using the Despeckle filter. (Filter> Noise > Despeckle)
Much as using power tools makes construction projects go faster, using digital power tools can produce better results more efficiently than doing it “manually.” There are lots of ways to tweak a photograph’s color and density, but one of the easiest methods is to use a Photoshop-compatible plug-in such as PictoColor’s iCorrect EditLab (Filters> PictoColor> iCorrect EditLab.) This plug-in merges the color correction and management functions while adding batch-processing tools so you can quickly color correct large numbers of photos.
Step 3: I decided what the Eiffel Tower really needed was a lake or reflecting pond, much like our own Washington Monument in D.C. I reached for Flaming Pear Software’s Flood plug-in. The dialog box for Flood features all kinds of controls that let you create a wide variety of digital water effects; you can conjure up everything from a serene, reflective pool to a violent Great Lakes squall.
The interface (Filters>Flaming Pear>Flood) has lots of slider controls that you can experiment with if you like that sort of thing, but notice the “dice” icon tucked into the lower left-hand corner of Flood’s dialog box. Clicking this icon produces random variables for all of the sliders and I prefer to sit back, clicking the dice until I see something I like in the preview window. That’s when I click OK. My final version of “Lake Eiffel” includes reality but also a healthy dash of fun.
While I used Adobe Photoshop CS to create this digital image, any image enhancement program that supports compatible plug-ins will work. You don’t need Adobe Photoshop CS to use Photoshop-compatible plug-ins. Adobe Systems may have defined the standard, but compatible plug-ins can be used with other image editing programs. These include Adobe’s $99 Photoshop Elements, Ulead Systems’ PhotoImpact, JASC’s Paint Shop Pro, Corel’s Painter and PhotoPaint, and MicroFrontier’s Color-It!, Enhance, and Digital Darkroom.
For this example, I used the Mac OS version of the products mentioned, but all this software is also available for Microsoft Windows. You can also download free trial versions of the plug-ins listed, so why not give some added splash to your n series of travel photographs?
All photographs ©Joe Farace
| Joe Farace is Colorado-based photographer/writer who has written or edited 25 books and more than 1400 magazine stories. For a limited time, you can get an autographed copy for his book on Photoshop-compatible plug-ins called “Plug-in Smart” from the Bookstore section of www.joefarace.com. |