Photography is extremely dependant on optics and optical effects for image quality. The better you understand these concepts, the more control you’ll have over your photographs. Here are several optics topics that you can use.
Diffraction Action
Depth-of-field is the apparent range of sharpness between the nearer and further objects in the photo. To get a greater depth-of-field, you need to select a smaller (larger numbered) aperture setting. But there’s a sharpness tradeoff at the smallest apertures. An optical effect called diffraction causes light to bend and disperse slightly as it passes by sharp edges. This can cause a slight loss of sharpness in photographs taken at the smallest apertures. Generally an aperture setting about midway between the largest and smallest will yield the sharpest overall results for a lens.
It’s difficult to show the loss of overall sharpness on a computer screen between photographs taken at larger and smaller apertures. But if you look at the photo below of a near-monochromatic (single color) light projected through a camera lens at F/5.6 you’ll see the diffraction rings that can take the edge off an otherwise sharp photo. The red light and the optics that projected it helped to exaggerate the diffraction effect and make it more visible.
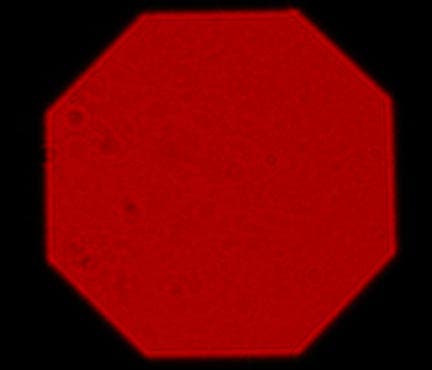
Look closely at the edges–see the parallel bands near each diaphragm edge? These are the diffraction bands that detract from the image sharpness. Imagine how much of the lens opening the same diffraction rings would take up if the lens were stopped down much smaller. When the diffraction bands comprise a larger percentage of the image-forming light reaching your film or sensor, the image loses sharpness.
By the way, the small “bull’s-eyes” are tiny dust specks on the optics. The light source pumps up those diffraction bands too.
Shape Shifter
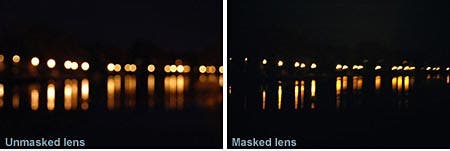
The shape of the lens aperture can affect the photo, too. Specular highlights such as streetlights in nighttime are a good way to illustrate this. If you throw the lights slightly out of focus, they take the shape of the aperture. You can change the shape of those out-of-focus highlights Try cutting some odd-shaped hole in a piece of cardboard that will fit into a filter holder such as a Cokin type. The hole can be fairly large. You don’t want to lose a lot of light by using a small hole. Your SLR viewfinder will show you that the highlights will be shaped like the hole you made. Overuse of this trick can look trite, but with a bit of restraint it can add impact.
Here are two examples. The photo on the left was taken through an un-masked lens. I added a mask with a triangular cutout to the one on the right.
Holy Shot
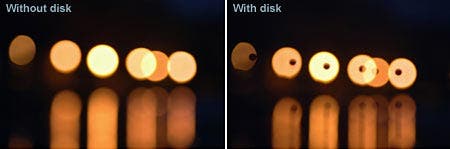
You can also use a “negative hole” for effect. The opposite of an opening can also affect your photos. Catadioptric mirror telephotos, such as, have an obscuring dark disc in the center of the front element. This disk supports a secondary magnifying mirror inside the lens. Out-of-focus lights show up as donut shapes in photos taken through these lenses.
If you don’t own a catadioptric mirror telephoto, you can fake it with your regular long lens. Simply adhere a black paper disk to the center of a skylight filter and put it on your telephoto. You’ll get the mirror lens look at zero extra cost. See the before an after shots here in these photos!
Star Search
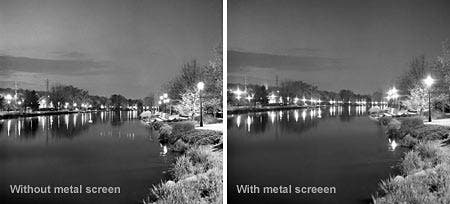
A similar technique is to cut a bit of window screen to fit in your filter holder. The diffraction will turn your specular highlights into star-like crosses. You’ll see this trick in some sporting or music event broadcasts. For less effect, just add two crossed wires instead of the screen. These photos show the effect of using no screen and using a piece of fiberglass window screen in front of the lens. A metal screen could be used as well. The originals were taken on Ilford Delta 400 film in a Hasselblad 500CM, 80mm lens.
Bend the Light
Refraction is the bending of light rays as it passes from one transparent material to another. This is caused by the change in the speed with which light travels through different materials.
Refraction is what makes lenses work. However, refraction in commonplace materials can be harnessed to make interesting photographs. Some of the earliest microscopes were nothing more than a flat plate of metal with a tiny hole in it. A tiny lens was fixed to the hole. The lens was held close to the observer’s squinting eye and unseen wonders were made visible. A drop of water could have been placed in the hole, where its propensity to form a sphere would have made it into a relatively high-powered magnifying glass. Some microscopes actually used water lenses.
A tiny drop of water or other clear fluid can also make a “smallifying” lens. If you hold any magnifying lens a foot or so away and look through it at a distant object, you will see a small image of the scene, inverted in the lens. A shorter focal length lens can be held closer to your face.
To make your own lenses from liquids, try putting small drops on a sheet of glass like a window. Elinor Stecker Orel’s tutorial on shooting refractions through water droplets goes into great detail about this method.
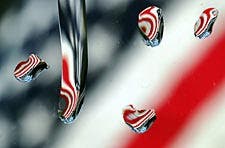
I like using small drops of clear corn syrup instead if water, since water tends to run. It takes several drops–even irregular ones–to make an effective photo. Select a bold patterned subject like the flag you see here.
© Adorama Camera