Let me begin this column by telling you that I am a proud member of the North American Nature Photography Association (www.nanpa.org). Many of my fellow members stress, as I do, honestly in photography and digital imaging. If one of our pictures is digitally enhanced or manipulated, we say so. No if’s, and’s, or but’s. For us, honesty is the best policy.
I am sharing this photo philosophy with you for three reasons: First, this column features a digitally manipulated image, one that I’m using to illustrate how you might be able to save one of your own photographs from the “outtake” folder on your computer. Second, I want to stress that if you manipulate an image, it’s very important to say so, especially if you get your picture published. Third, I want to share with you the power of the digital darkroom.
For this article I used Adobe Photoshop CS2, but you can do the same procedure with Adobe Photoshop Elements 4.0–or any digital image-editing program that lets you increase the canvas size and offers a Clone Stamp tool.
Okay, on with the column.
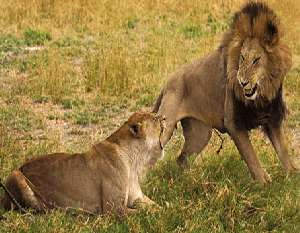
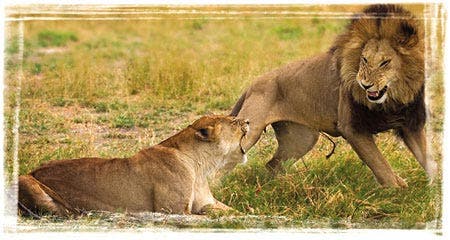
 I photographed these lions in courtship while on a safari in Botswana. It was late in the day and the sky was overcast, so the straight-out-of-the camera picture looks a bit flat and soft. That’s easy to correct by adjusting the Levels, Curves, Hue/Saturation and Brightness/Contrast.
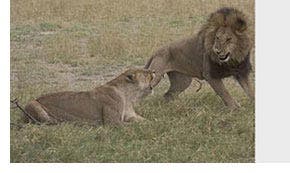
The big problem with the photo is that the male lion’s left leg (on our right) is cut out of the frame.
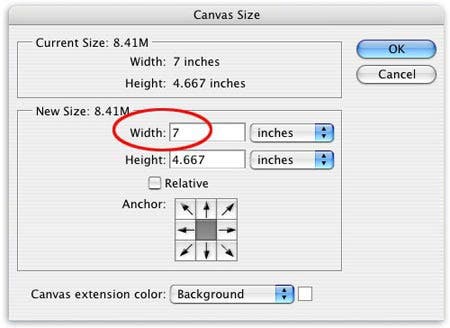
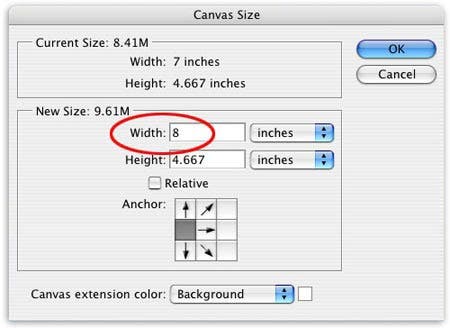
The first step in my Quick Fix was to increase the canvas size. In these two screen shots you can see that I increased the width of the canvas by one inch on the right side of the image.
My new document looked like this after I increased the canvas size (Image > canvas Size).
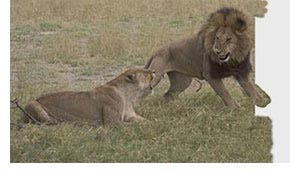 N I used the Clone Stamp tool to copy existing grass areas into the blank areas of the canvas. Then I used the Lasso tool to trace (select) part of the lion’s right leg (on our left). After making my selection, I copied it (Edit > Copy) and pasted it (Edit > Paste) over the lion’s left leg. That placed the copied right leg on a new layer on top of the original document. N I used the Move too, Eraser tool and Burn and Dodge tools to blend the “new” leg with the old.
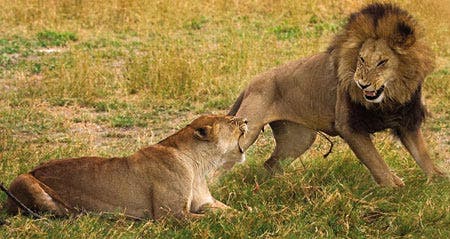
To take a break from my retouching, I decided to enhance the color and contrast of my picture. I did that using Levels (Image > Adjustment > Levels) and then by increasing the Saturation (Image > Adjustment > Hue/Saturation). Now that’s good color.
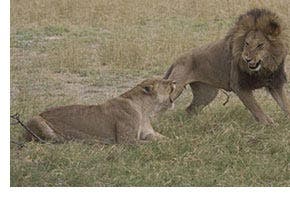
In looking at the image, I decided that there was too much “dead space” around the lions, so I used the Crop tool for a tighter crop, which resulted in a more dramatic image. In this image you can see the near-final result of my retouching. The “new” leg is still a bit darker than I’d like it. A bit more work had to be done. What’s more, if you look closely, you will see that the lion has two right paws!
To hide the flaws in my retouching, and the fact that the lion now has two right paws, I used a digital photo frame in OnOne PhotoFrame Pro 3.0.
All you keen-eyed readers probably noticed something else. Now, the background is more out of focus than in the original picture. I blurred the background by making a duplicate layer, blurring the entire layer, and then erasing the areas on the same plane as the lions. That’s similar to the effect I would have gotten had I used a longer telephoto lens.
I hope this column has given you some ideas on how you can fix up your photographs. In the process of fixing and getting published, please remember, “Honestly is the best policy.” The image is still your work, but the post-capture enhancement should be duly noted.
Rick Sammon has published 25 books, his latest: Rick Sammon’s Complete Guide to Digital Photography and Digital Imaging Workshops. He has produced a DVD for Photoshop Elements users: 3-Minute Digital Makeover, and three DVDs for Photoshop CS user: Awaken the Artist Within, Close Encounters with Camera Raw and Photoshop CS2 for the Outdoor and Travel Photographer. See www.ricksammon.com for more information.