The Big Smackdown.
Image-enhancing filters, such as a polarizers, are tremendously useful for enhancing a scene. But special-effects filters can transform your photographs into something spectacular or fantastic. If you’re aching for a different look in your pictures, should you try some of these magical pieces of glass (okay, some are made of plastic)? Or have physical filters been rendered obsolete by the virtual tools offered in Adobe Photoshop?
We decided to put both types of filters in the ring and let them slug it out. In one corner is a stack of filters; in the other, Photoshop CS or CS2. We compare the effects and the pluses and minuses of each approach. Which will come out the winner? Here’s the bell??
Round 1: Punch up the color
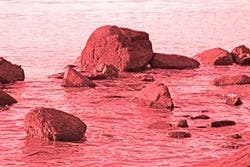
Glass: Color filters come in all the colors of the spectrum, letting you alter the hue of the entire scene or just part of the picture. Many solid-color filters are designed to control contrast in black- and-white photography, but when used for color pictures, they can create wild special effects. Color filters can intensify a scene where a color is already dominant, making grass greener, or turning a so-so sunset radiantly dramatic. You can use color filters to create a mood: A little bit of blue makes the subject and viewer feel colder; red can intensify a feeling of heat or excitement. Still not outlandish enough? Try photographing an ordinary seascape with a red filter to make its color completely unreal (see sample), or screw on a blue filter and underexpose to turn day into night.
As with any filter, the job of a color filter is to hold back something; in this case, it’s light of certain wavelengths. And because the filter is cutting out light, you’ll need more exposure. Generally, your camera’s TTL meter can compensate for the lower light transmitted through the lens, but it’s a good idea to bracket your exposures in any case.
When you’re photographing with print film and a filter that colors the entire scene, inform the lab what you have done. Otherwise they will attempt to neutralize the color, and the result may not be what you intended. If shooting digitally, don’t use auto white balance–choose WB manually.
In Photoshop: There are several ways to add overall color to an image in Photoshop. The method that really looks like a filter placed over the camera lens is appropriately called Photo Filter, which you’ll find in Photoshop CS and CS2. Go to Image > Adjustments to access it. After selecting a color, check the Preserve Luminosity box and adjust the density.
Glass or Photoshop? Each glass filter has a fixed color intensity and forces a longer exposure or wider aperture. Photoshop color filters are infinitely adjustable in hue and intensity, and don’t affect exposure. Advantage: Photoshop
Round 2: Color grad school
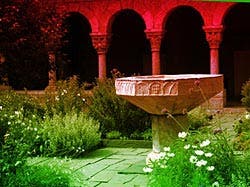
Glass: Graduated color filters have color that gradually fades to clear or to a lighter tint. The most useful filters for special effects are those that fade to clear, enabling you to make the sky more blue or the grass more green without affecting the rest of the scene. But why settle for a blue sky? You could turn it purple or red. Or you could use two filters of different colors, placed so one covers the upper part of the scene, the other the lower part, creating a fantasy scene.
In Photoshop: The Gradient tool gives you an infinite choice of colors. Open your picture and create a new layer (Layer > New > Layer). On the Color Picker, change the foreground and background colors to the hues you want. Click the Gradient tool, which co-exists with the Paint Bucket tool on the Toolbar. On the Options Bar, you’ll see five small icons; click on the first one to give a horizontal gradation. To the left of those icons is a colored rectangle with a little triangle. Click the triangle to open a series of colored squares. Click the first one if you want the gradient to go from foreground color to background; click the second to have it go from foreground color to transparent. Make sure the Mode window on the Options bar is Normal. On your new layer, drag the cursor from the top to the bottom of the image. This will fill it with color(s). Drag a shorter line within the image for a less gradual transition, drag the line beyond the image borders for a more gradual one. Change the Layer Blend Mode to Overlay, but you may also want to try other Layer Blend Modes. I used a red and green two-color gradient for the picture of the fountain.
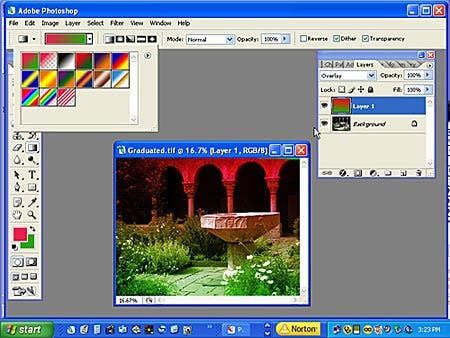
Glass or Photoshop? There are only a few colors available in glass filters, whereas there’s no limit to the hue combinations you can make in Photoshop. It takes a bit of maneuvering to position the transition area with glass filters; with a bit of practice, you can position it exactly when using Photoshop. Advantage: Photoshop.
Round 3: Tri-color effect
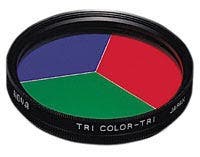
Glass: How about three colors? The in-camera way to add them to a scene is to use a tri-color filter. One such filter has three parallel sections of red, yellow, and blue glass. Another has red, green, and blue glass in wedge-shaped sections. These filters can be rotated so the colors fall where you want.
In Photoshop: Use a Selection tool to define specific areas, then fill the selections with any color you like, at any degree or opacity..
Glass or Photoshop? It’s faster to use a glass filter, but again, your colors and intensities are limited, so are your section shapes. And you have to use a longer exposure or wider aperture. Photoshop gives you more options, but each section has to be individually drawn, and wedge shapes are tricky. Advantage: Glass (if you are okay with the available colors).
Round 4: Color Polarizer Counterpunch
Glass: One of my favorite color filters is almost like magic. It’s called a color polarizer. These filters are available in several two-color combinations, and as you rotate the filter, the color of the scene changes before your eyes. For example, as you rotate a blue/red filter, you can see the scene gradually go from blue to magenta to red, giving you a bunch of color effects from one filter. What is utterly fascinating is that at the midpoint of the rotation, you may see areas of both colors of the filter plus a color that results from the blending of the colors. The only drawback is that these filters are light hogs, and require longer exposures, so you’ll need a tripod.

In Photoshop: If you want to change the overall color of the image, follow the instructions under Color at the beginning of this article. If you want areas of intermediate color, use a selection tool and add colors selectively to individual areas–a labor-intensive activity.
Glass or Photoshop? For an overall color change, Photoshop gives the most options. But for images with hints of three colors, the color polarizer does the job more efficiently. Advantage: a toss-up.
Round 5: Hit the spot

Glass: Center-Spot filters–color filters that have a clear area (often a hole) in the center–can effectively emphasize one flower in a group or de-emphasize a busy background. You can also find colored filters that have a different color in the center than on the rest of the filter. You can create your own two-tone filter by placing a light-tone solid-color filter plus a color-spot filter over your lens.
When using center-spot filters, both the aperture and lens focal length are critical togetting the result you want, and you must be able to control these. Here’s where a depth-of- field preview button can become your best friend. As you go from a large aperture to a small one, the transition between the center and the surrounding area becomes more sharply defined. The center area becomes smaller again. Another variable: When you change the focal length, different things happen: As the focal length gets larger, so does the clear area and the amount of diffusion surrounding the center area. It can get so diffused that you’ll hardly realize there is a clear area in the center. What you want is a reasonably-sized clear area with a soft transition. A good compromise setting is a focal length of about 50mm and an aperture of f/8. Use that depth-of-field preview to make sure you’re getting an effect you like.
In Photoshop: Use the Elliptical Marquee tool to select a circle, giving it a feather of about 25 pixels. Invert the selection (Select > Inverse). Now apply a Photo Filter as described above, but this time leave the Preserve Luminosity box unchecked, creating a dramatic spotlight effect on your subject.
Glass or Photoshop? With glass filters, you’re limited by the available colors, and you have to make a compromise setting of aperture and focal length to get a reasonably sized clear area with a soft transition. With Photoshop, there are no such limitations. Advantage: Photoshop.
Round 6: Over the rainbow
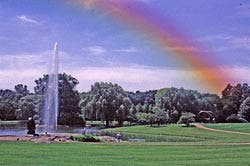
Plastic: If nature isn’t ready when you are, you can create your own rainbows. All you need is a Cokin rainbow filter. A large aperture and a wide-angle lens will make the bow slightly diffused and natural looking, or you can stop down and make it so sharp that it’s absurdly unrealistic. A good starting place for a fairly realistic rainbow is a focal length of about 28mm and an aperture of about f/8.
In Photoshop: You can create a quite realistic rainbow in Photoshop using the Gradient tool. Open a new layer over your image. Activate the Gradient tool, then click the little arrow on the far left of the Option Bar. This opens the Circular rainbow option. Click on it. Use your mouse to draw a line of any length on the layer. The longer the line, the larger the rainbow’s diameter.
Use the Move tool to reposition it. To change its size, go to Edit > Free Transform; pull the corners to reconfigure the rainbow. Use the Eraser tool to make the rainbow start and end where you want it. Finally, change the opacity so it looks realistic.
Glass or Photoshop? With the Cokin filter, placement of the rainbow can be a bit tricky, and for best results, you should use the recommended aperture and focal length. With Photoshop, you can position and shape the rainbow exactly the way you want it, independent of aperture and focal length. Advantage: Photoshop.
Round 7: Seeing stars
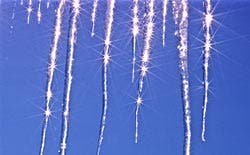
Glass: A star filter, also called a cross-screen filter by some manufacturers, turns every bright point of light into a gleaming star. It’s a classic glass filter effect. Think candles, street lights, sunlight on the water . . . . Star filters have a grid of fine lines etched into their surfaces. The more intersecting lines there are, the more radiating points the stars will have and the brighter they will be. You’ll find filters that will dazzle the scene with 2, 4, 6, 8, and even 16 rays (called “points” by the manufacturers, but they look like rays to me). But also consider the spacing between the lines. The closer together the lines are, the brighter the stars will be and the longer their rays. Grid spacing generally is 2- or 3mm, but not all filters indicate the spacing.
The secret to producing a dazzling star is to find a very bright point of light, especially one against a dark background. The source can be actual lights or highlights reflected on glass, metal, diamonds, or any shiny surface. Small points of light are transformed into bright stars with long rays. If the light source is broad, you’ll get wide beams instead of narrow, sharp rays but sometimes that can be effective. If the light is far away or dim, forget it: You’ll get a dim star, or none at all.
Star filters produce a bit of diffusion, especially at wider lens apertures. You may want to take advantage of this diffusion; otherwise, choose mid-range f-stop, probably about f/8. Take your meter reading from the main subject where the meter won?? be influenced by the bright light or the dark background. Do this without the filter in place.
You have other options with star filters. You can stack two filters to produce more rays. Some filters can be roated, letting you position the rays more precisely. And then there’s the Vario Cross Star filter. It has two pieces of glass with parallel lines etched on each surface. Each glass can be rotated independently, letting you vary the distance between the rays.
In Photoshop: In the collection of Photoshop brushes, you’ll find several that look like stars with long rays. Change the color of the brush to match the color of a point source of light on your photograph. Click the brush on the light, adjusting the size as you wish. Voila, stars!
Glass or Photoshop? Two four, eight points? You’d need a collection of star filters for different results. In Photoshop, you can simply click for the size you want. Advantage: Photoshop.
And the winner is…
So, after seven rounds, Photoshop seems to have knocked filters out, taking five; glass filters take one round, and one round is a toss-up. But wait–there are more special filters to explore! We’ll look at the rest of them at the rematch, coming soon! © Adorama, Inc.
