Peanut butter, BLT, grilled cheese–no, no. That’s a different website.
But if you shoot transparency film, you may want to try slide sandwiching to make something equally delicious.
Basically it’s done by putting two pieces of transparency film together in one slide mount. Some photographers call it a montage, but call it what you will, it can be quite effective with the right subjects. So, for those of you who shoot slides, here are some dynamite ideas to try.
And if you are a print-film addict, by all means shoot a roll or two of slide film so you can try out these cool techniques. You can always have prints made from your slide sandwiches, and the pictures will be unlike any you could get with print film.
 When combining two slides, the important thing to keep in mind is that dark areas on one slide will obscure lighter things on the other slide. This is an advantage if one slide is a silhouette against a light background, so let’s start there. A picture of a sunset might be nice, but it will have greater impact if you provide a strong foreground by sandwiching it with a silhouette of a tree, a boat, or some other appropriate subject.
On the other hand, if you have a silhouetted subject against a dismally bald sky, you’ll be much happier if you sandwich it with a prettier sky image–one with puffy clouds, a rainbow, or, of course, that gorgeous sunset.
 Try the combo special
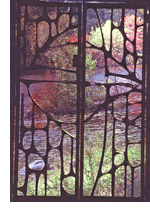
Once you see the possibilities, you may want to make a library of silhouettes to choose from when you want to enhance a bland landscape. Photograph trees, people, wrought-iron gates– almost anything that is well defined and can be easily identified when all details are eliminated. Store your collection in something more convenient than little boxes. To make them easy to find, I suggest putting them in plastic slide-protector pages, which you can then put in a three-ring binder with or hang in a standard file case.
Silhouettes work well in slide sandwiches, but they’re not the only slides you can use. Detailed slides can work well together if–and it’s an important if–you can combine them so that dark areas on one slide don’t obscure important areas on the other slide. Even if both slides have no especially dark area, there’s another thing you must consider.
Since you are putting two pieces of film together, their densities will add up. Indeed, they may add up so much that you can find yourself looking at a dark, murky combination. So, when you’re not working with silhouettes, the guiding rule is to use two somewhat (1/2 to 1 stop) overexposed slides.

Want toast with that?
If you’ve read my articles on making double exposures, I bet you’ve noticed that a slide sandwich has two characteristics that are exactly the opposite of those in a double exposure. In a slide sandwich, dark areas will mask lighter areas; in a double exposure, light areas will burn through dark areas.
Furthermore, in printing or copying a slide sandwich, you must overexpose each image so the resultant combination of images won’t be too dark; in a double exposure you must underexpose each image so the result won’t be too light. In the photos above, you can see a comparison between combining the same two images as a sandwich and as a double exposure.
 Intrigued by the sandwiching idea? Then head out with your camera and shoot a lot of overexposed (1/2 to 1 stop over) slides that you can use in combinations. And make sure to photograph some scenes that have large light-colored or empty areas where another image will fill in nicely.
Pour on the ketchup–and the mustard!
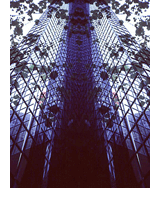
Slide sandwiching lends itself to creating some uniquely weird combinations of identical or nearly identical images. If you shoot such pairs of two similar images, you can place them back-to-back, as in the picture of the building, front-to-front, right side up, or upside-down. Or you can place them together so they are ever so slightly out of register.
Play with the ingredients
But you can also work with slides you already have. Spread out a lot of potential slides on a light box and place one on top of another to see what works, keeping in mind that the two slides should bear a relationship to each other, the combination conveying a logical meaning. Even slides you were ready to discard because they were overexposed or out of focus may be just what are needed for a slide sandwich. Of course, you want to be sure that dark areas on one slide won’t obscure important things on the other, but also take care that dark areas on both slides don’t overlap; if they do, you’ll get a very confusing image.
Finding slides that combine well is largely a trial and error process, but the combined result can be even more interesting than either slide alone. Great combinations can happen by pure accident. One slide just happens to fall on top of another on the light box, and wow! You’ve got a terrific new image.

Any way you slice it
Add patterns and t to your sandwiching library. These combine well with images that have a lot of light-colored or blank space. If you see a rainbow, billowy clouds, or a gorgeous sunset, photograph them for your collection. Take several overexposed photos of the sun on a very hazy day, placing it in different areas of the frame.
And take overexposed, out of focus shots of plain colors and multicolored fabric or paper (this is a good way to use those last frames on a roll of film). Bracket the exposures to give you different densities to choose from. A slide of colorful fabric became the background for the silhouette of the beach boys shown here.
 A shaped mask can add variety to a slide presentation. Draw a simple, easily identifiable shape, such as a map or a leaf, on a large sheet of white paper. Then paint around it with black paint leaving a white area surrounded by black. Use a gray card to meter your shape before you photograph it. Then sandwich the resulting slide with another slide of a relevant scene. In a similar manner, you can make titles for your slide show. Use your computer to print your words in bold, black letters on white paper, and photograph it. Then combine the result with a slide that is light enough to contrast well with the lettering.
Putting it together
You can pull a slide out of a plastic mount fairly easily. If your slide is in a cardboard mount, use sharp scissors to cut about 1/4th inch from two adjacent sides of the mount, then pull the two halves of the cardboard apart. Handle the slides carefully so you don’t get fingerprints on them. It’s a good idea to wear a pair of cotton film-editing gloves.
Clean all four surfaces with an air blower or antistatic brush. Then put them in a new slide mount. It’s best to put the emulsion sides of the film n to each other, enabling both images to be focused well when projected. Many people like to photograph the combination using a slide duplicator, which avoids any focusing problem. Or you may want to put the film in glass slide mounts, which hold the two pieces of film tightly together.
Sandwiches In Photoshop
To combine two images, size them so they are the same resolution and size. If one image is a dark silhouette, use the Magic Wand to select the silhouette. Then copy (Edit > Copy) and paste (Edit > Paste) it onto the new background, using the Move tool to place it exactly where you want it. Do it this way, too, to add a shaped mask or lettering.
For any other combination of images, select one entire image (Select >All). Then copy and paste it onto the other image. Finally, in the Layers Palette, change the Mode to Darken. (Leave the Mode at Normal for silhouettes.)
