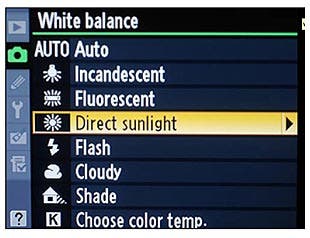
White balance is about color, and getting it right. While Average White Balance will work for many situations, you’ll get better pictures if you understand how WB works and how you can take control.
There’s quite a lot to the concept of white balance. And, especially if you’re one of a good number of photographers still shooting much – or even all – of your work in JPEG mode, paying smart attention to white balance not only has an effect on how your images look, it can really affect how much time you need to spend in post production.

The point of shooting white balance correctly is so that you can capture the color in an image as accurately as possible. Of course, it’s not uncommon to manipulate white balance as a means of artistic expression by purposely warming up or cooling off a scene. But, if you choose to balance the color of light, there can be some complexity involved. Not only do different light sources have different color temperatures, but the same light sources can even have different color temperatures based on multiple factors.

The color of light is measured on the Kelvin scale. Kelvin works as follows: The lower the number, the warmer the light, or the more yellow or orange it is. The higher the Kelvin number, the cooler, bluer or more purple the light. The color of light sources can change, too. The earliest rays of the sun, for instance, start out as a cool light and then quickly advance to a brighter yellow as they warm up during the day. The rays peak in warmth around sunset and then drop to a cooler light in the evening.

Correctly setting your white balance helps to render your subject and the surrounding environment closer to what your eye sees. Our eyes will adjust white balance automatically. We have to help our cameras to do the same. White balance is actually about color. You can utilize a gray card as a reference when shooting and apply your white balance corrections based on that. But DSLRs come with a wide variety of white balance settings. You can really see the effects of these settings by simply shooting the same subject in the same light with the same settings and just dialing through all the options. White balance modes vary with each camera, but here are some of the options your camera might include:
 Auto White Balance mode is the camera’s default setting. The camera selects a white balance based on an algorithm of what it calculates is most correct for the shot. This is generally a good setting, but certainly not perfect in all situations. On some advanced cameras, like Nikon DSLRs, you have the option to tone your AWB mode to be a bit cooler or warmer, as well.
Daylight mode takes an average of the color of light and determines a white balance accordingly.
Shade mode assumes the light is cooler, so it will add a good amount of warmth to the image.
Cloudy mode assumes some of the warmth of the light has been dimmed, so it adds a hint of warmth to the images.
Tungsten mode assumes that incandescent lighting, or light from a bulb, is being used, and it generally adds some strong coolness to the tone of the image.
Fluorescent mode assumes it must correct for indoor fluorescent lighting. But because this type of indoor lighting is not as warm as tungsten lighting, it does not offer as much coolness as the tungsten white balance mode.
Flash mode manages the cooler light that is emitted from a flash, so it adds warmth – somewhere between the amount given to Cloudy mode and Shade mode.
Custom mode allows you to photograph a gray card under similar lighting and then set that as your white balance for the rest of the shoot.
Kelvin mode gives you the option to set the white balance over a broad range of values.

In summary, don’t ignore the significance of achieving consistent white balance on a shoot. Current editing software allows for a lot of changes to be made for color correction, but you can spend less time editing if you get it right in-camera—and achieve much more accurate results.


