In Part 1 of “The Pitfall in Darkening a Sky” I showed how over-darkening a washed-out sky (or similar light area) could lead to posterization. Now I want to show you how to avoid this problem when darkening an area fairly strongly.
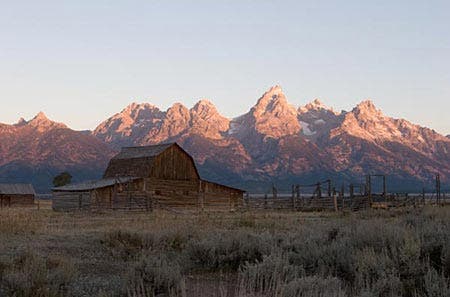
I’ll use the same image I used in that tutorial:
It’s better RAW
This illustration is a JPEG, which is 8-bit and has compressed tonalities on top of that. If you want to follow along with the steps here you’ll need to use an image of your own which had been brought into Photoshop as a 16-bit file from a RAW file or scan.. Simplify things by choosing one consisting only of a background layer.
I’m using Photoshop CS2. If you have a different image editor you may be able to use it. You’ll need one that shows histograms, but that is a very basic feature. Of course, menus will be different in different programs and versions, and I’m speaking Windows here–if you use a Mac substitute Cmd for Ctrl and Option for Alt.
Do you like cake?
As I said in the previous tutorial, being able to darken a sky significantly and avoid posterization is a lot like having your cake and eating it, too–an idea that has appealed to me since I was a little kid. The way you avoid it is by working with “high bit” images. In an 8-bit image you have 256 tonal values (2 to the 8th power), from black to white, but digital cameras and scanners can capture a 12-bit range, or 4096 values (2 to the 12th power.)
There is potential confusion because computers store numbers in either an 8-bit box or a 16-bit box. A 16-bit box can hold 65,536 values (2 to the 16th power.) Since a 12-bit number won’t fit in an 8-bit box it gets stored in a 16-bit box. But even though the box is really big, you still have only 4096 values. Don’t be greedy. That’s a lot better than 256.
Another confusing point is that a “16-bit” file is twice as large in megabytes as the corresponding 8-bit file, but they both have the same number of megapixels. Bit depth has nothing to do with resolution or the sharpness of an image. Absolutely nothing. It has to do with how many tonal values are in the image.
The RAW advantage
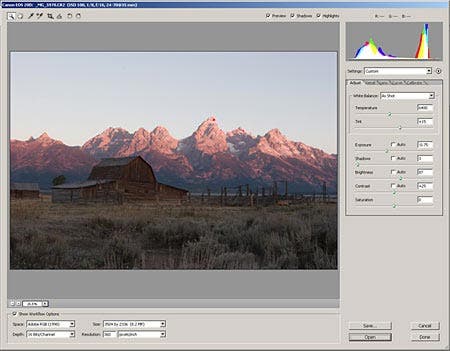
To get the full 12-bit range of information from a digital camera you need to shoot in RAW and then set a choice in your RAW processor to bring the file into Photoshop as 16-bit. You don’t have this option if you shoot in JPEG, as it currently supports only 8-bit files. Similarly, to get a high bit image from a scanner, you set a choice in the scanning software for how the data is brought into the image processor.
In Adobe Camera RAW, in the lower left of the window, check Show Workflow Options and then in the Depth box choose 16 Bits/Channel.
Darkening a 16-bit sky
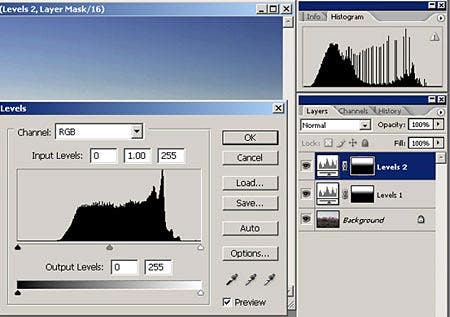
OK–let’s see what happens when we work with a 16-bit image. Here the same image is converted in Adobe Camera Raw as 16-bit, instead of the 8-bit file used in Part 1. On the 16-bit image I have done the same dramatic darkening and saturation of the sky as I did in Part 1, as shown in the Levels dialog box below.
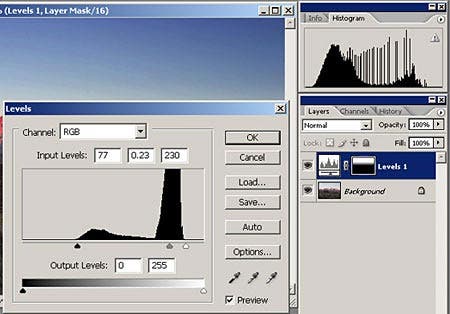
If you look at the Histogram palette you can see Photoshop’s estimated histogram of my changes based on a cached image. The wide gaps between the spikes would represent posterization. But this histogram is only an estimate. If you click the exclamation point in the upper right you will get an updated histogram calculated from the true 4096 levels in the image.
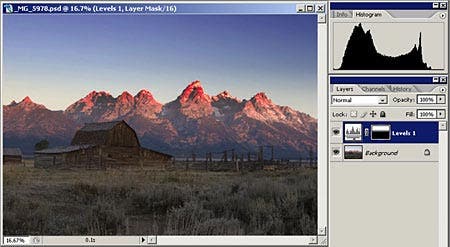
The now-accurate histogram is a dramatic change. The Histogram palette shows 256 levels so it is showing the 4096 values in this image as they would appear when the image is reduced to 256, which is today’s standard for printing and web-based uses. By the Levels adjustment we made, we undoubtedly created some gaps in the 4096 levels, just as we did in the 256 levels of the 8-bit image in Part 1. But when we squeeze 4096 levels down to 256 there is plenty of overhead to fill in any gaps. If you could print or display on screen a high-bit file which has had big changes made to its tonalities, any gaps in its histogram would cover such a tiny range of values that you wouldn’t see them.
Flying on instruments
You might be able to see some posterization-like artifacts in the screenshot shown here; I can see it on my monitor. In Photoshop you often see artifacts at resolutions less than 100 percent, but if you zoom in to 100 percent you will see an even-toned sky. This is a little like flying in the clouds on instruments — in cases like this you should believe the histogram (the instrument displays) rather than what you see on the screen (or think you see out the window) unless of course you are looking at a 100 percent view.
In addition to using the Histogram palette, you can see the range of values in just the area you darkened by using the method I showed in the previous tutorial, Part 1. You do this by re-loading the selection for darkening the sky. Make sure the Levels layer is the active one (blue) and from the Menu Bar choose Select > Load Selection. Then just make a Levels adjustment layer and look at the histogram in its dialog box. Don’t make any adjustments. This is just to see what you have.
Now you see essentially the same histogram displayed in the dialog box as you did in the Histogram palette in the figure above. (They aren’t absolutely identical, but they attempt to represent the same information.) You see again there are no gaps–no posterization.
The small upward spikes are sort of the opposite of gaps. When 4096 values are squeezed into 256 “boxes” 16 values get compressed into each box. This leads to some irregularity, but what you see above would never show in a print or on screen.
Don’t fall into this pit
I keep my master file in 16-bit, but eventually I have to convert to 8-bit for printing, output to the web, etc. But beware! There is a huge pitfall in doing a 16-bit-to-8-bit conversion. You have to flatten your adjustment layers into the Background before converting, or you have completely lost the advantage of working in a high-bit file. If you convert without first flattening, it is the same as if you had started with an 8-bit file.
Similar problems with stretching out tonalities over a wider range also occur in lightening the dark areas of an image such as this. These problems can be even more serious because a digital sensor captures far fewer levels in the darker tones compared to the lighter.
Although I have been using this compromise-exposure image as an example, when I worked up this image for my portfolio, in order to get the best final image I composited two different exposures: one exposed for the sky, and one exposed for the foreground. (That’s the subject of another tutorial…)