Have you ever printed a digital picture and you just knew that you captured the entire image, but somehow the file seems “cropped”? You are not alone.
One of the reasons people are disappointed in prints made from their digital camera’s files is not the quality of photograph; it’s usually about what’s missing. That might be Uncle Bernie, who was on the edge of the group photograph taken at last year’s family reunion. It’s not that you don’t like Bernie–when you look at the file on a computer he is there in the image–it’s just that he’s a victim of the difference in the aspect ratio in the image captured by your camera, and the aspect ratio of your print. This is one of the most overlooked and misunderstood aspects of printing digital images.
Aspects of ratios
Aspect ratio is the numerical relationship between the height of the image and its width, and is usually expressed with two numbers. All 35mm cameras use the same 24x36mm (3:2) format and those camera collectors out there–you know who you are–who want to argue about half-frame (18×24 mm) film cameras will have to admit that particular format never really caught on with the majority of photographers.
By comparison, digital SLRs and point-and-shoot cameras are available in many different aspect ratios and that can cause problems when making prints on standard-sized paper. A 4×6 print has an aspect ratio of 3:2 making it perfect for some cameras (no cropping) while an 8×10 has an aspect ratio of 4:5, making it “ideal” for others.
There’s a bit more to the story than just mismatched aspect ratios. Digital camera sensors are often cropped internally to match up with one of the standard print aspect ratios, and that can cause some problems in the “what you see is what you get” department.
Don’t give me that crop
If you’re Thomas Knoll–who, after taking a photo of a bird whose wing tip appears outside at the frame but knew that he caught the whole magilla–you do something about it. DNG Recover Edges is droplet software (you drop the file onto the icon, it does the rest) that’s designed to reveal pixels at the edges of RAW files that have converted into the Digital Negative (DNG) format.
The Adobe DNG Converter that converts most RAW files into DNG is a free download from Adobe. The extra 10 pixels that Thomas Knoll recovered from the RAW file were enough to put the entire bird back into the frame. The Luminous Landscape website hosts this free software and provides additional information about it.
Drag-and-droplet: Camera manufacturers mask off pixels at the edges of the frame and these missing pixels are not available when these image files are displayed normally. DNG Recover Edges is a droplet that lets you recover between 4 and 16 pixels around the edge of the image.
Print shapes vs. image aspect ratio
Let me show you how the aspect ratio of the camera can affect the final print. Sometimes this mismatch only crops the image a little tighter and most amateur snapshots will benefit from being a little tighter anyway so it may not be a problem with most shots. Difficulties do occur when a subject gets too close to an edge in the original camera file.
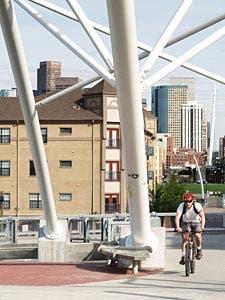
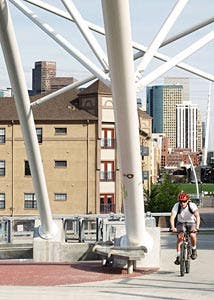
Full-frame at 4×5: This original photograph was made with an Olympus E-500, a DSLR that produces images with an aspect ratio close to that of 4×5 or 8×10 prints. It’s not a perfect match but like similar cameras it is so close that if you are viewing an 8×10 print made from this image file you will not notice anything different from the original. The problems occur when you decide to make a 4×6 or 5×7 print from this file. ©2007 Mary Farace

Unwanted crop at 4×6 inches: When cropped into a 4×6 print the bike rider gets dangerously close to the edge of the print and since all automated photo printers crop somewhat from all the edges, my guess is that an actual 4×6 print made from this file would clip the rider’s elbow. No big deal, you say, for this photo? What about a group shot of the kids in your son’s preschool class? You could crop one of the kids on the side in half! ©2007 Mary Farace
The change will do ya good: Sometimes the best way to solve the cropping dilemma is to change the print size, which in turn changes the print’s aspect ratio. 5×7 is slightly different (wider) than 4×6. If you really want a 4×6 print, next month, I’ll show you how you can use Adorama Pix‘s built-in cropping tools to overcome this problem, but now you should begin to understand the cause of the problem. ©2007 Mary Farace
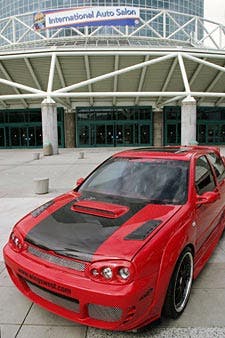
Show me a sign: This file was captured with a Canon EOS 20D, which has an aspect ratio of 2:3, just like 35mm film. This file makes 4×6 and 11×14 prints with little or no cropping. That’s especially helpful when my original goal was to capture as much of the car as possible while keeping the sign readable in the background. ©2005 Joe Farace
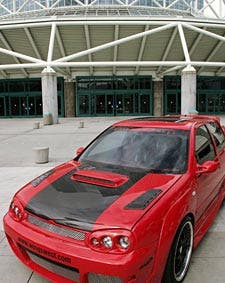
Something’s missing: What happens when I make an 8×10 print that has a different aspect ratio than the original file? At this point you gotta know that something’s got to go. The first thing to disappear is the sign—as well as a piece of the front bumper. Unlike the bicycle photo example that was cropped from the side, 4×5’s (and 8×10’s) from 3:2 images get cropped from the top and bottom. If this was a horizontal image the sides would get cropped and any people on the edges of a group photograph would be gone. Adios!
The point of this aspect ratio discussion is not to say that one format –3:2 or 4:5—is inherently superior to the other. There are advantages and disadvantages to both, and usually aspect ratio is not one of the deciding factors in picking a camera.
The most important concept to keep in mind is how the aspect ratio or your captured file will be printed using the print size (and aspect ratio) of your choice. Play it safe and provide extra space at the edges for group photos or if the image file contains something of importance at the edges. Sometimes you just get what you get and you need to be able to make changes before it’s printed.
Joe Farace is the author of a new book called “Getting Started in Digital Imaging” published by Focal Press (ISBN 024080838X.) It”s available in all the best bookstores as well as Amazon.com.