Put a funky new spin on stereoscopic digital photography, and have a ball with Wiggle 3D.

Sancho Panza by C. Paul Jennewein, aluminum, collection of Brookgreen Gardens, Pawleys Island, SC. Photo by David FitzSimmons.
Have you taken all the classic steps to create a three-dimensional look in your photographs? You know, leading lines, engaging foreground, middleground, and background elements, misty skies creating aerial perspective? These timeless techniques help build the illusion of depth in the still image—be it a tromp l’oeil painting, a zone system black and white, or a large format FujiChrome. But perhaps it’s time to try something new, a classic technique with a technological twist.
No, don’t waltz over to those red and blue “anaglyph” glasses (first popularized in the 1950s) or unpack that antique stereopticon full of its 19th century know-how. Instead, try today’s version of the three-dimensional electric slide: a funky, digitally-dancing technique called Wiggle 3D, which animates your image on your computer monitor.
Wiggle 3D addresses a fundamental goal of still photography: to take a three-dimensional world, capture and then present it in two dimensions, and make viewers believe that they are seeing the original scene in three dimensions. A variety of the compositional techniques in traditional still photography allow the human brain to “reconstruct” depth from 2 dimensional visual cues: relative sizes of subjects, vanishing points, and selective focus are just a few of these time-proven techniques.
But sometimes these illusions of depth are just not enough. Some dynamic scenes may benefit from a little jazzing up. Of course, the most realistic depth perception comes from binocular vision. Binocular vision is how the left and right eyes perceive the same scene from slightly different positions, and the human mind uses the “parallax”—the slight shift in objects’ relative positions—to interpret the three-dimensional nature of the world. Photographers have always sought to recreate this kind of pure depth perception.
A Brief History of Stereoscopy
Photographers in the 19th century sought variation in their craft, pioneering ways for pictures to mimic binocular vision. The stereoscope (perhaps best known today by the children’s brand, View-Master) and the red/blue ghosted images viewed with anaglyph goggles are the most common approaches. In both cases, one eye sees a subject from one point of view and the other eye sees the same subject from just an eye-width to the side. Both of these techniques, however, require specialized production and viewing equipment. But not Wiggle 3D.

Diana of the Chase by Anna Hyatt Huntington, bronze, collection of Brookgreen Gardens, Pawleys Island, SC. Photo by David FitzSimmons.
Enter Wiggle 3D
Unlike these and other stereoscopic processes, Wiggle 3D requires nothing more than a computer, photo-editing software (a free download is listed below), and two carefully captured images. Anyone can start producing images with dynamic depth by following a three-step approach:
- Photographing the scene
- Aligning the images
- Animation

Step One: Photographing the scene
Find a scene that will work well in Wiggle 3D. The main subject is in the middleground with ample foreground and background elements to create parallax for depth perception.
Dionysus (right) by Edward McCartan, gilt bronze, collection of Brookgreen Gardens, Pawleys Island, SC. Photo by David FitzSimmons.
Photograph the scene twice, moving the camera to one side or the other about eye-width apart (about four inches from pupil to pupil, in other words). Frame the scene with one eye open then swap to the other eye to get a feel for it. Remember to keep the subject in the same place in the viewfinder, keeping in mind that the background and foreground elements will move some, which makes the whole effect possible.
Additional pointers:
- As much as possible, use the same manual settings—manual focus, manual exposure, pre-set white balance, etc.—for both captures to keep the images as identical as possible. Even a slight adjustment of framing may be enough to alter a programmed exposure or white balance, which will have a negative impact on the animation.
- Main subjects usually are best placed in the middleground. Follow the classic layering techniques to give the images both foreground and background intrigue.
- Landscape is usually better than portrait for Wiggle 3D animations.
- Vertical subjects work particularly well; when used as the axis of rotation, virtually no part of them appears to move.
- While many Wiggle 3D compositions work well with subjects placed in the center of the image, interesting effects can be achieved by placing your main subject off-center. But it’s easier to get started with centered compositions.
- Tripods are almost a necessity, and it helps to be on level ground.
- Use a level, such as the hot-shoe type, to keep the camera horizontal.
- Move your camera in an arc around the subject, not parallel to the subject. Imagine your camera rotating on the end of a string that is tied to the main subject.
- Always move the camera left or right rather than up or down.
- Experiment with the left/right distance. About 4 inches works well for most subjects, but try varying the distance for different subject distances and focal lengths. In general, close subjects, especially with telephoto lenses, require smaller left/right distances.
- It is usually better to shoot with wide angle lenses and then crop later. While subjects may appear small relative to expansive scenes, the wiggling of the foreground and background elements will focus the viewer’s attention onto the main (not-wiggling) subject.
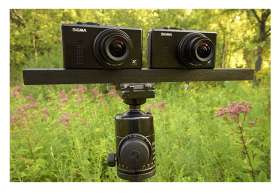
- If using one camera, avoid elements that move between exposures—such as people or wind-blown trees—although some movement can add interest. See also “How to Build a Two-Camera Rig for Wiggle 3D” for shooting moving subjects.

Lions (foreground) and Diana of the Chase (center), both by Anna Hyatt Huntington, bronze, and Dionysus (distant background) by Edward McCartan, gilt bronze, all in the collection of Brookgreen Gardens, Pawleys Island, SC. Photo by David FitzSimmons.
Step Two: Aligning the images
After shooting the two photographs, open both them in your favorite photo-editing software that supports Layers.
- Copy/Paste one of the shots onto the other, creating two Layers in one image. (Close the single-layer file.)
- In the double-layer file, change the Opacity of the top layer to 50%.
- At 100% magnification, use the Move tool to position the top layer so that the main subject is directly on top of the main subject in the bottom layer.
- If one image is tilted slightly, Rotate the top image for better alignment. When the two images are aligned, bring the top layer’s Opacity back up to 100%.
- Crop the image as desired, and then resize it. Smaller files work best, so try something around 6 to 8 inches wide at 72 dpi.
Step Three: Animation
The real effect of Wiggle 3D comes from the animation. Here you create an image file that, when displayed, alternates between your two images. This part of the procedure varies according to what software you use.
Choose File > Save for Web. Select Animate, which activates the Animation options. Choose a frame delay of .2 seconds for most images. Make sure to keep Loop checked. You can preview your animation by clicking the Preview In icon along the bottom. Click OK and Save your file.
Activate the Animation palette from the Window menu. From the Animation palette menu, select Make Frames From Layers. Click below each image in the Animation palette to change the animation delay time. Try .1 seconds or .2 seconds, or select Other and enter a decimal value. (I prefer .17 seconds.) You can then preview your animation by clicking the Play icon. From the Animation palette menu, select Optimize Animation. Then choose File > Save for Web & Devices, and Save your file.
Open your pair of Wiggle 3D images in whatever photo editing program you use. Select Save As, changing the file type to GIF (instead of, say, JPG). Use your software’s default settings for saving the GIF files. Next, download and install the diminutive but effective UnFREEz from WhitSoft Development. Then drag the two already-prepared GIF files into this nifty shareware program, check the Loop Animation option, and set the centiseconds (cs) to around 20. Finally click Make Animated GIF The Make Animated GIF dialogue box allows you to enter a new file name. Click Save, and that’s it! In a matter of seconds UnFREEz generates the animated GIF.
Animated GIFs can be viewed by a number of programs, most notably web browsers. Just drag the GIF file into your open browser window. For PC uses, try using Windows Picture and Fax Viewer, making sure to click Start Slide Show (the projection screen icon) to display the image on an uncluttered black background. Images can also be posted on the web; browsers will display web-posted GIFs with animation automatically.
While animated GIFs are the simplest way to create Wiggle 3D images, other advanced animation techniques also work. Flash and Java programming can achieve similar results. If you know how to animate in Flash or Java, you’re good to go with high-end Wiggle 3D images.

So, how does wiggling work?
Psychologists and neural biologists are still attempting to unlock the workings of depth perception. It appears that one of the main factors in perceiving depth is timing. Images that wiggle may need to be synchronized with the mind’s processing of parallax perception. Wiggle 3D is akin to something called “binocular rivalry,” where separate images presented to each eye compete for perception. Sometimes these two images alternate for viewers. It seems, therefore, that if the time delay for wiggling is just right, the mind is tricked into thinking it is seeing “rival” images and attempts to interpret or “see” three dimensions.
Diana (right) by Augustus Saint-Gaudens, bronze, collection of Brookgreen Gardens, Pawleys Island, SC. Photo by David FitzSimmons.
One interesting way to view Wiggle 3D images is to close one eye. Indeed, depth perception seems enhanced this way. It has been reported that people who have lost vision in one eye have been elated to see depth in Wiggle 3D images.
In the end, Wiggle 3D is distinct from true stereoscopic perception because the same image is presented to both eyes, not different images to each eye. Nonetheless, the Jitterbug images of this technological approach set our minds a-spinnin’. So try out the dancing depth of Wiggle 3D, and get your kicks!
If you’re interested in giving Wiggle 3D a shot, check this out for building your own 2-camera rig. And we’d love to see your Wiggle 3D shots! Leave a link to your own Wiggle 3D shots in our comments field below.