Here’s how to make sure the transition from one version of Photoshop to another goes smoothly.
I recently installed a new version of Adobe Photoshop. Installing a new version I had to reset a number of defaults. While this report talks about CS4, if you are installing a more recent version, much of this advice still holds true.
Photoshop is used in many contexts such as graphic arts and the printing industry in which different settings would be used, so the defaults are not always the best for the digital darkroom user.
Even if you haven’t upgraded recently, you can change the preferences and settings at any time for your existing version. If you have never looked at them you may find your settings can be improved. This will work for any recent version of Photoshop. My screenshots are for the Mac version of CS4 but the dialogs are substantially the same for the PC version and for earlier versions.
Two versions
When you upgrade Photoshop from a previous version you get the same full version that a new user paying full price gets. It installs alongside your old version, which remains fully functional. You can choose to leave both versions or not, but before uninstalling the old one you can save any custom actions, brushes, gradients, styles, tool presets and shapes that you have created so you can load them into the new version. (See details below.)
Preferences
To begin, let’s look at Preferences. On the PC you will find them in the Edit menu and on the Mac in the Apple menu in the upper left of the screen. You will need to step through several screens by highlighting the items in the left panel as shown below. The defaults are generally good, but can be tweaked a bit.
Under General I like to uncheck Export Clipboard, which allows a copied selection to be pasted into another application after Photoshop has quit. It is a feature I never need and it uses memory and slows performance when quitting the application.
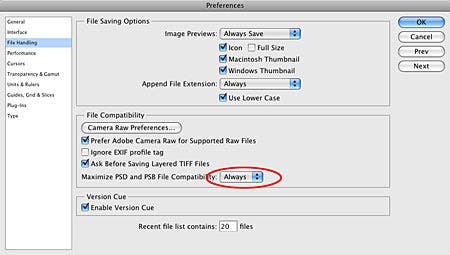
Under File Handling, if you want your images to be opened in earlier versions of Photoshop or in Lightroom, you should check Always under Maximize PSD and PSB Compatibility. If you have not had this set and you start using Lightroom, it will not be able to read your existing files. (If you encounter this problem, open the files in Photoshop, choose Save As, leave the name the same and click Replace. If you need to do this with lots of files you can make an action and batch process them. Be careful about where the action will try to save them, though. It will use the folder in use when the action was recorded.)
If you have two or more internal hard drives, Photoshop will run faster if you set up a partition on a non-system drive for its scratch files. You don’t need a very big partition; 25G should be plenty. You can tell Photoshop to use a partition (or other drive) under Performance, shown below. On the Mac, use the arrows to the right of the drive list to promote drives to first, second, etc. choice.
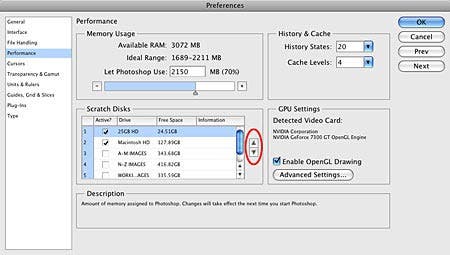
Memory usage is also set in this dialog. Leaving it at the default 70% is safest. If you want to try a higher value, see the links to information on optimizing performance at the end of this article.
In Transparency and Gamut I turn off the transparency checkerboard as it interferes with seeing cleanup detail in masks. (If I have a masked pixel layer above the Background I will turn off the visibility of the Background to see if the mask is clean, and the checkerboard interferes with seeing stray bits of reduced opacity not fully “erased” by the edge of a soft brush.) You can get rid of the checkerboard by setting Grid Size to None.

Units and Rulers looks a little boring but you can do a neat thing there. If you enter your screen resolution you can see an image you have sized for printing at actual size, by clicking the Zoom tool in the Toolbar and clicking the Print Size button on the Options Bar along the top of the screen. In earlier versions of Photoshop this wasn’t a great option because it was invariably an odd magnification that gave a less than perfect representation of the image. But this is no longer the case with CS4; the image is displayed beautifully at all magnifications.
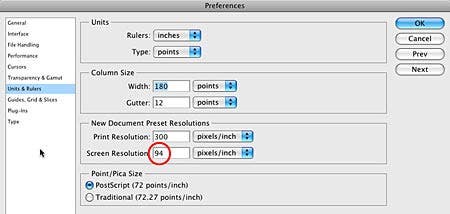
You can find your monitor resolution in its specs. Note the horizontal resolution (number of pixels) and divide it by the number of inches measured across the screen, but don’t let a ruler scratch or poke a delicate LCD screen. Don’t use the manufacturer’s “size” of the monitor; that is a diagonal measurement. For example, my “21 inch” monitor is actually 17.9” inches wide and has a pixel resolution of 1680 x 1050, giving me the 94 ppi resolution shown above.
Color Settings
Next go to Edit > Color Settings, shown in the figure below. Many digital darkroom users will want to make some changes here. In the Working Spaces section, the RGB working space is very important. The other three (CMYK, Gray and Spot) are not of concern to most digital darkroom users. The default working space is sRGB. Clicking the arrows to its right will show other choices. If you have More Options (or Advanced Mode in some earlier versions of Photoshop) set, you will see all the color profiles on the computer. The only ones of concern here are the five clustered with sRGB:
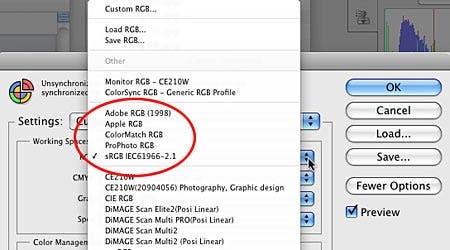
Using sRGB vs. the other choices of Adobe RGB or ProPhoto RGB is a fundamental workflow decision that is too involved to go into here. Basically, sRGB is more suitable for files that will be digitally projected, viewed in e-mail or on the web, or sent to certain consumer-level printing businesses. Adobe RGB contains a wider color gamut and is more suited for printed output with today’s printers.
ProPhoto RGB has an even wider gamut that may be matched by a future generation of printers, but you need to know what you are doing to use it without harming your images. (At minimum, you need to work with 16 bit files. An Internet search will yield further information.)
If you work in AdobeRGB or ProPhoto RGB you should convert to sRGB before saving a JPEG for projection, the web or e-mail. If you are shooting JPEGs it is best set your camera to match your Photoshop working space. If you are shooting raw the camera color space doesn’t matter; rather you should set the raw converter to output the file in your working space. (See the section on Adobe Camera Raw below.)
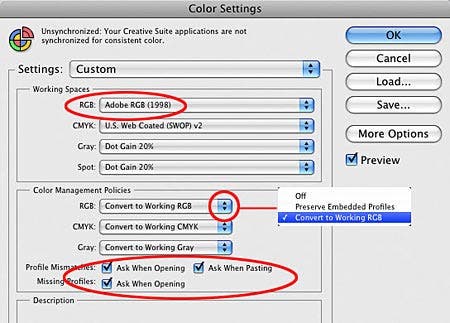
The items in the Color Management Policies section should be changed from the defaults. These settings specify the action to be taken if you open a file whose embedded color profile does not match your working space; for instance, if you are working in AdobeRGB and you open a JPEG that is in sRGB.
The RGB option in this dialog box is the only one that concerns most digital darkroom users. In the figure below, the three dropdown choices (shown in an overlay in the figure below) let you set the one that will come up as the default in the profile mismatch dialog, discussed below, but you will be able to change it there. (That is, you will be able to change it IF you have checked the Ask When Opening boxes discussed next.)
There is not a right answer for which choice to set here, but there is definitely a wrong one. If you choose Off you have disabled color management and the colors you will see in your images will not be accurate. Which of the other two choices you will need to make in the case of a mismatch can vary, but most often you will want to convert to the working space. That is the safest option to set for the default if you are not certain what to do.
In order for you to have this option presented to you it is necessary for you to check the three “Ask When Opening” boxes, circled below. I wish these boxes were checked by default, but they are not. The high-end special workflow users who do not want them in the way would know to un-check them.
With these boxes checked, when you open a file that is in a different color space than your working space, you will get a profile mismatch warning as shown below. The option whose radio button will be checked is the one you specified in the step above.
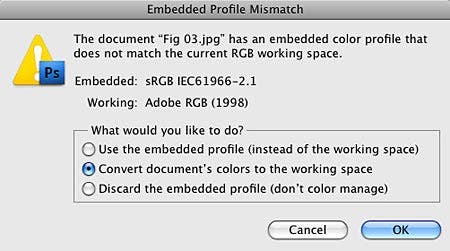
If you are uncertain what to do the safest option is to convert to the working space. But be aware that converting an sRGB file to the larger gamut of the AdobeRGB or ProPhoto RGB spaces cannot manufacture extra gamut. The file will still have the more limited colors of sRGB.
The additional settings under More Options (or Advanced Mode in earlier versions of Photoshop) are best left at their defaults for the average digital darkroom user.
More understanding of these settings can be gained from books on color management. A very accessible one for photographers is “Color Confidence” by Tim Grey.
Other settings
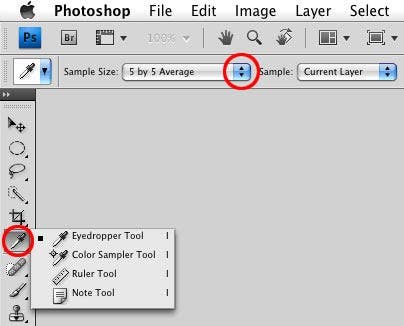
The Eyedropper: Click on the Eyedropper in the Toolbar and look at the Options bar along the top of the screen. The default 1 pixel sample is not good for most uses. Noise can make adjacent pixels vary quite a bit in what should be an even-toned area. A 3×3 or 5×5 average sample gives a better representation. The option to the right, of how layers are sampled, may be set differently depending on what you are doing. Usually you will want Current Layer.
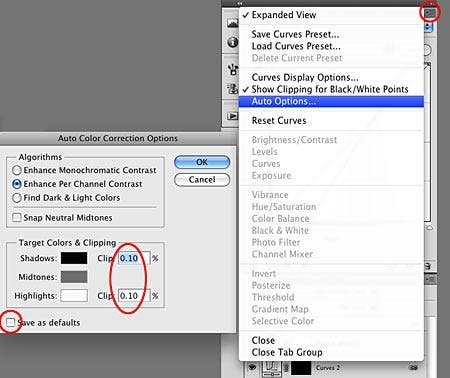
Auto Options: You will need to open an image to access this and the next few settings. Open a Levels or Curves adjustment and note the Auto button just above the histogram on the right. You generally don’t want to use this Auto function to set Levels or Curves. It has a place in some advanced workflows, but in most cases the digital darkroom user should click the flyout menu and choose Auto Options.
I think this is one place CS4 got it wrong. In CS3 there were choices next to one another of Auto and Options. Options is now hidden in the flyout menu, under the name Auto Options. To use it, try all three choices shown in the Algorithms section in the figure below (and try each one with and without Snap Neutral Midtones) to see which you like best. The best one will vary with the image. If none is ideal take the best and say OK to get back to the Levels or Curves dialog and tweak the settings in each individual color channel.
The Clip defaults in Auto Options of 0.10 are too high and should be more like 0.01. Don’t forget to check Save as defaults. This will also make the choices in the top part of the dialog the default if you use the Auto button.
Select target shadow and highlight color: Go into any Levels or Curves adjustment and double-click the black eyedropper to get the dialog below for Select target shadow color. Set the default values for the RGB colors to 5, 5, 5 as shown below. (Recommendations vary slightly among experts for the exact values, but these are about average.) Don’t change any of the other numbers. Say Yes to the save as defaults question.
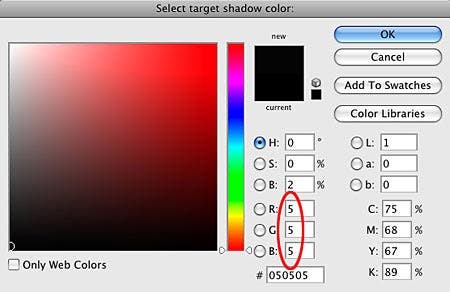
Do the same for the white eyedropper and set Select target highlight color to 250, 250, 250 in these same RGB boxes. The reason for setting these eyedropper options are explained in my tutorial on setting black and white points.
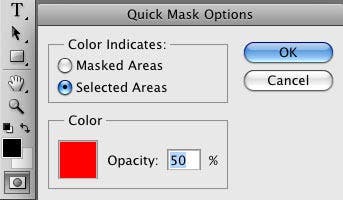
Quick Mask defaults: I use Quick Mask frequently to paint on selections so I can then make an adjustment layer which will be automatically masked by my selection. I usually select a small portion of an image so I like to double click the Quick Mask icon in the toolbar and change the default from Masked to Selected Areas. That way I don’t have to inverse my selection before I make the adjustment layer. (You can access this dialog on the fly if you need to change the Quick Mask color. If you are working on a red rose it is hard to see where you painted with the default red color.)
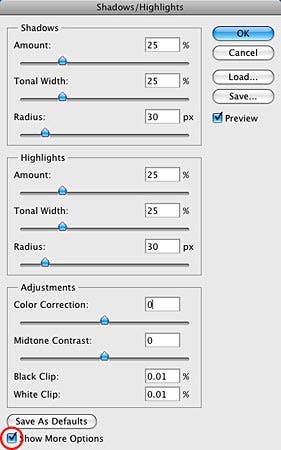
Shadows-Highlights adjustment: Go to Image > Adjustments and choose Shadows-Highlights and check Show more Options in order to get all sliders. Just using the Shadows and Highlights sliders, as shown by default, doesn’t come close to the control you need. Having this over-simplified dialog as the default harms those who least understand Photoshop by implying these two sliders are sufficient. Also, the default settings in the Shadows-Highlights adjustment dialog are way off for most digital darkroom users. I prefer to reset them as shown below. They need to be adjusted differently for each image but this is a better starting point.
Plug-ins
Plug-Ins are programs purchased separately from Photoshop that are accessible within it, such as Nik Dfine 2.0 and OneOne Software’s PhotoFrame. The safest thing is to re-install the programs from the original disk or an up-to-date download. If you know it is safe, in some cases you can copy the plug-in from its folder in the previous version to the corresponding one in the new one. The folder for Windows XP and Photoshop CS3 is C:\Program Files\Adobe\Adobe Photoshop CS3\Plugins. For OS 10.5 on the Mac it is Mac HD\Applications\Adobe Photoshop CS3\Plug-Ins. Don’t do this unless you are certain it is OK for that particular plug-in. You will have to restart Photoshop for it to recognize a plug-in you have copied or installed.
Bridge preferences
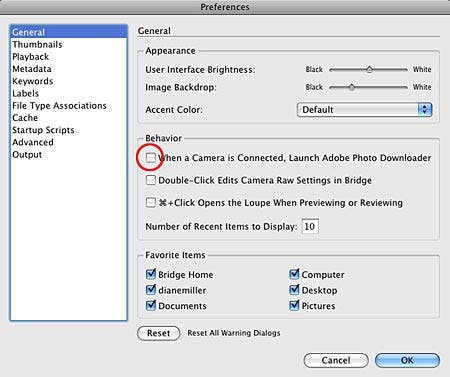
These are accessed on the Mac under the Adobe Bridge CS4 menu and on the PC under the Edit menu. Two settings here deserve pointing out; the rest are matters of choice and are not critical. The first is in the General dialog, where you can choose whether to have the Bridge downloader launch when you connect a card or camera. (A card reader is a much better option than connecting a camera directly.)
The second is on the Startup Scripts page where you should be sure to leave all the items checked. If you uncheck some of them you will be missing some menu items.
Bridge workspace customization
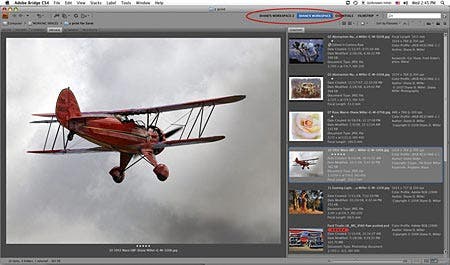
To my delight, Bridge CS4 picked up my two customized workspaces from CS3 and put them at my fingertips on the Application Bar, circled in red below. The workspaces have been moved here from the lower right of the screen in CS3.
Bridge keywords
If you are using Bridge keywords you will want to copy your keyword set from your old Photoshop version. Open Bridge CS3 and click the Keywords pane in any workspace view. Click the flyout menu arrow in the upper right and choose Export. Save it to a temporary location where you can find it, such as the desktop. Then open the new Photoshop version and in the Keywords menu choose Clear and Import. The Clear option will get rid of the items you have deleted from the very generic and basic set of keywords that came with Bridge. If you have already added some keywords in the new version and don’t want to delete them, just choose the straight Import option.
Camera Raw preferences
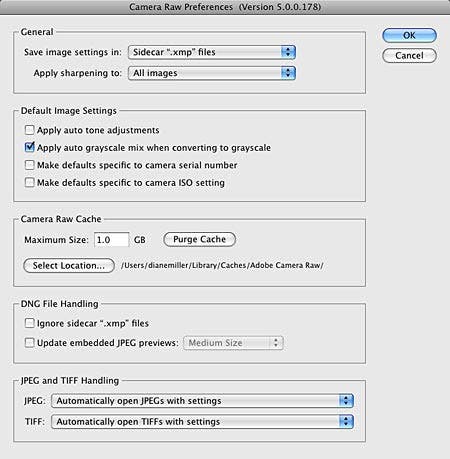
These are found in the same menu as the Bridge preferences, above. I like the defaults here. It is preferable to save the conversion settings in sidecar files, rather than in a central database, as the sidecar files will go with the raw files if you move them to other folders. If you move files from Bridge they will move together; if you move files outside of Bridge by drag and drop, be sure to move the corresponding .xmp sidecar file along with each raw file of the same name. It contains the raw conversion parameters, keywords and other metadata.
If you leave sharpening in Camera Raw at its default settings it is OK to leave the default checked here, which is to apply it to all images. The sharpening parameters are set in the Camera Raw dialog in the third tab from the left and the default sharpening of Amount 25, Radius 1.0, Detail 25 and Masking 0 is very subtle and won’t damage the image. In addition, sharpening is applied to the L channel in Lab mode, which virtually eliminates artifacts. I never sharpen further until I am in Photoshop and have resized an image for output. If I am outputting in Lightroom it does its sharpening last, after resizing.
I don’t want auto tone adjustments applied so I agree with the default, which is to leave that box unchecked. If it were checked bracketed exposures would be equalized. I have left all the settings in this dialog at their defaults.
Camera Raw output settings
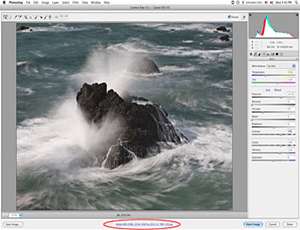
At the bottom of the Camera Raw window double click the item circled in red in the figure below to set conversion defaults.
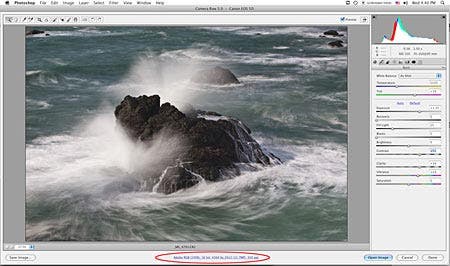
You will get the dialog shown below. Set the (color) Space to match your working space and the (bit) Depth to your choice. 16 bits preserves all the tonal levels your camera can capture and is mandatory if you are using ProPhoto RGB for your working space. Most cameras today can capture 12 or 14 bits, giving you 4096 or 16,384 (!) levels in the histogram. I don’t want to reduce that to the 256 levels of an 8 bit image until I have finished all my adjustments in Photoshop.
Having these extra tonal steps in the histogram will prevent the posterization of tonalities (comb or picket fence look) that can occur with large adjustments in Levels, Curves, etc. on an 8 bit image. In Photoshop I keep my master file at 16 bits and when necessary, such as for making a JPEG, I flatten my adjustment layers and then go to 8 bits (Image > Mode). Be sure you flatten first or you have lost the advantage of 16 bits.
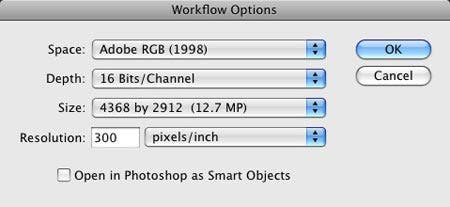
Leave the Size at the native resolution of the camera, which will be the value with no plus or minus sign. Set the Resolution to your choice; it is only a scaling factor and makes no change to the number of pixels in the image. Many people use 240 or 360 ppi. Keeping the same resolution for all images throughout your workflow can save some extra steps and “What happened?” moments, such as when you drag an image (or piece of one) onto another canvas at a different resolution and the size of the dragged piece is not what you expected because it has rescaled to match the destination.
Presets from a previous version
Similar to Bridge keywords above, you can move saved presets for Brushes, Shapes, Styles, Gradients, etc. from a previous version by going to each tool preset window and clicking on the Save option in the flyout menu. Save to a temporary location such as the desktop, close the previous Photoshop version and open the new one. Go to the corresponding preset flyout menu and choose the Load option, and navigate to the file you saved. You can then delete the saved files.
Updating
There will almost always be updates to program components since the installation CD was made. The process should be automatic but make sure it runs, and schedule it to run periodically. The Update function is in the Help menu.
Optimizing hardware performance
For those who wish to delve further, there is excellent information on the Adobe web site for optimizing performance on Mac and PC systems.
Diane Miller is a widely exhibited freelance photographer who lives north of San Francisco in the Wine Country and specializes in fine-art nature photography. Her work, which can be found on her web site, www.DianeDMiller.com, has been published and exhibited throughout the Pacific Northwest. Many of her images are represented for stock by Monsoon Images and Photolibrary.
