When it comes to photography, there are a lot of new terms to learn: exposure (internal redirect), shutter speed (internal redirect), ISO, and f-stop. Some of these terms are more self explanatory than others. For many beginners, f-stop is one of the trickier terms in their new hobby, so let’s go back to basics and give you a solid understanding of f-stops.
What Is an F-Stop?
The f-stop refers to the aperture opening of the lens through which light can pass to the sensor or film. By looking at the current f-stop listed, you can quickly get an idea of how much light you’re allowing in, and how much depth of field you will have in your image.
F-Stop is also commonly known as:
- F Number
- F Stop Number
- “f/” followed by a number
Other Terms for F-Stops
We’ve already referred to the lens opening as “f-stop” and “aperture,” but it’s also sometimes called the “f number” or “f-stop number.” When shopping for a new lens, you’ll often see apertures referred to as “f/” with a number. For instance, if you see “f/1.4” or “f/5.6,” those numbers indicate the diameter of the aperture.

What Does F-Stop Control?
F-stop, or aperture, specifically controls the size of the opening in the lens. With a larger opening (or a smaller f-stop number) you’ll allow more light to enter. With a smaller opening (or a larger f-stop number) you’ll allow less light to enter. By controlling the amount of light entering the lens, you’re also controlling the overall exposure of the image. Images with a wider aperture opening will be more prone to overexposure, while images with a narrower aperture opening will be more prone to underexposure. You’ll need to adjust your shutter speed or ISO accordingly to balance out changes in f-stop and to get the ideal exposure.
Aperture vs F-Stop?
Before the light from the scene can hit your digital camera’s sensor and help create an exposure, it must first travel through the camera lens. The amount of light that reaches the sensor depends on your lens and the settings you’ve chosen.
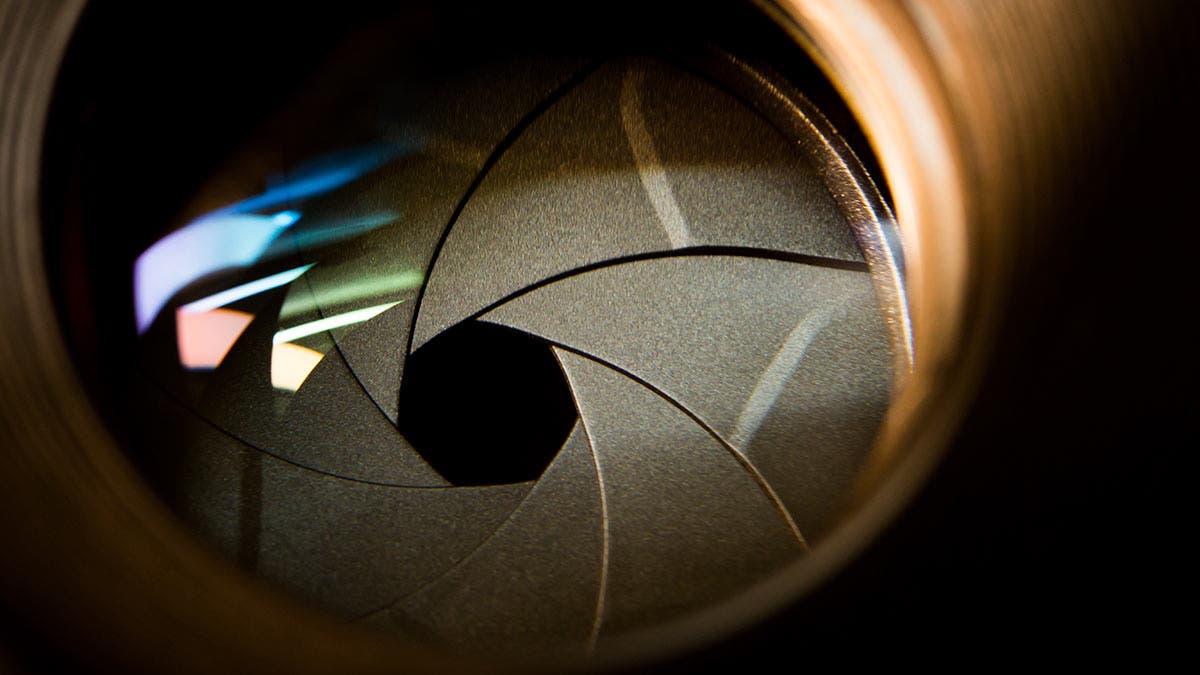
Inside every lens is a mechanical aperture. Consisting of several connected blades (generally between six and nine), the aperture opens and closes to let in more or less light. If you look at older manual aperture lenses, you can see the aperture opening and closing with a twist of a dial. In modern lenses, you change the aperture by adjusting the settings in your camera body.
Aperture Size: How to Read It
F-stops may seem a bit counter-intuitive to learn, but once you get the hang of it, you’ll know it for life. The key takeaway is this: the smaller the number, the bigger the physical opening of the aperture. Conversely, the larger the number, the smaller the physical opening. So f/1.4 is a very wide opening (or larger aperture) while f/22 is a much smaller opening (or smaller aperture).
What Happens When I Change My F-Stop?
A couple of important things happen when you change your f-stop. First of all, a wider aperture (think f/1.4 to f/2.8) will let a lot more light in through the lens and on to the sensor. This allows you to shoot with a much faster shutter speed. A narrower aperture (think f/16 to f/22) will let in much less light and require a slower shutter speed.
What are Common F Stops?
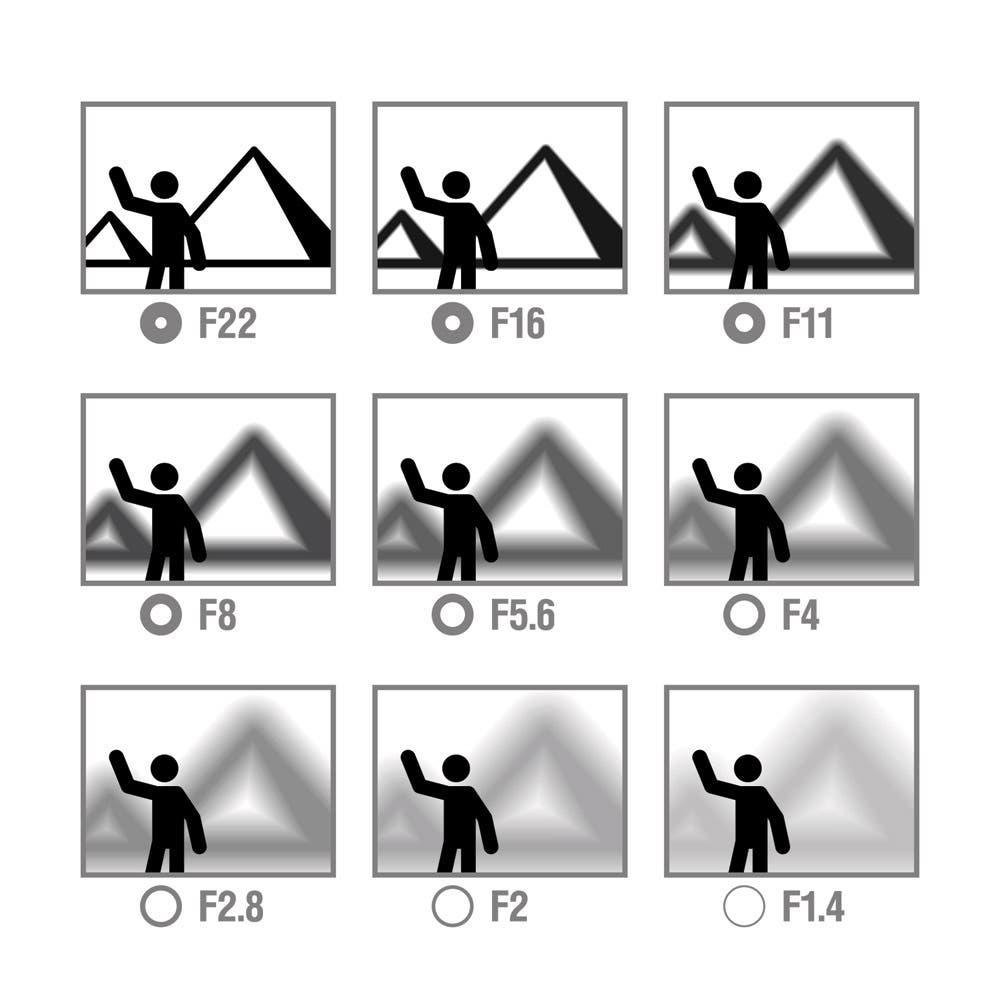
F stops generally range from f/1.4 (let in lots of lot for darker areas) to all the way to f/22 (let in little light for bright areas). A wider aperture will keep less of the scene in focus. A narrower aperture will give a crisp focus to more of the scene. Portrait photographers prefer wider apertures like f/2.8 or even f/4 — they can focus on the subject and blur the background.
That’s also why landscape photographers typically shoot in the f/11 to f/22 range — they want more of the landscape in focus, from the foreground to the distant horizon. Take a look at the graphic below to see it in action.
Generally, subjects such as macro, which value heavily blurred backgrounds, are best shot with the widest apertures (f/1.4-f/4). This ensures that all elements of the scene are in focus, from the foreground to the distant background.Practice working in these general f-stop ranges until you get more comfortable with the available apertures on each of your lenses. Then you can experiment to get exactly the look you’re going for!
| F Stop | Aperture Size | Example Photography |
| /1.4 | Most Wide | Astrophotography |
| f/2.0 | Wide | Astrophotography |
| f/2.8 | Wide | Astrophotography |
| f/4.0 | Moderate | Astrophotography, Portrait |
| f/5.6 | Moderate | Portrait |
| f/8.0 | Moderate | Portrait |
| f/11.0 | Narrow | Portrait |
| f/16.0 | Narrow | Landscape |
| f/22.0 | Most narrow | Landscape |
Why Doesn’t My Lens Go Wider Than f/4?
Every lens has what’s called a maximum aperture, meaning the widest the aperture can possibly go. Traditionally, less expensive kit lenses don’t feature the wider range of apertures. They might only go as wide as f/4 or even f/5.6.
If you really want to blur the background for macro or wildlife shots, you’ll need to look for a lens with a maximum aperture of f/2.8 or even f/1.4. If you’re shopping for a lens that zooms, it’s normal for the lens to have a wider maximum aperture when it’s zoomed out than when it zooms in. That’s why some lenses have two apertures listed in their titles, such as 18-55mm f/3.5-5.6.
Tips and Tricks: How Do I Use F-Stops In My Photos?
The best way to learn f-stops is simple: practice using them. But here are some quick tips for how you can get better.
- Try shooting the same subject with a range of apertures and see how the images change from one to the next.
- Experiment with each of your lenses to see the apertures that are available to you and how they affect your images. If you have a zoom lens, try taking pictures at the widest aperture and at a few different focal lengths. This will show you how your maximum aperture changes as you zoom.
- Start by shooting in aperture priority mode to allow your camera to adjust shutter speed and keep the exposure consistent between frames. As you feel more comfortable with adjusting aperture and shutter speed, you can switch to manual mode to take more control over each element of your photographs.
How Do You Control F-Stop?
When the camera is in Auto mode, it automatically decides the aperture and other settings based on the available light. If you want to set shutter speed and f-stop (aperture), the camera has to be in Aperture mode or Manual mode.
The same wheel or slider controls shutter speed and aperture on most cameras. To change the aperture, you have to hold down the AV button and then adjust the wheel. Both the AV button and aperture/shutter speed control wheel are on the top-right of the camera. You have a wheel for both aperture and shutter speed on more advanced cameras.
You can also set the aperture manually and allows the camera to decide the best shutter speed for the available lighting conditions. To use a fixed f stop, the camera has to be in the Aperture Priority mode.
What is the Lowest and Larges f-stop?
The lowest f-stop available is f/0.7. It belongs to Zeiss Planar 50mm, a lens used by NASA to film the moon, and Stanley Kubrick to make a film at candlelight. However, most photo lenses go as low as f/2, fewer go to f/1.2, and only a few reach f/0.95.
The largest f-stop available is f/45. It belongs to Sigma 105mm f/2.8 EX DG Macro and provides the maximum depth of field possible for a macro lens. There is also an f/40 aperture in Itorex 50mm, a lens that recreates the pinhole lens effect. Most commercial lenses have the minimum aperture at f/32 or f/16.
Why Aperture is Important
Aperture controls the amount of light that reaches the sensor. Together with shutter speed and ISO, the aperture controls the efficient use of available light and the luminosity of the image. When the aperture is wide open (small f-stop), more light reaches the sensor and creates a brighter image. When the aperture is narrow (large f-stop), less light reaches the sensor and creates a darker image.
Aperture also influences the depth of field, determining how much of the image will be in focus. Small apertures produce a deep depth of field and allow you to have the entire frame in focus. Large apertures produce a shallow depth of field and let you blur a busy background and make the subject more visible.
Bottomline
Learning the parts of your camera and how to use them is the most important step in your photography journey. Experiment with settings, shots, and styles, and you’ll soon be mastering your new hobby.
