Few things capture a trip’s true essence like a travel video. Whether it’s the rushing sound of waterfalls or the glittering ocean during a tropical sunset, moving images can instantly transport you back into a trip’s — or life’s — best moments.
That said, not all video is created equally. Over the course of my career as a filmmaker and travel journalist, I’ve learned quite a bit about what you should and shouldn’t do when it comes travel videography. I’ve shot some epic videos I’m highly proud of, and experienced equally embarrassing mishaps and failures. Today, I’ll focus on the latter, highlighting the five mistakes you could be making as a travel videographer — from my own experience.
1. You don’t understand your camera’s potential
If you’re investing in a nice camera or gadget, do yourself a favor and learn how to use it (is what I told myself after not taking my DJI Spark out of the box for five months). It goes without saying, but owning the gear is only half the battle; learning how to use it is the critical next step. I watched YouTube videos about the Spark and practiced in a drone-friendly field for days before feeling comfortable shooting with my new drone. If you’d rather speed it up, take a class — but go in knowing that time spent practicing is still essential. (Said differently: one class won’t turn you into a videographer, but shooting video will!)
2. You forget to capture audio
Visuals are one part of a travel destination’s story. Sounds like cars honking in the streets of Cairo or the sizzling of peppers in a Mexican kitchen will make your travel video authentic, engaging, and memorable for the audience. To capture this audio, use an on-camera microphone like the portable Rode VideoMicro microphone. For a budget-friendly alternative, turn on your smartphone’s recording app or keep a small lavalier microphone running (with the mic attached to your purse handle) while you explore town. I tried this trick all over Cairo and was impressed with the Tascam DR-10L’s quality, even when tucked away in my purse.
3. You only capture one type of shot
The best travel videos have a mix of wide-angle and tight shots that give viewers a sense of place. It’s easy to whip out your wide-angle GoPro and call it a day, but to take your travel videos from average to awesome, you’ll need to approach the filming process differently. In fact, you’ll need to approach it like a filmmaker.
Keep an eye out for any small details that could help illustrate the city’s culture; think food frying, your Uber driver honking (with their permission), or foot traffic — at foot level — on a bustling main square. Pairing these tight detail shots with wider cityscapes and views will give you tons of fun variety in editing — with a top-notch video as the result.
4. You go entirely handheld
Now, I’ll be the first to say you don’t always need a gimbal. It’s takes up space in your luggage, it takes time to stabilize, and it can cause quite a stir at airport security (I speak from experience). Nonetheless, if you’re hoping to sell your footage or make a top-notch film, you should consider some sort of stabilizer. The gimbal’s smooth-moving motion can make an average film look high-quality and polished, helping you sell your film for what it’s truly worth.
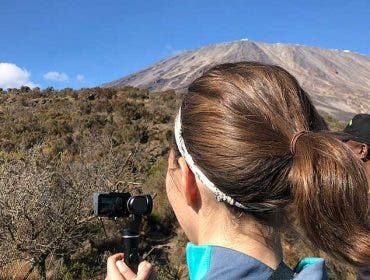
Here’s the good news: You don’t necessarily need a big gimbal for your mirrorless or DSLR camera. A stabilizer for your GoPro or phone can actually do the trick. For example, when I filmed on Kilimanjaro, I brought my Sony A7III and A7sII and knew I wouldn’t have the time or energy to stabilize my cameras on my Zhiyun Crane (it’s sizable, and I was climbing a mountain!). Instead, I relied on my GoPro for smooth-moving hiking shots and my Sony Alphas for tighter shots around camp, and the footage turned out great. Here’s a sample of the result, created for our climbing company!
Climbing Kilimanjaro with Amani Afrika from Stephanie Vermillion Studio on Vimeo.
5. You don’t get the proper permits and releases
Every city, state, country and park has its own rules on what you can and can’t film for commercial use. For example, if you’re filming in a U.S. National Park for fun, shoot away, but if you’re hoping to sell your footage or a post-trip film, you’ll need a permit. This goes for most parks, big cities, and privately-owned facilities.
As always, it’s better to be safe than sorry, so Google regulations thoroughly and call the institution’s main line if you’re left with any questions. Similar to permits, make sure you get releases from anyone featured or speaking in your films. I had to do this after the fact for a film I decided to sell from Kilimanjaro (do as I say, not as I do!) and ended up chasing people down halfway around the world just to get the right paperwork.
If you’re just entering the travel videography world and need help building your kit, rest assured: We have the gear for you! Videographer Ben Addy compiled his top travel video gear essentials for filmmaking so you can go out and capture top-notch travel films, too.
Feature photo by Stephanie Vermillion