Many people believe that unique, spectacular scenery is a must for taking good landscape photography. As a result, they ignore the beautiful landscapes nearby and focus on exotic or remote locations. This mindset not only makes logistics a nightmare and limits artistic opportunities but also impacts storytelling.
For me, photographing the Danish landscape, which for some may seem too flat and boring, is an emotional experience. I know the landscape and its stories by heart and adapt my compositions to its flatness and emptiness, showing them as its best features rather than shortcomings. But to make the viewer understand my emotions, I need something more than a camera and a lens. I need good lighting, and there is nothing better than the blue hour and golden hour for landscape photography.
Planning
You’d think that planning for a landscape photoshoot only means getting you and your gear to the location, but the truth is, you need much more planning than that. To benefit from the amazing light of blue hour and golden hour, you need to check the weather forecast, find out the sun’s position in the sky, be aware of how much time you have, and go through your list of compositions in advance. All these before the photoshoot. And yes, I do the same planning when I go to a new location and when I photograph the familiar landscape in which I grew up.
How Long Do the Blue Hour and the Golden Hour Last?
Theoretically, blue hour is the last hour before sunrise and the first hour after sunset, while the golden hour is the first hour after sunrise and the last hour before sunset. However, the “hour” part of this definition is not really accurate. Blue hour, in particular, can be extremely short. These particular periods of good light depend on the time of the year and on how far from the Equator you are.
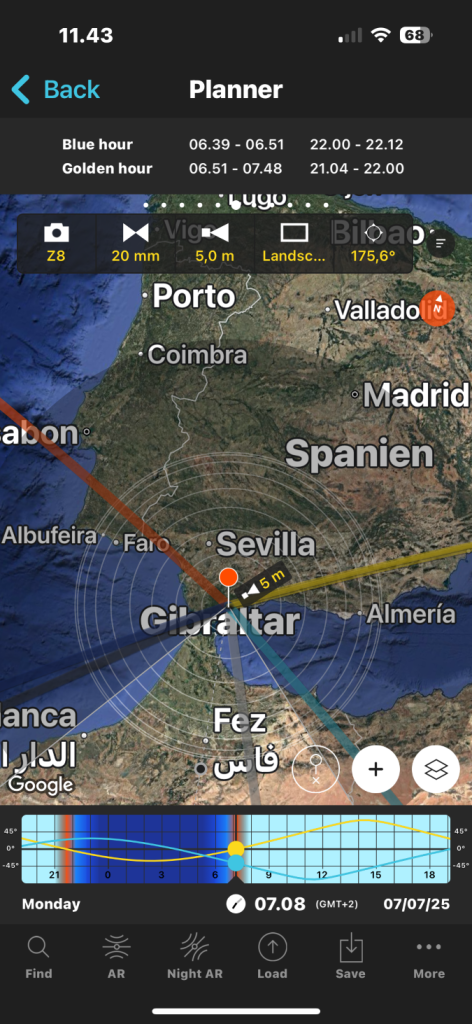
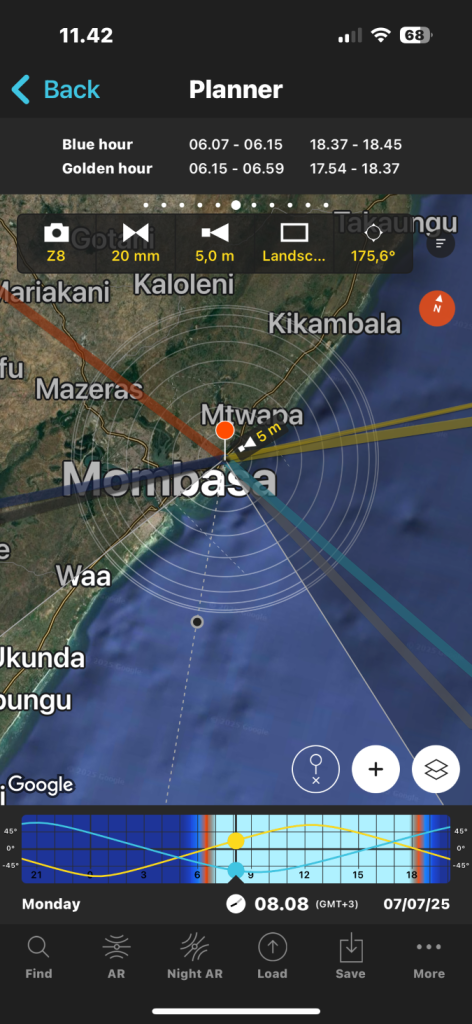
For example, in midsummer in Denmark, I get approximately half an hour of blue hour light in the morning and half an hour in the evening. But if I were to shoot in Sevilla, Spain, I would have approximately 12 minutes with each occasion. Closer to the Equator, in Mombasa, Kenya, I would have just 8 minutes with each occasion. When you have so little time to shoot, knowledge really is power.
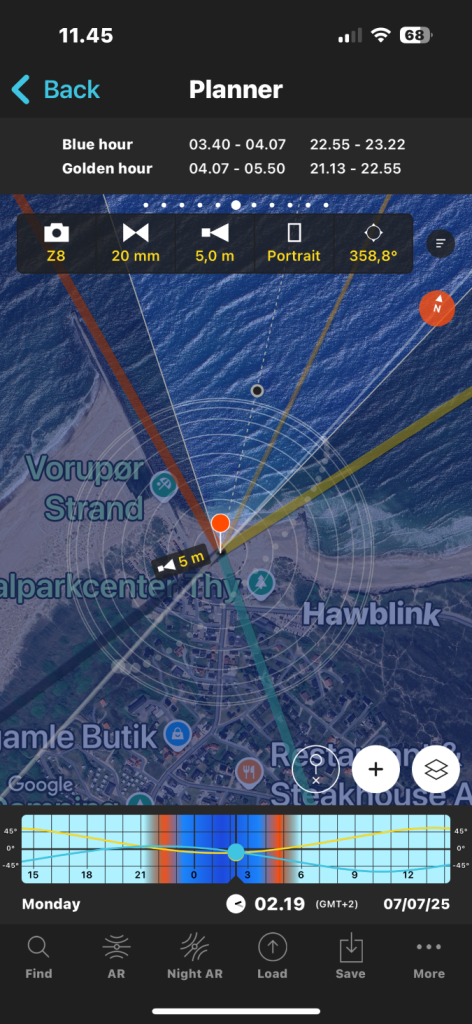
How do I know all these? Well, like everything else these days, information comes from an app. In my case, PhotoPills, a photography planning app for Android and iOS devices that provides accurate data regarding sunrise, sunset, blue hour and golden hour durations, Moon cycles and eclipses, Milky Way information, and much more. It has detailed maps of the world, so I just input the location of my landscape photoshoot and get the time and duration of blue and golden hours.
So, when your photoshoot can last only 30 minutes or less, planning is key.
What Weather Is Best for Blue and Golden Hour Landscape Photography?
Now that you know when and for how long you get the blue hour and the golden hour, you need to know when you get the best light quality. This means you need to investigate the clouds. Of course, you don’t want to go shooting on a completely overcast day, but you want some clouds. In my estimation, having between 30 and 70% overcast is ideal for blue hour and golden hour landscape photography.
What I’m looking for is to have a gap between the horizon and the clouds. Having heavy clouds closing on the horizon means I get no blue or golden light at all. I want the sun to light up the clouds from below. To find this information, you can check the weather forecast or use another app, such as Photo Ephemeris, which predicts where in the clouds the golden light will be.
Decide on the Compositions You Want to Capture
Even when I intend to take landscape photographs during the golden hour and have more time at my disposal than just the blue hour, I have more success when I know what shots I am going for. My advice is to correlate the time you have with the shots you want to take.
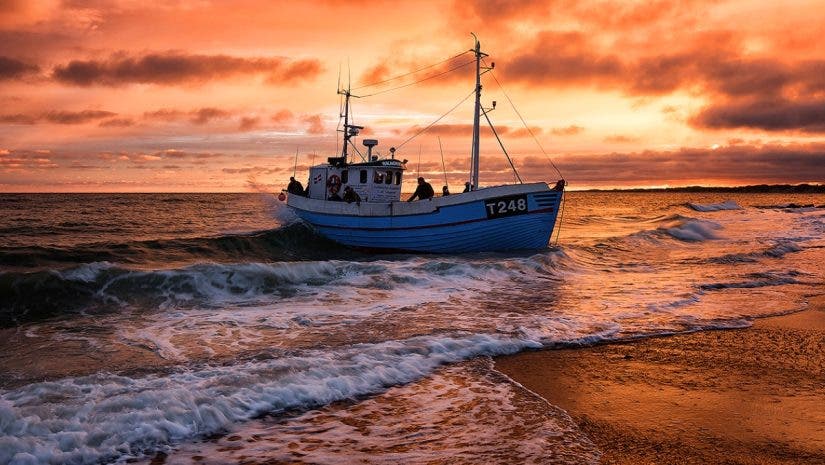
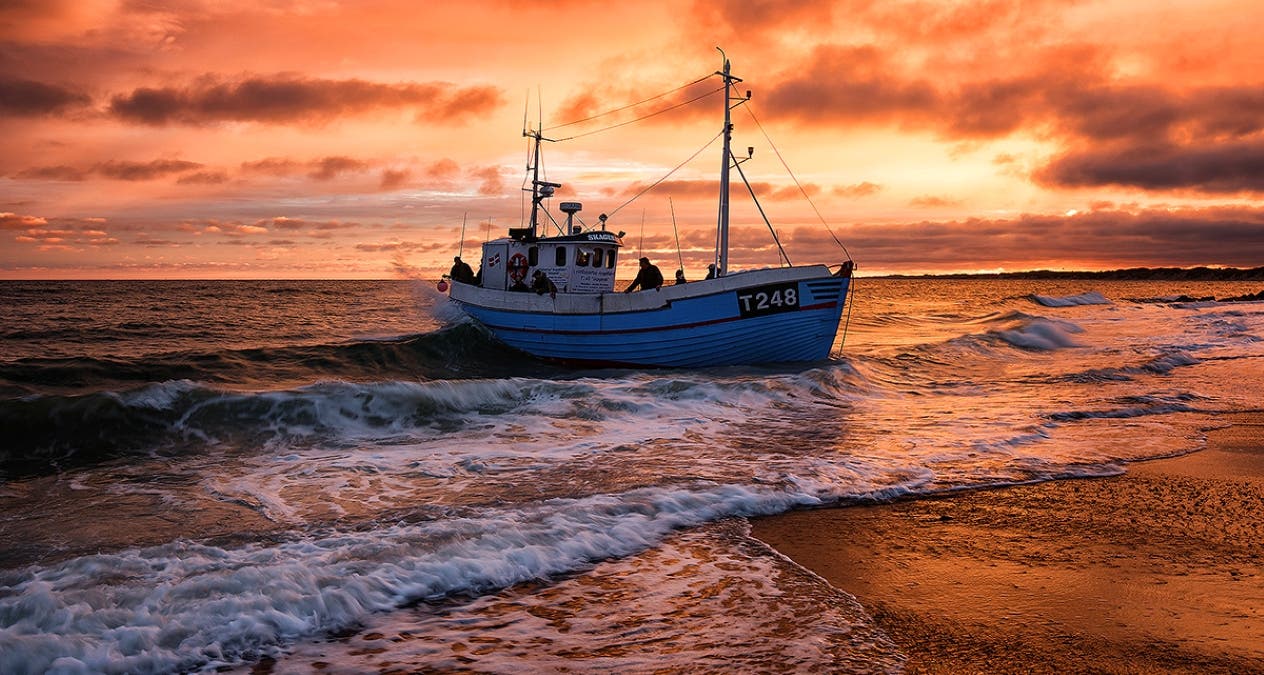
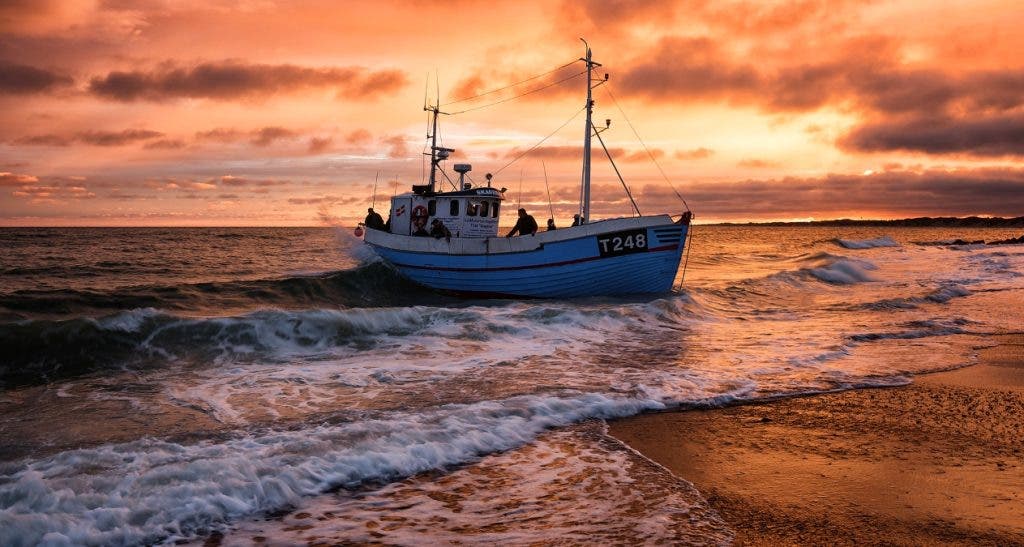
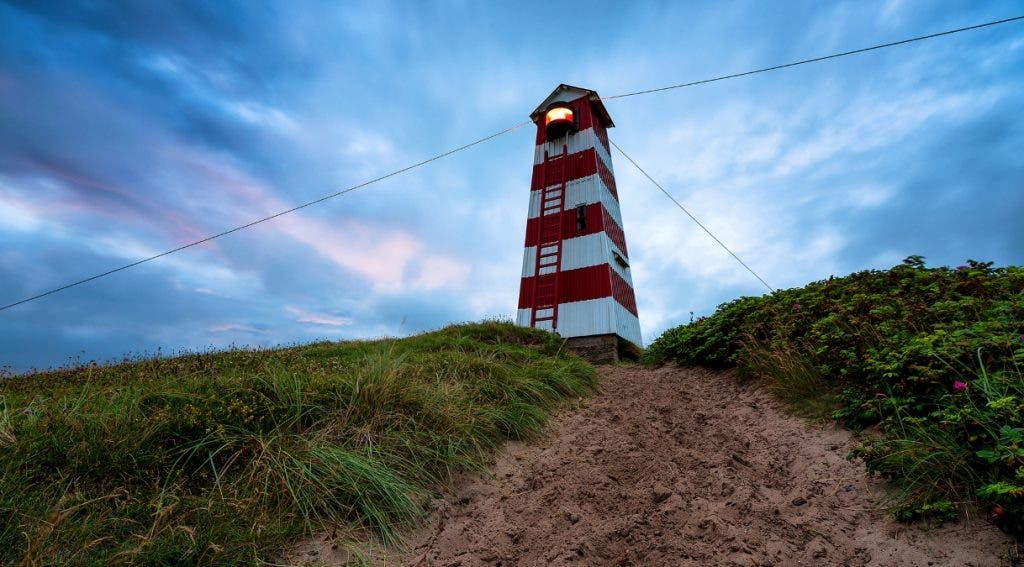
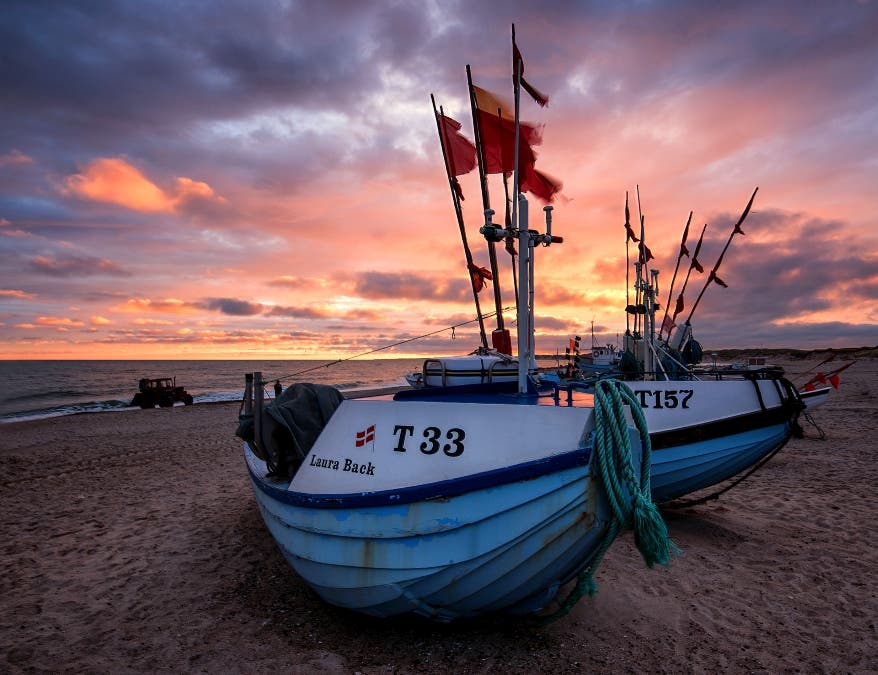
For instance, on one session, because I had planned my shots and decided on the compositions I wanted to capture before the photoshoot, I managed to take great shots of a lighthouse and some fishing boats with both the blue hour and the golden hour as a background. I had tried out the compositions a couple of days before and then waited for the best morning light to go shoot them.
The trick is to scout the area and find a few compositions you can take without walking for more than 5 minutes between them. Don’t waste shooting time running back and forth, seeking good subjects and camera angles. Settle on a few compositions, maybe even take test pictures, to know what you are doing beforehand.
Augmented Reality
If you use PhotoPills, check out the augmented reality feature. It shows you where the sun will be in the sky and how it will move later in the day. It helps you imagine the light’s direction and quality and plan your shots accordingly.
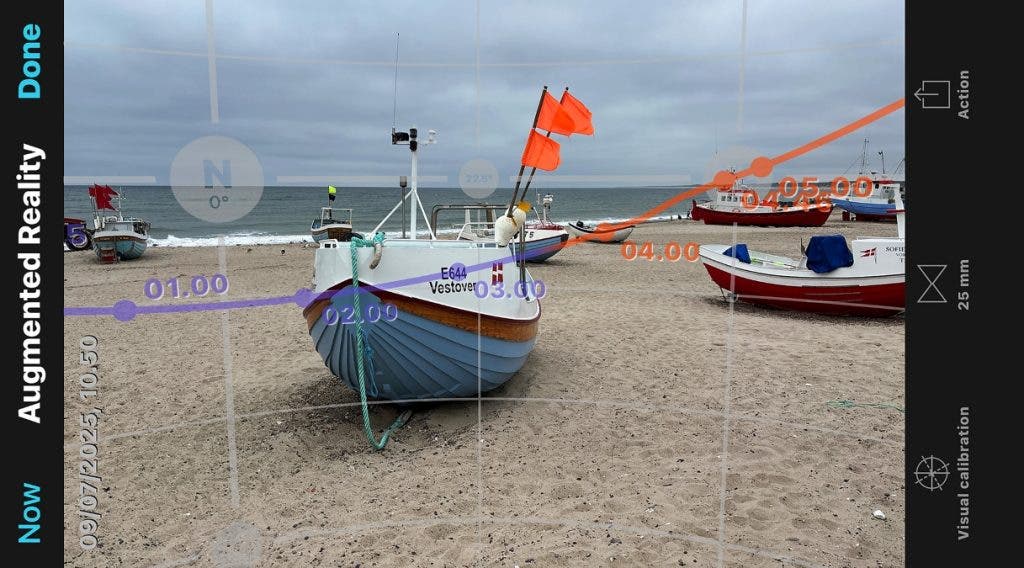
I don’t like pointing the camera directly at the sun, although it is a type of composition you often find in blue hour and golden hour landscape shots. It gets you a lot of contrast, especially if the sun is above the horizon. I prefer to have side lighting and create a softer, more natural contrast. To set up for side lighting, I need to know where the sun will be in the sky when it rises relative to the subject.

For this lighthouse image, I wanted more of a side-lit shot. I planned to use the small path as a leading line with the light coming from the side. However the cloud cover actually made the light behind the light house brighter.
This is the resulting shot from doing that initial planning.
Setting Up
Blue hour and golden hour landscape photography requires intention, engagement, and planning. If you think, “I’m here and I should shoot something.”, I’ve been there. I photographed places that weren’t ideal just because they were close to me, or I was already there. The result was less-than-great images that take up a lot of space on my drive but are useless. Intention and planning are game changers.
How to Position the Camera
Look for dramatic subjects that you can include in the foreground and create a powerful focal point. Choose static subjects, such as a lighthouse, rocks, houses, trees, and so on. You want them to be in approximately the same position when you come back for the photoshoot. Foreground objects in landscape photos add depth and produce a three-dimensional effect.
If, like me, you prefer side lighting, the golden, lateral light will enhance the drama of your subject and make them stand out even more. Thus, ensure you check the sun’s position in the sky and the direction of its trajectory. You can benefit from both blue hour and golden hour light during the same landscape photoshoot if you plan your shots and place the camera based on the sun’s position.
If you prefer backlighting, you may want to use the objects in the foreground to block the brightest point to reduce contrast and avoid overexposing the solar disc.
My Go-To Blue and Golden Hour Landscape Photography Setup
In terms of gear, landscape photography is forgiving. You can use a broad range of cameras, from entry-level to high-end models. You can use a wide-angle lens, a medium telephoto lens, or the classic 50mm. Prime or zoom lenses work equally well.
During blue hour and golden hour, light’s intensity is lower than during the day. However, because you will use a tripod, and long exposure is normally not an issue, you don’t need to think too much about the ISO performance. The most important is a sharp lens and a very sturdy tripod. At the same time, shooting on location means you carry your gear and should consider its weight and portability.
That being said, my favorite setup for blue hour and golden hour landscape photography includes the following gear:
- The Nikon Z8 full-frame mirrorless camera, because it is compact, lightweight, and portable, while producing the high-quality images I want.
- The NIKKOR Z 20mm and NIKKOR Z 24-70mm lenses, because they are fast and sharp (f/1.8 for the prime 20mm one and f/4 for the zoom 24-70mm one), versatile, and amazing at shooting in low-light conditions.
- A sturdy tripod, because during the blue hour and golden hour, you need to have longer exposure times (e.g., f/10 of a second to a few seconds for the blue hour light) and must stabilize the camera.

Final Thoughts
I hope I convinced you to plan for a blue hour and golden hour landscape photoshoot! And I hope you remember to make the most of the beautiful scenery around you or far away. For me, landscape photography is worth the effort of scouting for locations, checking apps and forecasts, and finally, waking up very early to catch those few minutes of stunning light. It’s not just the result that matters. The mindful journey from intention to end photographs is rewarding, too.