
By Jason Schneider
![]()
![]()
Are you ready for your close-up?
Photographers use the terms “close-up” and “macro” loosely–sometimes interchangeably–to describe anything from a head-and-shoulders portrait to a larger-than-life print of a ladybug on a leaf. True macro (defined by Wikipedia as a subject magnification of 1:1, or life-sized), requires a macro lens, a macro filter, or a bellows attachment.
Some manufacturers use “macro” to describe pictures taken at between about 1/5 life-size (1:5 magnification) and true life-size (1:1 magnification) macro images. These ratios refer to the size of the image captured on the digital image sensor or film compared to the size of the object in real life. Therefore if the image a coin recorded on the image sensor or film measures 1/2-inch in diameter and the actual coin measures one inch in diameter, the ratio is 1/2 to 1, which is the same as 1:2 or one-half life-size.
You can shoot many wonderful “near-macro” pictures in this range. An 8×10 or 8-1/2×11 inche enlargement can look stunning.

Not quite, but still nice: Most “kit” lenses that claim to be macro will provide 1:4 or 1:3 magnification, as seen here.

The real deal: At 1:1 (lifesize) magnification, this is true macro.(Photos by Mason Resnick)
![]()
![]()
If you’ve always been fascinated with macrophotography but didn’t know where to begin, let me show you how remarkably easy and straightforward it is. And if you’ve tried shooting close-ups without much success, I’ll give you some excellent hints and tips guaranteed to get you close-up pictures you can be proud of.
Which camera’s best?
Compact digital cameras: Virtually any current model digital compact, point-and-shoot digital camera is capable of shooting close-up portraits at the telephoto end of its zoom range, and the majority have a macro setting that will get you down to inches from the subject. Some only focus closest at the wide-angle setting, which won’t give very high magnification, though. Check the specs: Commonly-found almost-macro magnifications of 1:3 or 1:2 may be good enough.
Hint: At short distances, the camera’s optical viewfinder will not be accurate, but that’s OK–most digital cameras display exactly what the lens on the LCD screen. Make sure your camera is focusing properly (this may require zooming in on the preview image after you shot the picture to confirm focus). With practice, you can achieve satisfactory results.
Electronic Viewfinder (EVF) cameras: On an EVF camera, the information that appears in the LCD screen also appears in the viewfinder. Some EVFs offer longer-zoom-range lenses which can provide even closer magnification. Check the specs–some models offer true macro!
Single-lens reflex (SLR) cameras: By far the best type of camera for all-around close-up shooting, and especially for taking exciting pictures at the closest macro distances, is the single-lens reflex (SLR). Why? Its optical through-the-lens viewfinder shows the most detailed, accurate view of the subject, and the lenses on SLRs are interchangeable, giving users the choice of an amazing array of optics, all optimized for different aspects of the close-up universe. SLRs often let you select the autofocus zone that best suits your subject, and they’re easier to focus manually, essential in close-ups where the depth of field (the depth of the sharpness zone) is very limited.
Note: While all the techniques I’ll cover apply to a variety of cameras, most of the equipment (with the exception of close-up lenses and some lighting equipment) is aimed primarily at SLR users.
Lenses for macro photography
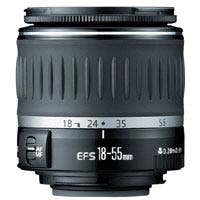 Kit lens: The standard or “normal” zoom lens that may have come with your SLR is typically somewhere between 28-80mm and 28-100mm (35mm equivalents on digital cams) and has a f/3.5-5.6 aperture. These lenses are certainly capable of taking close-ups and some even have a flower icon on them to indicate they can go close. (See “are you ready for your close-up?”) If you set it to maximum telephoto position (the longest focal length) it will probably take you close to the macro range. A typical example will focus down to around 1.3 feet, providing a magnification of around 1:4 (1/4-lifesize) at 90mm. Shooting pictures at this range is a great way to get your feet wet in close-up and near-macro photography.
Wide-range macro zoom lens: Many photographers opt for a long-range zoom with macro focusing capability as either their standard or second lens. Typical examples would be an 18-200mm f/3.5-5.6 for DSLRs or a 28-300mm f/3.5-6.3 for 35mm and DSLRs. These will usually provide near-macro capability over their entire zoom range, but they achieve their maximum macro magnification of between about 1:3 and 1:4 only at their longest focal lengths (maximum telephoto position). Shooting macro pictures at 200mm or 300mm gives you a larger working distance (the distance between the front of the lens and the subject), which has several advantages that we’ll get to.
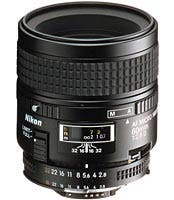 Fixed-focal-length macro lens: Single-focal-length (non-zoom) macro lenses are the crown jewels of macro photography. Used by serious macro shooters from enthusiasts to pros, most of them focus down to 1:1 (life-size) without adapters, provide superior overall image quality and sharpness, as well as better flatness of field (the ability of a lens to provide critically sharp imaging over the entire image plane). These lenses, which are specifically optimized for macro photography, also provide faster maximum apertures (from f/2.8 to f/4) than their zoom-lens counterparts, resulting in a brighter viewing image and (with flat subjects) the ability to shoot handheld at higher shutter speeds. Single-focal-length macro lenses are available in 50-, 55-, 60-, 90-, 100-, 105-, 180- and 200mm focal lengths.
Of course, these lenses don’t zoom and are therefore less versatile than zoom lenses. They are also more expensive than non-macro single-focal-length lenses, and those in the 90-200mm range may easily cost as much as or more than a long-range macro zoom. However, all perform extremely well in non-close-up shooting, and many pros use these exquisitely sharp macro lenses, such as a 90mm f/2.8 or 180mm f/3.5, for portraiture, landscape photography, and street photography as well as specialized applications like forensic and medical photography.
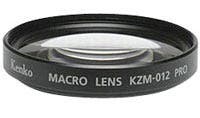 Close-up lenses (filters): Often described as “the poor man’s macro” close-up lenses are single-element (or occasionally two-element achromatic) meniscus lenses, similar to those in reading glasses, that screw in place over your camera’s lens to allow you to focus closer to the subject. They come in various diopters (powers) and the higher the number the closer (higher magnification) you can get. The most common close-up lenses range from +1 to +10, but much stronger close-up-lenses are available for specialized applications.
Hint: Since these simple lenses introduce some astigmatism and distortion that is directly proportional to their power, it’s best to stop the lens aperture down by 2-3 stops (say from f/2.8 to f/8) when shooting with close-up lenses, especially those with higher diopter numbers.
The big advantages of close-up lenses is that they have virtually no effect on the exposure (you don’t lose any light, as you do with teleconverters or extension tubes), they’re inexpensive, and take up practically no room in your gadget bag. A minor downside is that your camera won’t focus to infinity with a close-up lens in place. They can be purchased individually or in sets of three, typically a +1, +2, and +4, and can be stacked to give various combinations (e.g. a +1 and a +2 together will equal a +3).
Rules for stacking close-up lenses: Place the highest-power lens closest to the camera lens, then the next highest, etc. and avoid stacking more than two close-up lenses if possible. Play by the rules and close-up lenses work quite well. If you’re on a tight budget, try them.
Extension tubes and bellows: Basically these are spacers that fit in between your camera and lens allowing you to focus closer.
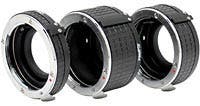 Extension tubes are available individually for specific lenses and in stackable sets giving a discrete range of possible magnification increases, depending on the focal length of the lens you’re using. Since they have no optical elements, they don’t introduce any distortion or aberrations like close-up lenses. . Want to focus down to 1:1 with a non-macro 50mm lens having a two-foot minimum focusing distance? Simply mount a 50mm extension tube on the camera with your 50mm lens on the end.
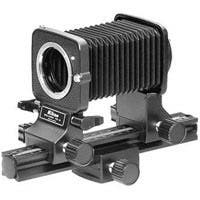 A bellows is basically an infinitely variable extension tube that has the advantage of flexibility in focusing a wide variety of lenses over a wide range of magnifications, but you must focus it manually, and is more unwieldy when shooting in the field.
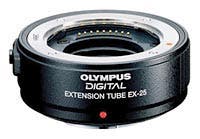
Both extension tubes and bellows were more popular among close-up shooters back in the era before autofocus 35mm and digital SLRs with electronic contacts in their lens mounts dominated the market. Today you cannot use inexpensive,m generic extension tubes and bellows with most current 35mm and DSLRs. However the major camera makers and a few independent manufacturers offer dedicated extension tubes for current SLR systems that have built-in contacts to transfer the information and support all the high-tech features of your camera. They cost more than generic tubes, but they provide a convenient, cost-efficient way to extend the range of your existing lenses, including macro lenses.
Today, bellows are considered specialized accessories and are sold in limited numbers, mostly to professionals needing really high magnifications (up to 22X).
Note: All extension tubes and bellows have one notable downside–extending the distance from the lens to the image place causes light loss that can make focusing more difficult in dim light and may require longer shutter speeds and a tripod, or flash.
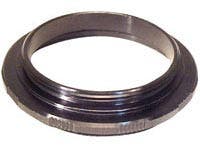 Reversing rings: These inexpensive accessories allow you to mount your existing lens backwards on a manual-focus camera without adding any additional optics. So if you have an older camera, or a current one with backwards compatibility such as a Pentax or Nikon, this is a viable option. With a 50mm lens, this gives the equivalent of a very powerful (+25-diopter) close-up lens, but the lens will be only about 1-1/2 inches from the subject, which can make shooting (and adding extra lighting) inconvenient. Depending on the focal length of your lens, a reversing ring will allow you to take pictures up to more than 3X (three times life-size). This classic technique works quite well, albeit a lot less conveniently (loss of automation on newer cameras) than using a macro lens.
 Teleconverters: A 2X teleconverter offers a convenient way to double the effective focal length of a macro or other close-focusing lens, and it automatically doubles the working (lens-to-subject) distance, allowing you to take the same macro picture from father away. This is important with skittish subjects like small animals and insects, and it makes it easier to angle flash units or reflectors in from the sides to achieve better lighting. The downside: You lose the equivalent of two stops of light, so you’ll have to use flash, a higher ISO setting, or a slower shutter speed and a tripod to prevent camera shake.
Macro lighting
Natural light: Shooting on bright days will often enable you to take macro pictures handheld at fast shutter speeds. Bright but overcast days give excellent results because the light is diffused and less harsh. A sturdy tripod is an essential accessory because it will let you set small apertures such as f/16 and f/22 for more depth of field, and shoot at slower shutter speeds.
On-camera flash: Your camera’s built-in flash or a shoe-mounted auxiliary flash can work well for close-up or macro photography if the subject is at least two feet from the lens. If it’s closer, the lens may block the flash beam, giving odd shadows or inadequate illumination. Using a macro zoom lens at telephoto position or a macro lens in the 90-200mm range will give you a longer working distance.
A simple but effective technique is to use a through-the-lens-metering (TTL) flash with a dedicated extension cord, either handheld or mounted on a bracket, and aim the flash at the subject from the side. To get less directional (flatter) lighting, hold a white piece of cardboard on the other side of the flash to serve as a reflector. If you don’t have an assistant, mount your camera on a tripod and use the self-timer.
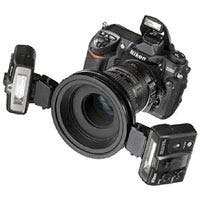 Two-flash bracket: Many serious macro shooters also use a two-flash bracket mounted on their SLRs to hold two small flash units positioned at 45-dregree angles to the subject. The flash units can be connected by wires attached to your camera’s flash contacts, by slave units that fire them when your built-in flash goes off, or wirelessly. Wireless triggering systems provide maximum convenience and flexibility in macro setups and are used by most pros today.
Tip: Use lighting ratios! With a two-flash setup, each unit can be set to a different power output to achieve a lighting ratio, which will give better modeling and make the subject look more lifelike. Example: If you set one flash at full power, the other at half power, you will achieve a classic 2:1 lighting ratio that works well for portraits of spiders and people alike. For a more dramatic effect, try a 3:1 or 4:1 ratio.
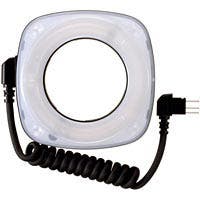 Ring flash: A ring flash is a donut-shaped flash unit that attaches around the front of your lens. It provides perfectly even lighting with virtually no shadows. This flat lighting works very well for many close-up and macro subjects. Most serious macro shooters have a ring flash in their kits because it is a simple, lightweight device that requires no setup time, and provides a sophisticated point-and-shoot approach to macro photography that lets you work rapidly and capture fleeting subjects. Some ring flashes incorporate two or more individual flash tubes in the ring so you can achieve a lighting ratio to give a more dimensional rendering of your subjects. Ring flashes are now available at moderate prices, though the best pro models are more expensive.
Focusing rails and tripods
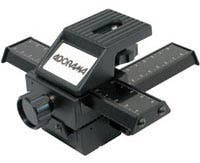 Since precise macro work often entails working with a depth of field of about one millimeter, critical focusing and exact positioning of the camera are critical. A sturdy tripod is an essential accessory for serious macro shooting, and another accessory to consider, especially if you often take pictures at life-size (1:1) or greater magnifications, is a macro focusing rail. Basically it’s a small rack-and-pinion device that moves the entire camera/lens units back and forth in tiny increments. In other words, you do the basic setup with the tripod, and the fine positioning with the macro rail.
Exposure
Back in the days when dinosaurs roamed the earth and we walked to school barefoot in the snow–before through-the-lens metering systems, TTL flash systems and digital photography–exposure calculations for close-up and macro photography were fairly complex and tedious. Today, any additional exposure resulting from focusing closer, adding extension tubes, using teleconverters, etc, will automatically be compensated in auto-exposure modes by the camera’s built-in metering system. Just make sure the camera-selected shutter speed readout in your SLR’s viewfinder is not too slow for taking sharp handheld pictures–at macro magnifications the slowest handholdable shutter speed is often 1/250 sec.
If your DSLR is not delivering consistently accurate exposures, you’ll be able to tell by carefully examining the results on the histogram display in the LCD. Use its magnification feature to zoom in on details to make sure they’re properly focused, and check the hisogram to make sure the curve is near the center of the chart. If it isn’t, you can brighten or darken the results by using the exposure compensation control, or by selecting a different metering pattern. Center-weighted, averaging, evaluative and spot metering can all give good results, but one or the other may work best with your particular subject.
Practice makes perfect
If you follow the suggestions and techniques outlined in this article, you should be well on your way to taking rewarding and satisfying close-up-and macro pictures, but remember, there’s no better teacher than hands-on experience. So get out there and enjoy yourself while discovering and capturing one of the most fascinating aspects of photography–and at the same time, enhancing your creative potential. Good shooting!
© Adorama Camera, Inc.