Creating footage that looks cinematic and professional requires finesse beyond simple altitude and navigation, and knowledge of your controls. Creators can attain the best results by utilizing some specific flying techniques. While a drone equipped with a high-quality camera that can be customized for specific modes has its advantages, a simple beginner drone can also produce excellent results. This is because cinematic drone footage depends mostly on how the pilot flies the drone, with deliberate, controlled movements.
By understanding your drone’s capabilities and familiarising yourself with cinematic guidelines for captivating footage, you can produce high-quality stories that immerse the viewers in a 3D experience.
This is not a guide to modes on specific devices, which can vary and be fairly complex, but are useful. This article is about manual piloting and learning to do it yourself. So let’s explore my top 5 cinematic drone movements for capturing the best, most engaging views of any location.
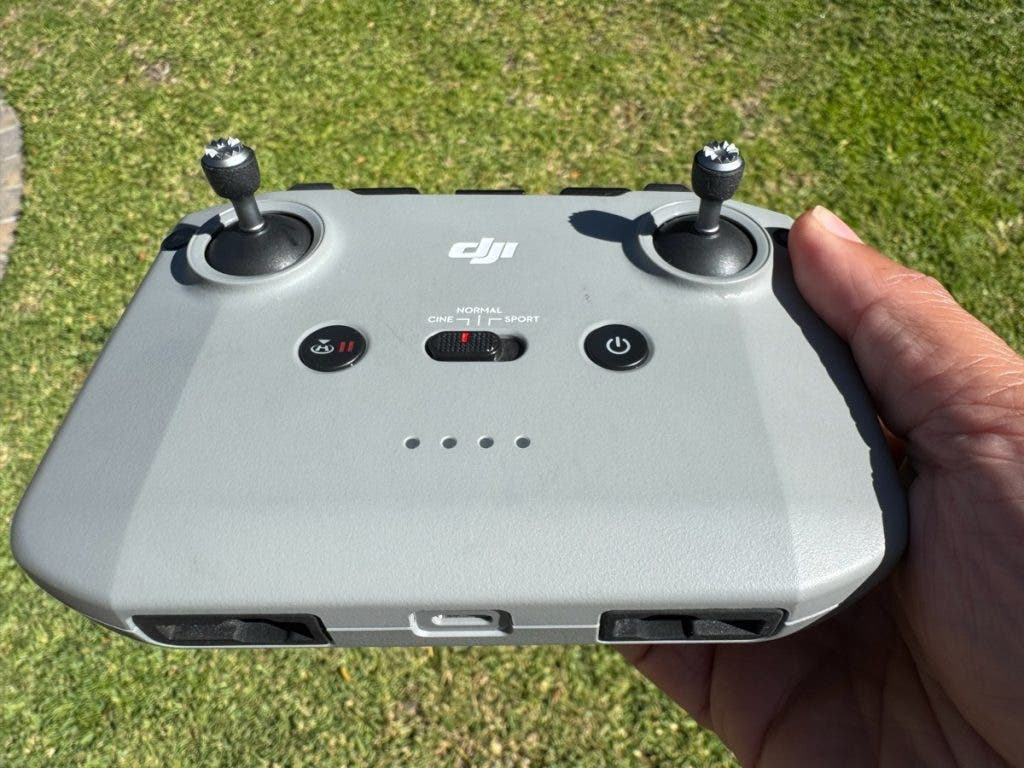
The Essential Foundation: Cine Mode
Before attempting any specific manoeuvres, the most important first step is to engage Cine Mode if available in your drone. It is also known as Tripod Mode or Cinematic Mode.
Cine Mode is the key to smooth footage because it greatly reduces the drone’s responsiveness. Unlike Normal Mode, where the drone reacts quickly to joystick inputs, Cine Mode provides slower, more gradual acceleration and braking. This feature prevents the sudden starts, abrupt stops, and rapid corrections that can make footage look amateurish.
| Stick | Direction | Channel | Function (Movement) |
| Left Stick | Up/Down | Throttle | Controls the drone’s vertical movement. |
| Left Stick | Left/Right | Yaw | Controls the rotation of the drone on its vertical axis: Left spins the nose left, Right spins the nose right. |
| Right Stick | Up/Down | Pitch | Controls forward/backward tilt and movement: Up moves the drone forward, Down moves it backward. |
| Right Stick | Left/Right | Roll | Controls the side-to-side tilt and movement: Left slides the drone left, Right slides the drone right. |
1: The Orbit (Circle of Discovery)
The Orbit is a spectacular move that immediately adds context and depth to a subject. It requires the drone to fly a perfect circle around a fixed central point (a landmark, a person, a structure). At the same time, the camera remains consistently locked onto that centre subject.
Why This Move Works: It’s a powerful way to allow the viewer to absorb the subject from every angle while simultaneously establishing its relationship with the surrounding environment.
Manual Execution:
- Initial Placement: Position the drone at a close radius to the subject, but as high as needed to provide the ideal view of the subject and its surroundings.
- Coordinated Controls: The execution requires simultaneous input on both controller sticks: the left Yaw stick (move left or right) is used to rotate the drone, and the right Roll stick (move it left or right) is used to fly the drone laterally.
- Synchronisation: Apply smooth, consistent pressure to both sticks, adjusting the yaw and roll inputs to maintain a perfect, circular path with the camera centred on the target.
The video clip below of the Namibian sunrise is an orbit shot that reveals the surroundings, while the main aim is to share a short story about a photographer capturing a tree at sunrise in the desert. The beauty was that I could keep this as a long shot, gradually going up for a minute, fast-forwarding it in certain places, and adding sound effects to make it more cinematic.

The Orbit cinematic shot from the Namib Rand, Namibia.
2: The Dronie (The Grand Reveal)
For me, the Dronie is the most satisfying cinematic shot. It’s the aerial equivalent of a “dolly zoom,” starting close on a primary subject and smoothly moving backwards and upward to reveal the massive scale and context of the environment behind it.
Why This Move Works: The shot begins with intimacy and connection, focusing on the subject, and concludes by providing a broad, sweeping context that establishes the location, scale, and environment. I often hear my friends say “wow” when I show them a dronie, as it leaves them in awe of the grand scale of the landscape.
Manual Execution:
- Start Position: Position the drone close to the subject, a few feet away, ensuring the subject fills a significant portion of the initial frame.
- The Pullback: Smoothly push the throttle stick (left stick, up) to gain altitude while simultaneously pulling the pitch stick (right stick, back) to move the drone away from the subject.
- The Reveal: Maintain the combined ascent and backward motion until the subject is visually small, and the whole landscape is revealed.
Pro Tip: To maximise the dramatic effect, pause the movement briefly for 2-3 seconds while the drone is close to the subject before initiating the pullback.

The Dronie cinematic shot from Greyton, South Africa.
3: The Cable Cam (The Straight Track)
The Cable Cam, also known as the Straight Track, is a shot characterised by its simplicity. It simulates a camera moving along a perfectly straight, invisible overhead cable.
Why This Move Works: It is ideal for following a moving object in parallel or for smoothly showcasing the flow of a road, river, or coastline.
Manual Execution:
- Initial Placement: Position the drone parallel to the direction of the desired movement.
- The Track: Apply gentle, consistent pressure to the Roll stick (right stick) to move the drone sideways, forward, or backwards. The camera’s gimbal should remain fixed in one direction.
Pro Tip: When tracking a moving subject, a subtle input on the Yaw stick (rotation left stick) may be necessary to keep the subject perfectly centred in the frame as the perspective shifts.

The Cable Cam cinematic shots from various angles. Madagascar and South Africa.
4: The Rocket (The Vertical Climb)
The Rocket is a highly dynamic vertical ascent that drastically alters the viewer’s perception of a scene. The drone flies straight up, typically starting low, with the camera either pointed straight down or fixed on the horizon.
Why This Move Works: It is a quick, efficient way to establish height and inject a burst of energetic motion into an edit.
Manual Execution:
- Camera Angle: Set the gimbal angle before takeoff, usually between 30 and 45 degrees, or straight down at 90 degrees.
- Launch: Apply a smooth, firm, and consistent input to the Throttle stick (left stick, up) to initiate a perfectly vertical climb.
- Pace: Maintain a consistent speed during the ascent. This movement often benefits from speed ramping in post-production, i.e., starting the clip slowly and accelerating the footage.
Here are a few clips of the Rocket shot. For maximum visual impact, I used speed ramping to retain viewers’ attention.

The Rocket cinematic shot is best used with speed ramping for fast-paced videos.
The Tilt Reveal (The Look-Up Push-In)
The Tilt Reveal is effective for transitioning from a detailed focus to a wide landscape shot. The drone moves forward as the camera gimbal slowly tilts upward, revealing the horizon and the scene ahead.
Why This Move Works: This move generates a strong sense of momentum and discovery. It creates a feeling of travelling into the landscape.
Manual Execution:
- Start Position: Position the drone from where you want to start. Tilt the camera gimbal down, nearly to 90 degrees, focusing on the immediate foreground.
- Coordinated Movement: Gently push the Pitch stick (right stick, forward) to initiate forward flight. Simultaneously, and very slowly, adjust the Gimbal Wheel to tilt the camera upward toward the horizon.
Pro Tip: Since this requires two simultaneous inputs and gimbal control, Cine Mode is non-negotiable. Do not pause at any stage while moving the gimbal wheel upwards because it will cause discontinuity in the reveal, and you will have to do it all over again.

Conclusion
Creating a professional video clip requires editing and enhancement, with appropriate sound effects and music, for a fully immersive viewing experience. For a pleasing result, you should acquire sound footage through extensive practice of these and other cinematic movements. This will allow you to develop your own style and refine your skills and subtle manoeuvres, rather than solely depending on the drone’s built-in tracking modes. Enjoy the ride!