Photographers love to tinker with their images. If there’s too much grain in a photograph, we experiment with finding chemical or digital methods to eliminate it. If there’s no grain in our digital images, we work in the digital darkroom to add some. This brings me to an important point: In the small JPEG files you see here, the grain may be too subtle to appreciate. The best way to see how the grain looks is to try some of these techniques yourself and apply as much or as little grain as you like.
THE BUILT-IN TOOLS
If you already have Adobe Photoshop or even the less-than-$100 Photoshop Elements, you can use its built-in Grain filter. (Filter>Texture>Grain) That method may be too easy for some Pixologists, who like to find harder and more complex ways to create effects that are a little bit different. Here’s a tip from M.P. Hunt, a fine arts photographer, who suggests using Photoshop’s or Elements’ Diffuse Glow filter. (Filters>Distort>Diffuse Glow) This method yields a more subtle grain effect and doesn’t produce the mutilated RGB pixels the Grain filter does. Thanks, M.P.
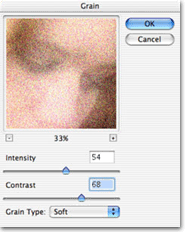
Use the Grain Filter: Photoshop’s built-in Grain filter offers a pop-up menu that gives you access to ten kinds of grain structures, including vertical, and adjustable sliders that let you increase the amount of grain and contrast to make sure it pops out.
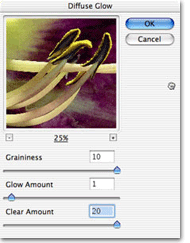
Get Really Grainy: Another way to archive a grainy effect is to use Photoshop’s Diffuse Glow filter and set the Clear slider to near maximum, place the Glow slider to 0 or 1, then play with the Graininess slider and as they say on The Food Channel, “season to taste.”
MORE POWER? USE POWER TOOLS
If you’re in a hurry, you gotta use power tools. When working in the digital darkroom, I use the “20-minute rule.” If you can’t achieve the effect you want in twenty minutes, you probably never will. One of the most practical Photoshop-compatible plug-ins around is Visual Infinity’s (www.visinf.com) Grain Surgery. Not only can it remove grain or digital camera noise from an image file, but you can also use it to ADD grain. You can even sample your favorite grainy film stock (mine is Ilford 3200 black and white film exposed at an EI of 100) and import its grain structure into the plug-in and onto your digital images.
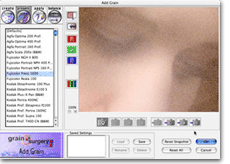
Real Grain for a Digital World: Visual Infinity’s Grain Surgery has several sliders that let you create grain from scratch but you can also reproduce the actual grain structures of more than 20 real-world films including some from Agfa, Kodak, and Fuji.

For this photograph of aspiring model Charity Terry, I first used Andromeda’s (www.andromeda.com) ScatterLight Lenses plug-in to add soft focus, then added graininess with Grain Surgery emulating grain from Fuji’s Press 1600 color negative film. Is my digital homage as good as a Farber original? Not hardly, but the effect is there and easy to create with the right power tools.
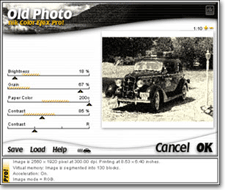
nik Multimedia’s Old Photo is a fast way to add grain and convert the image to monochrome while producing a grainy “old newspaper” look. It’s part of their Color Efex Pro package of Photoshop-compatible plug-ins (see “Power Tools are Portable”) that are available for Mac OS, including OS X, and Microsoft Windows. Old Photo makes it a one-step process to convert the image to monochrome and add grain at the same time.

Catch a Cab!
The original photograph of Steve Sims Roberts’ wonderful 1937 Plymouth taxicab was captured with a preproduction digital SLR and was lightly tweaked in Photoshop to look its best. Note the front-mounted water bag for the long treks across Colorado’s wide-open and arid spaces.

Yank them sliders: Using Nik’s Old Photo is simple. Just move the sliders that control the various effects, including grain, and look at the results in the puny Preview Window. Those little yellow slash marks are Nik’s suggestion as to the “normal” limits of each effect. Ignore them, especially the one controlling grain, and let your aesthetic sense be your guide.
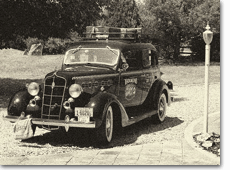
Old Cab; Old Photo. In order to give the photograph a faded, old newspaper look, I extended the Grain slider almost as far as it could go. The Paper Color slider too.
Demo or trial versions of many, if not all, of the plug-ins mentioned in this story are available from the various companies’ websites. Download them and give’em a try.
Power Tools are Portable
While the most popular plug-in standard was created by Adobe Systems for Photoshop, compatible plug-ins can be used with many other programs. Including Ulead Systems’ PhotoImpact, Corel’s Painter and PhotoPaint, and MicroFrontier’s Color-It!, Enhance, and Digital Darkroom. If your image manipulation program accepts compatible plug-ins then all of the power tools in this story will work for you too!
All photographs ©2003 Joe Farace
Joe Farace is a Colorado-based photographer/writer who has written or edited 24 books. His book “Plug-in Smart” is available through www.joefarace.com.