
If you can tame the light when photographing flowers outdoors, you are going to get better photos. The good news? It doesn’t need to cost you a fortune to find the right light!
Spring time is the right time for photographing flowers, whether it’s a mother’s day gift (flowers eventually wilt; photographs of flowers don’t!), photographing a wedding flower bouquet, or just because we like flowers. Here are some ideas to help you put your flower photography in the right light.
Finding Flowers to Photograph
The great thing about flower photography is that you may not need to go any farther than your own lawn, in which case you don’t have to ask permission, and you can spend as much time as you’d like getting great photos. But let’s say your neighbor has a flowerbed that is fill of photogenic flora. Logic dictates that asking permission would go a long way. As a friendly gesture, you may want to offer prints (you can order them online from AdoramaPix) as a way of saying “thank you.”
Another place rich in flowerful subjects is a local arboretum or public garden. If it’s a public park or other freely-accessed space, you probably can just bring your gear and start shooting. If it’s a fee-based private arboretum, you should call in advance and ask if you can bring a tripod and lights. It is very likely that you’ll get an OK.
Related:
Once you have the right lens and gear, you’ve identified photogenic flora, and have gained access to them, it’s time to get shooting. One of the most important aspects of flower photography is finding, controlling or bringing in the right light to show off the flower beautifully, accurately, and/or artistically, depending on your goals. The existing light is often insufficient. Let’s look at two key lighting scenarios and how to improve them.
Direct Sunlight
Direct sunlight is harsh and angular. It creates bright highlights and deep shadows, and when photographing in such light, you generally have to sacrifice one for the other. Photograph with the sun behind you and you and the camera could end up partially or fully blocking your light source. Here are four ways to mitigate direct sunlight:
Blow it out with a ringlight
Ringlights (such as the Flashpoint Ringlight) are affixed on the front of your macro lens and provide even full frontal light that evenly illuminates the interior of the flower. They come in the form of flash or constant output LED rings. If you are looking to get accurate, detailed images, this is the way to go. Some advanced ringlights let you independently adjust power on either side for control over right-left lighting ratios. Nikon’s system is based on two lower-powered independent shoe mount flashes on either side of the lens. Working up close, a little power is all you need.
Now matter which ringlight flash system you choose you should have enough light to shoot at a small aperture for maximum depth of field.
Block the sunlight
Use anything—a sheet of cardboard, a reflector, whatever—and hold so the sunlight is blocked and the flower is in shadow. This is a bit tricky, since you won’t have as much light hitting your subject. A sturdy tripod is recommended, unless you are using this technique in tandem with a ringlight flash, because you’ll need a long exposure in order to shoot at a smaller aperture.
Also, if you’re blocking the sunlight and you have any background in the image, that background will probably be blown out, since it will be brightly lit by the sun while your subject is in shadow. Be aware of the background lighting and either move in to eliminate a distracting background, or move so there’s a shaded background behind the flower, if possible.
Diffuse the sunlight
A variation of blocking harsh direct sunlight is to diffuse it. The advantage here is that it softens the light while still allowing a lot of light into the scene so you can use a shorter exposure. An Interfit Photographic 12-inch Round Light Diffuser is a portable, hand-holdable solution and costs very little. Hold it just above your subject to block the light.
Bounce light into the flower
This is a good solution if you have a strong backlight, since it will reflect light directly. Since you’re working up close, you can hold the bounce just below or to the side of the camera and angle the bounce so the light lands in a pleasing manner. An advantage to this approach is it bathes your subject in light, reducing the need for a longer exposure. A 12-inch reflector should be sufficient for most floral subjects.
I’d use either a white or silver reflector, depending on the kind of light available, but I’d also pack a gold option, since you may find yourself wanting to add a bit of warmth.
A nice thing about carrying a variety of 12-inch reflectors and diffusers is that they aren’t expensive ($10-12 is a reasonable price) and they give you several options. You can combine a diffuser blocking direct light with a reflector bouncing sunlight into your subject, to give you even greater lighting control. You’ll probably need a couple of reflector arms that can attach to the legs of your tripod so you have at least one hand free to adjust the camera and press the shutter release! The Novoflex Rod support system or Novoflex Gooseneck flash extension arm can hold your stuff for you.
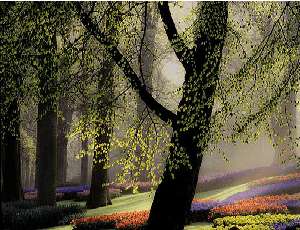
Dappled Shade/Sun: A Lighting Challenge
You may find yourself under a tree shooting a flower, fern or fungus, and may need to fight bad light. The biggest issue when shooting under a tree is that the shadows interplay with sunlight and the unevenness of light can cause headaches, unless you’re prepared.
Again, I recommend using a diffuser (rather than blocking light, since you’re light level is already reduced) as the low-budget way of getting even lighting, but also bring along a grey card or other white balancing tool, since the green from the leafy canopy will skew the hue and your colors may not be so true.
If you can afford it, the investment in a ringlight really pays off here. You’ll blow out any problematic light balance by simply blasting more light from your flash than the ambient light. For some added dimensionality, consider holding a reflector almost behind the flower or subject so the flash light will bounce off the back of your subject, creating some rim/back lighting.
Distracting background? Here’s a simple way to eliminate it. There may be distracting details in the background but by moving the camera you may find you’re not getting the desired angle on your subject. A simple response is to bring a variety of solid color paper with you. Since your depth of field is shallow, you can hold the paper about a foot away and it will be blurred, and nobody needs to know it is paper.
Buy a pack of 9×12-inch sheets of construction paper from a local office supply or art store. These usually include 10-12 different colors. Use colors that you might find in nature—brown, blue, green are all good choices, as are black and white for a more dramatic contrast and defined figure-ground relationship. If you don’t mind getting wacky, experiment with other colors that complement the colors of the flowers you’re photographing. Bring an artist’s color wheel (available from art supply stores) with you to help you experiment with complementary and contrasting color combinations.
You could even use one of those extra 12-inch reflectors as a background. A gold or silver background could add a dynamic element to your shot!
There are many other factors, of course, when shooting macro: lens choice, controlling focus, keeping wind-blown blossoms and flowers still, and composition, to name a few. But controlling and taming the light is key. It makes the difference between amateurish snapshots and pro-level results that you can be proud of.