Find out what all the fuss is about.
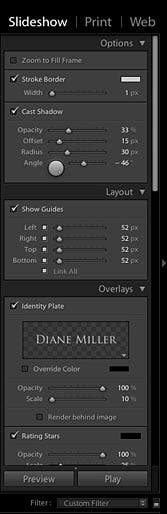
There has been a great deal of interest in Adobe Photoshop Lightroom, which has just (August 2008) been upgraded to Version 2. Even though Photoshop appears in the name, it is a separate program from Adobe Photoshop CS3 although the two are tightly integrated. For some users it might replace Photoshop and for others it could be a supplement. I recently got hold of Lightroom 2 and put it through its paces. Here’s what I found.Lightroom is in the same class as Apple Aperture, but while Aperture runs only on Macs, Lightroom runs on both Mac and PC platforms. Both versions are on the same installation disk and if you have both PC and Mac computers you can install it on both. Catalog data written to one platform can be imported into the other, so a notebook computer running one platform can be used to catalog images as cards are downloaded in the field and back home the data can be imported to a desktop running the other platform. Photoshop or Lightroom?While Photoshop has many tools for graphic art and web design, Lightroom is targeted specifically at the needs of photographers, both in workflow and image adjustments. It is particularly suitable for photojournalists and photographers who do stock, commercial work, sports, weddings and events, for whom a fast and efficient workflow for hundreds of images from a single shoot is critical. Lightroom handles downloading, previewing, rating, organizing, keywording and RAW conversion. Then it handles slideshow presentation to a client, uploading to a web site for client review and printing.Photographers who do extensive artistic adjustments on images will still want to work in Photoshop after organizing and making initial adjustments in Lightroom, to use such things as filters, layer compositing and masking. Those who work up only a few images from a shoot and do a lot of artistic manipulation may not find a compelling need for Lightroom. I always thought I was in that category and had not previously used Lightroom beyond checking out the trial version when it came out in 2007. But the recent buzz got me interested and I decided to check it out again. The bottom line: I like what I found and it now has a place in my “dimroom” somewhat like a second enlarger. (I always wanted two enlargers anyway…) It won’t replace Photoshop for me, but it will be a powerful front end, strongly supplementing Bridge (with much more functionality) and giving me the choice of doing RAW conversions in either Lightroom or Adobe Camera Raw. Integration with Photoshop is excellent. After doing work in Photoshop I can be seamlessly returned to Lightroom where my changed images will be updated.The powerful workflow management of Lightroom begins with downloading images, which are imported into the catalog. These can be brought in from your image storage drives or disks as well as from a card. You can also group chosen images across folders into collections.Image DatabaseI have to admit I have been remiss about image organization. I have a bank of large hard drives (with backups) where files are organized in a subject-related folder structure. But it can be a chore to locate a specific image. Did I file it under the location or by subject? So many images could be filed under several categories, but doing so would waste disk space and if I modified one copy the others would not be synchronized. Or was an image relegated to CD or DVD rather than being worthy of room on the hard drives? There are asset management programs devoted to cataloging images, but I never quite got around to using them. Lightroom comes to my rescue. It is a powerful database that works with your existing folder structure and storage system. After images in a folder are catalogued, even those currently “offline” (on DVD, for example) can be located and identified by a thumbnail in the library and their secret location revealed to you. And of course Lightroom can chug through my hard drives and DVDs and let me catalog all my old files and add them to its library. In addition to RAW it handles .dng, .psd, .tif and .jpg files. In contrast, Bridge is a browser, not a database. Even with its keywording, sorting and search functions, it is not in the same class as Lightroom. The Library only contains thumbnails; the original files are not disturbed. And changes you make to files outside Lightroom, such as moving or renaming, can be synchronized into Lightroom. For me, this database capability alone would justify having Lightroom alongside Photoshop, but there is much more to it. Modular WorkflowIf you have been using Lightroom you will find many features have been added with Version 2. It has a better user interface and improvements in all the modules. The Lightroom interface is divided into modules for different stages of the workflow. These are accessed by clicking on their names in the upper right of the screen. Managing files is done in the Library module where you can download, import, add metadata by batch or individually, sort, order, keyword, and probably make coffee if you have a USB coffee pot. The various modules have many choices of how images are displayed, including a filmstrip, a grid (similar to a light table), a full-screen view and a very fast full screen 100 percent view. You can compare multiple images two at a time to choose the best of a series and you can sort by camera data or by information you have added such as ratings and keywords.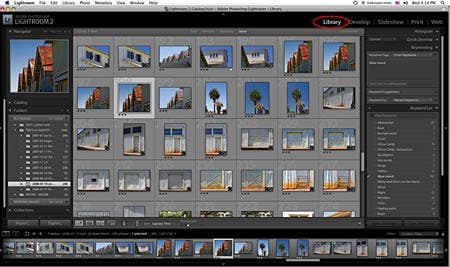 RAW conversion is done in the Develop module. Version 2 uses essentially the same conversion engine as Photoshop CS3, which is an awesome step up from earlier versions. It looks very familiar and is completely intuitive to a CS3 Camera RAW user. If you are still using Photoshop CS2 or earlier and haven’t planned to upgrade, Lightroom may be your killer app. Here is the Develop module with a crop (non-destructive, of course) in place. RAW conversion is done in the Develop module. Version 2 uses essentially the same conversion engine as Photoshop CS3, which is an awesome step up from earlier versions. It looks very familiar and is completely intuitive to a CS3 Camera RAW user. If you are still using Photoshop CS2 or earlier and haven’t planned to upgrade, Lightroom may be your killer app. Here is the Develop module with a crop (non-destructive, of course) in place.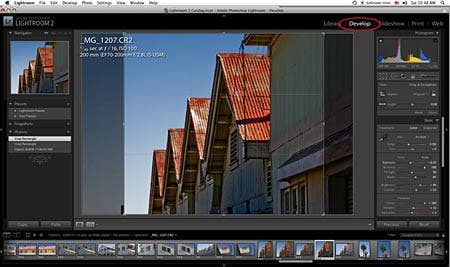 There is a nice improvement to the Vignette feature in Lightroom 2. Vignette (which is accessed in the panel on the right side of the Develop screen, by sliding the scroll bar further down than shown in the figure above) is designed to remove corner darkening, but it often used to increase darkening. But if corners are darkened and then the image is cropped non-symmetrically, the vignetting effect will not be even. Now there is an additional post-crop vignette slider whose effect will be symmetrical within the crop frame, and will change if the crop is changed. The Develop module goes well beyond CS3 with the capability to do non-destructive adjustments painted onto to local areas (new in Lightroom 2). This can be done with a gradient tool (simulating a graduated neutral density filter) or a brush. The brush can have an auto feature turned on (similar to the very intelligent Quick Selection tool in Photoshop CS3) which lets you brush over a delineated object to select it with amazing accuracy. And of course the brushed areas can be modified at any time, as can the adjustments made to them.The local adjustments include exposure, brightness, contrast, saturation, clarity, sharpness and painting on a color tint. For many users this feature would allow Lightroom to replace Photoshop. These are handled the same way as other RAW conversion parameters, as non-destructive settings saved with the RAW file that may be edited or deleted later, the same way conversion settings are handled in Adobe Camera Raw. Here I have increased saturation in an area on the left of the image and painted a red tint in an area on the right. There is a nice improvement to the Vignette feature in Lightroom 2. Vignette (which is accessed in the panel on the right side of the Develop screen, by sliding the scroll bar further down than shown in the figure above) is designed to remove corner darkening, but it often used to increase darkening. But if corners are darkened and then the image is cropped non-symmetrically, the vignetting effect will not be even. Now there is an additional post-crop vignette slider whose effect will be symmetrical within the crop frame, and will change if the crop is changed. The Develop module goes well beyond CS3 with the capability to do non-destructive adjustments painted onto to local areas (new in Lightroom 2). This can be done with a gradient tool (simulating a graduated neutral density filter) or a brush. The brush can have an auto feature turned on (similar to the very intelligent Quick Selection tool in Photoshop CS3) which lets you brush over a delineated object to select it with amazing accuracy. And of course the brushed areas can be modified at any time, as can the adjustments made to them.The local adjustments include exposure, brightness, contrast, saturation, clarity, sharpness and painting on a color tint. For many users this feature would allow Lightroom to replace Photoshop. These are handled the same way as other RAW conversion parameters, as non-destructive settings saved with the RAW file that may be edited or deleted later, the same way conversion settings are handled in Adobe Camera Raw. Here I have increased saturation in an area on the left of the image and painted a red tint in an area on the right.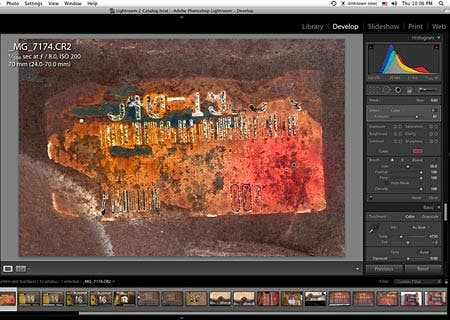 Here is a closer look at the local adjustments, which are in a panel just below the histogram. From the left they are Crop/Straighten, Clone/Heal, Red Eye Correction, Gradient Mask and Brush Mask. Here is a closer look at the local adjustments, which are in a panel just below the histogram. From the left they are Crop/Straighten, Clone/Heal, Red Eye Correction, Gradient Mask and Brush Mask. 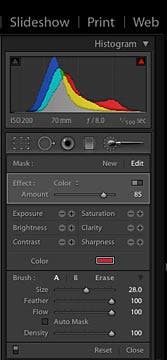 In Lightroom you can save multiple versions of settings for an image. Of course, the ability to save conversion settings has been a great convenience for a long while in both Lightroom and Photoshop. You can adjust images but don’t have to convert them to .psd, .tif or .jpg until you need to output them for printing or to post on the web or e-mail. The slideshows created in Lightroom can display RAW files (edited or not) so there is no need to convert most images prior to a client’s initially viewing them.The Develop module is tightly integrated with Photoshop. After adjusting the RAW parameters of a file you can right-click or choose from items in the Photo menu to go directly to Photoshop for further work utilizing filters, adjustment layers and masking, you can open an image as a Smart Object in Photoshop, or you can select a set of files and go directly to choices for Photomerge, Merge to HDR, or to import several images as layers in one image. And the finished image can then be added back to the Lightroom Library.The Slideshow module is designed to allow easy-to-create but very professional and sophisticated presentations to clients or friends. Lightroom now supports dual monitors, which (among other things) enables a slideshow to be presented to a client on one monitor while you control it and sort or edit images from another. Options have been added to custom design introduction and ending screens. In Lightroom you can save multiple versions of settings for an image. Of course, the ability to save conversion settings has been a great convenience for a long while in both Lightroom and Photoshop. You can adjust images but don’t have to convert them to .psd, .tif or .jpg until you need to output them for printing or to post on the web or e-mail. The slideshows created in Lightroom can display RAW files (edited or not) so there is no need to convert most images prior to a client’s initially viewing them.The Develop module is tightly integrated with Photoshop. After adjusting the RAW parameters of a file you can right-click or choose from items in the Photo menu to go directly to Photoshop for further work utilizing filters, adjustment layers and masking, you can open an image as a Smart Object in Photoshop, or you can select a set of files and go directly to choices for Photomerge, Merge to HDR, or to import several images as layers in one image. And the finished image can then be added back to the Lightroom Library.The Slideshow module is designed to allow easy-to-create but very professional and sophisticated presentations to clients or friends. Lightroom now supports dual monitors, which (among other things) enables a slideshow to be presented to a client on one monitor while you control it and sort or edit images from another. Options have been added to custom design introduction and ending screens.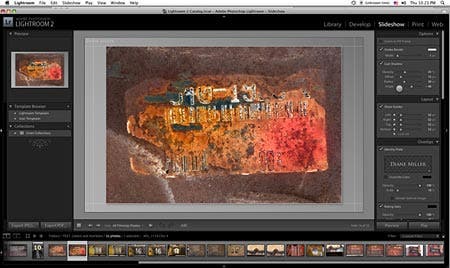
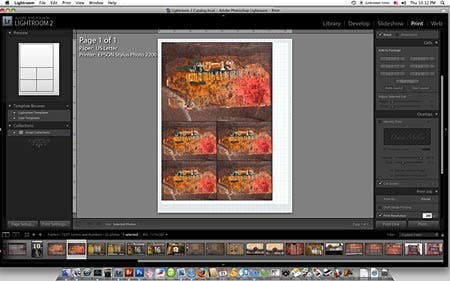
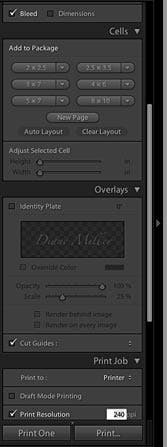
The Print module now has a picture package feature that will do automatic paper-efficient layouts of multiple sizes of an image, as well as single prints. Sophisticated output sharpening is now available, based on the PhotoKit sharpener from PixelGenius, that takes into account image size and paper choice.
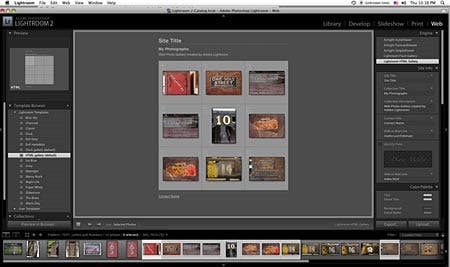
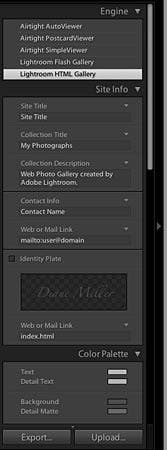
And the Web module lets you create a gallery to upload to an existing site, with more advanced features than those in Photoshop. It also gives you output sharpening control.
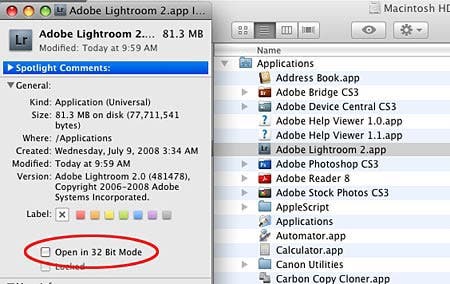
Under the hood, Lightroom has improved memory handling for large images and has improved search functionality. It is the first Adobe application to take advantage of 64 bit operating systems such as Mac OS X.5 and Microsoft Windows XP 64 and Vista 64. Among other things, that means it can utilize huge amounts of RAM. It also takes better advantage of multiple processors or multiple cores.The Lightroom team has, from the beginning, enlisted photographers in the design process and really listened to them. And Lightroom is also very friendly to third-party plug-ins for uploading to web sites or commercial printers.Setting UpInstallation on my Mac Pro was fast and easy. All I had to do was open the CD and double-click the install icon. But I recommend that you look at the Read Me PDF first. If I hadn’t done this I wouldn’t have known that on the Mac, Lightroom 2 defaults to 32 bit operation. If you have OS X.5 (Leopard), which is 64 bit, you need to uncheck the default preference. Go to the Applications folder, highlight the Lightroom application, hit Cmd-I and uncheck the item shown below. On the PC, Lightroom 2 will detect if you have a 64 bit OS and you don’t have to do anything.
|