
Although specific timing varies by region, fall is the season to photograph the red deer rut. Red deer are native to Europe and the biggest and most spectacular deer in Denmark. You can find them in Asia and North America, too. Their breeding season provides opportunities for great action shots and storytelling, but doesn’t last too long. With that in mind, if you missed the red deer rut, focus on the fallow deer rut, which comes immediately after. Being aware of the wildlife’s timeline ensures you will never run out of interesting subject matters. But let’s come back to our majestic red deer and see what you should and shouldn’t do when photographing the red deer rut.
What to Do When Photographing Red Deer Rut
Arriving at a location and hoping to get at least a good shot is not a recipe for success. Wildlife photography requires planning, logistics, specific gear, and well-tested camera settings. If you play it by ear, you’ll end up with mediocre photos in the best case. Especially when dealing with a short-lived event, such as the red deer hut, knowing what to do is key. Here are my guidelines extracted from many years of experience.
Do Your Research
It may seem boring to read about red deer, but I assure you it is worth the trouble. Learning the general habits of red deer helps you gauge your expectations, sense the best camera settings, and come up with a suitable photo setup.
Research also helps you pick a location. My advice is to scout your location beforehand to understand the terrain and where the deer congregate. Again, just showing up in a place where you’ve read deer appear won’t work as smoothly as you imagine. I found that I take the best photos when I plan to go to the same location multiple times and become familiar with it.
Also in the research stage, try to find out lighting-related information. Look for apps that tell you the exact sunrise and sunset times, light direction at any hour, a precise weather forecast, and many other useful data to set up the ideal lighting.
Move Slowly and Quietly
Red deer easily startle. You don’t want them to see you or perceive you as a threat. Therefore, use any natural cover you can find to keep a low profile. Avoid sudden movements because a moving object is more visible than a stationary one. Make as little noise as possible, which includes muting your camera and phone, wearing suitable clothing, and setting up your gear in advance (e.g., mounting the camera on the tripod beforehand if you use one).

Prioritize Safety and Welfare
Like with any other wildlife photoshoot, when it comes to photographing the red deer rut, the animal’s well-being and your personal safety should come first. Red deer are considered the most dangerous deer species here. Stags are unpredictable and highly dangerous during the rut due to high testosterone levels, which means they may get aggressive, and not just between themselves. It rarely happens, but one can’t completely exclude the possibility, so stay focused.
Keep the Minimum Distance
There are minimum distance requirements you should obey. In parks, never get closer than 40 meters. In the wilderness, you should keep an even greater distance. For instance, the British Deer Society recommends extending the minimum distance to at least 100 meters when photographing a rutting stag. That’s why you should do your homework and research red deer before planning a photoshoot.
Time Your Visit Wisely
Also relying on research, getting the best photos depends on how well you time your visit. Animals aren’t equally active throughout the day. For red deer, the best photographic opportunities usually appear during the first light of morning and in the late afternoon or early evening. They prefer the twilight: dawn and dusk. Uncomfortable as it may be for you, these are the times of day to book in your agenda.
The weather may be the catalyst for your red deer photographs, so embrace it. Cold, clear nights followed by misty mornings create a dramatic atmosphere that enhances your shots. Just imagine capturing the stags’ breath as they roar in the cold morning air. This sort of atmospheric shot is what wildlife photography is all about.
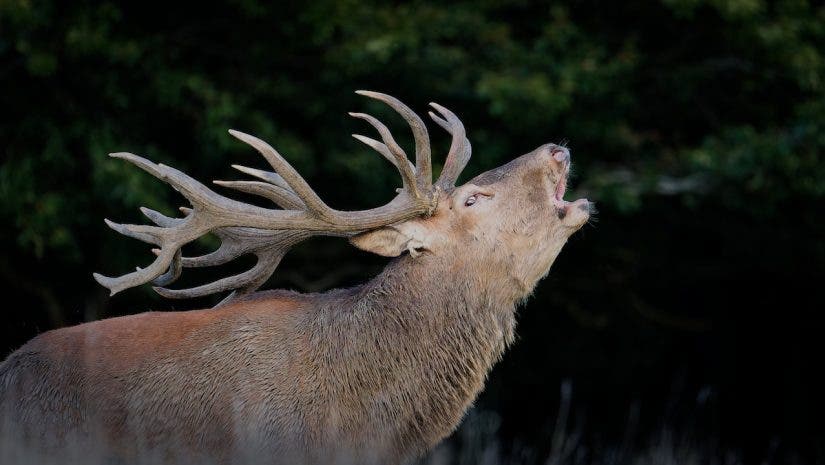
Focus on Behavioral Moments
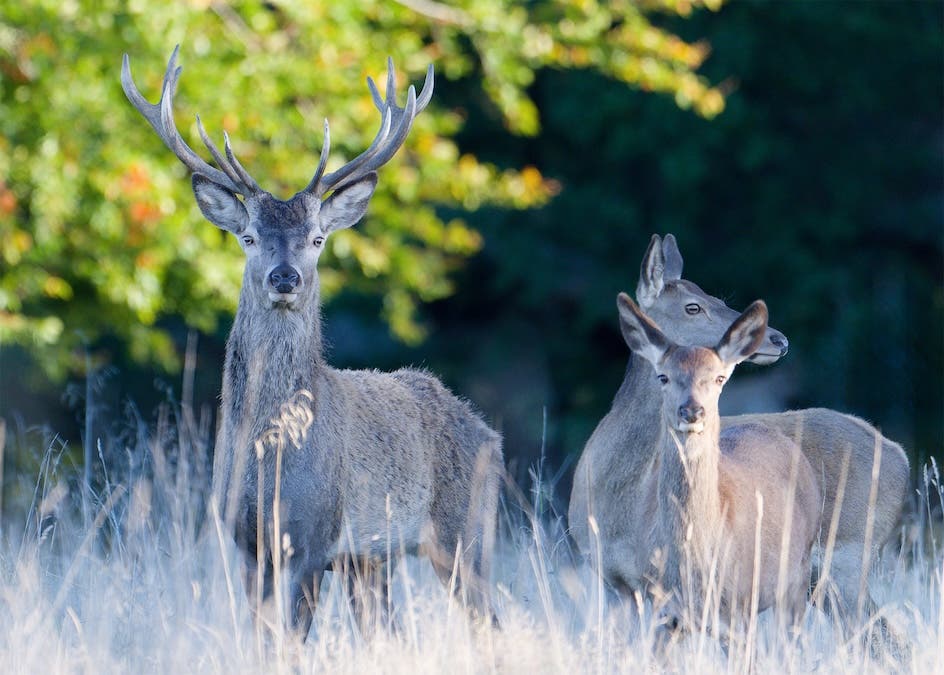
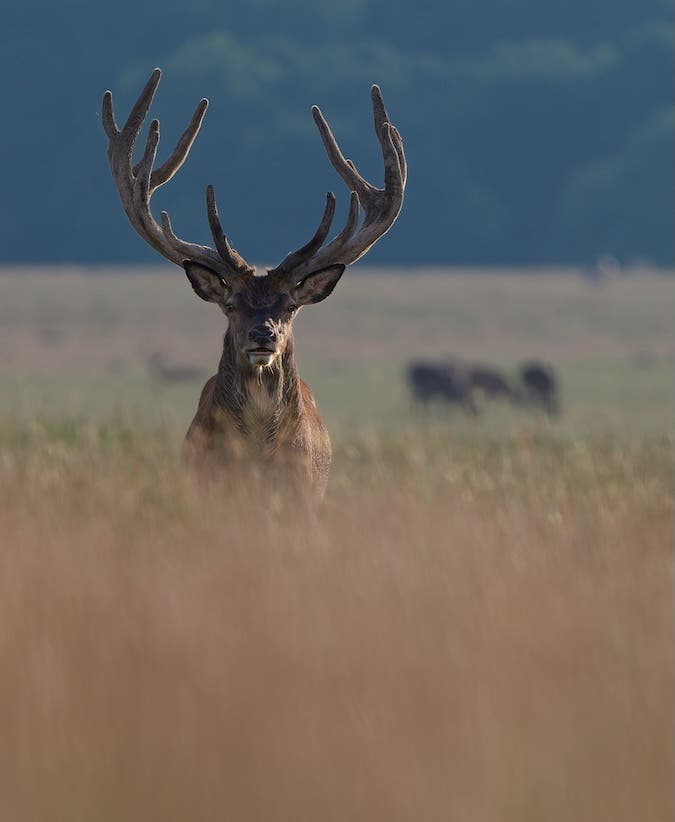
Capturing any scene from a red deer rut may be a Bucket List moment, but if you want to take your wildlife photography to the next level, don’t settle for portraits and environmental shots. Instead, look for iconic, action moments, such as a stag roaring (bellowing) (even better if it is in the cold air and you can see the breath), a stag scraping the ground (wallowing), stags proudly parallel walking to display dominance, or stags in combat with locking antlers. And while the fight for dominance provides a lot of adrenaline, don’t forget about the hinds’ reactions. They make interesting characters as well.
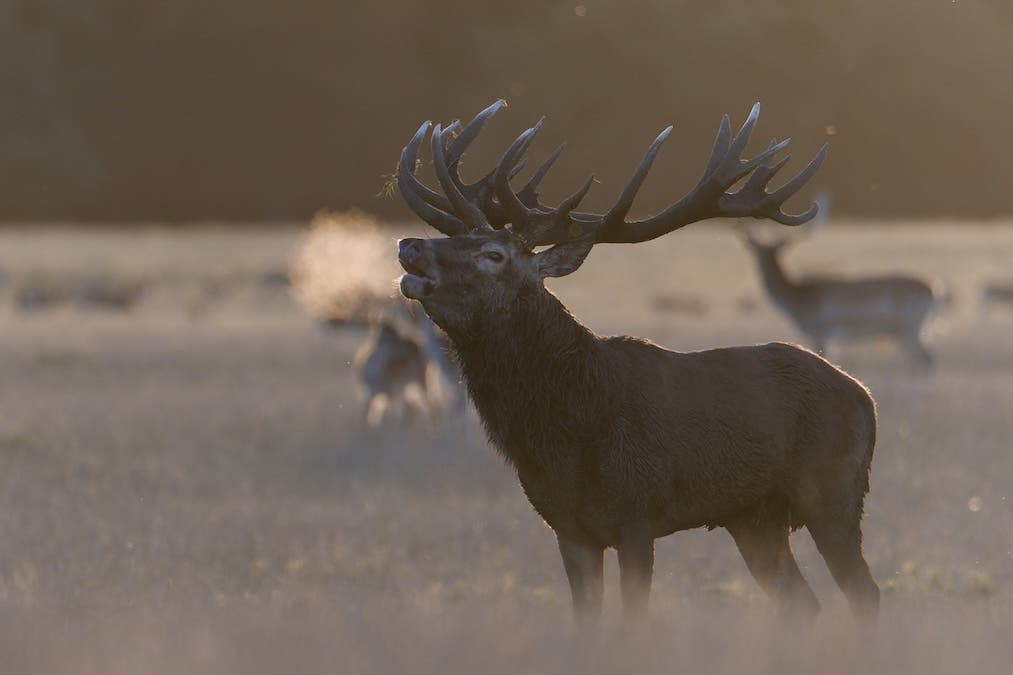
For the most impressive shots, I advise you to use backlighting to add drama and capture that beautiful rim of light.
Use a Telephoto Lens
Because you must keep the minimum distance but still get close-up images, you need a telephoto lens. In my experience, a 400mm or longer lens is a must when photographing the red deer rut. It helps you frame your subject from the get-go and avoid cropping your photos in post-processing to improve composition.
Use Fast Shutter Speeds
Fast shutter speeds are required to freeze motion and capture sharp, clear action images. Especially when the deer are fighting, walking, or running, use a shutter speed of at least 1/1000th of a second or faster. When they are bellowing, you can get away with a much slower shutter speed. If the twilight doesn’t provide enough light to correctly expose the image, consider increasing the ISO value instead of opening the aperture. A wide aperture creates a narrow depth of field and makes focusing difficult.
What Not to Do when Photographing Red Deer Rut
As we often learn from mistakes, I’d like to share mine with you. It’s easy to focus on what you have to do, such as camera settings and composition, and forget about those little things that may ruin your photos or your day. And because we are dealing with wild animals, a few precautions are in order.
Do NOT Assume Deer Are Tame (Even in Parks)
Let’s establish one thing: red deer are wild animals, not cute cartoon characters. Even deer in public parks remain wild animals. They may be more familiar with humans and have a lower “danger circle”, but they are still wild animals. Besides, the rutting stags are full of testosterone, which makes them more aggressive than usual towards their fellow stags and towards whoever comes their way.
Do NOT Move or Wave If a Stag Approaches
As a rule, if a rutting stag advances toward you or shows signs of aggression (e.g., walking parallel and glancing at you), do not shout or wave. Back off slowly and quietly. Don’t provoke it. It weighs around 200kg, has antlers up to 1m long and 15kg in weight, and can reach approximately 70km/h. So, be cautious.
Do NOT Approach Too Closely
This is the most critical rule. Never enter the deer’s “circle of fear” or comfort zone. Research the minimal safe distance and stick to it. Buy a longer telephoto lens if you need to, but don’t get too close.
Do NOT Get Between Deer
Even with the safe distance in place, you must consider the animals’ positions. As another rule you should swear by, never position yourself between a dominant stag and his group of hinds (harem) or two competing stags that haven’t engaged yet. They will, and you’ll be in their way.
I accidentally broke this rule on my last visit to a red deer park, even though I didn’t venture much. It can be especially difficult to stick to the rule in parks, where the deer per square kilometer density is higher than out in the wild. I was photographing the dominant stag and didn’t realize that a contender had moved behind me. Suddenly, the stag turned and saw me and the contender at the same time, and decided to move towards me. I tried to make myself smaller to signal that I’m not a threat, but when that didn’t work, I started to walk backward slowly without any sudden moves that could startle him. A few moments later, he focused his attention on the other stag, who decided to do the same as me: move away.
Do NOT Be Disruptive to Others
Because my last encounter with red deer was in a park, I must add another DON’T to the list, which is don’t disrupt other people. Be mindful of other photographers and observers and respect their space and view lines. It’s less likely to be the only one photographing the red deer rut in a red deer park, so try to be thoughtful and respectful with both animals and humans.
Final Thoughts
For me, photographing the red deer rut is a thrilling experience that’s possible for only two months a year. I take this opportunity and the responsibility that comes with it seriously and thoroughly prepare, respecting animals’ welfare, prioritizing safety, focusing on storytelling, and being mindful of everyone around. So, follow my dos and don’ts, and you’ll capture stunning images while enjoying the amazing natural event that the red deer rut is.