Geeky as this may sound, woven nylon rope is a wonderful thing. The quarter-inch-thick white stuff costs 38 cents a foot (in my neck of the woods) and can stand over 200 pounds of pull before it snaps. It doesn’t rot, tangle, or stretch, and a few bucks of the stuff (plus, in some cases, a few pennies worth of hardware) can be used to create a camera brace and a dead accurate flash meter. It can also save your knee joints and limit the possibility that your lighting equipment might topple over!
Intrigued? Read on.
The Rope Monopod
Most photographers use monopods or tripods to steady their cameras and, in truth, even at fast shutter speeds, picture sharpness increases with steady support. The trouble is, tripods and monopods are often a drag to carry, especially if you are out for a day of fun and not planning to make long exposures.
 Well, there is a camera-steadying device you can make for two bucks that weighs almost nothing. To pique your interest even further, you can even stash it in your pocket. All you need is a 1/4-20 eyebolt, two 1/4-20 locking nuts, and 5-6 feet of nylon rope.
Tie one end of the rope to the eye of the bolt. Thread the bolt into your camera’s tripod socket and you’re all set. Get ready to steady things by raising the camera almost to your eye, stepping on the free end of the rope and the pulling the rope taut by raising the camera up that last little bit to the shooting position.
The taut rope between the camera bottom and the underside of your foot will create (for lack of a better term) a rope monopod. You’ll find that you can probably gain one or two shutter speeds in handholding ability once you have something to brace against, in this case the taut rope.
Putting the middle of the rope under your knee will probably work just as well if you have to do a low angle shot. My monorope (ropepod?) has been with me for years and it’s provided me with the extra steadiness I’ve needed on more than one occasion.
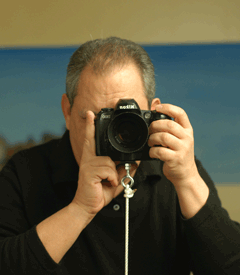
The photo of my monorope in use, above, was taken with the aid of a mirror (note that the word “Nikon” is reversed. As an aside, this is NOT the way I normally hold my camera but I wanted to be sure you would be able to see the eyebolt.
The $6.00 Flash Meter
Because of the way distance affects the intensity of light if you know the correct exposure for a flash at one distance from a subject you can figure out the exposure for that flash at other distances. While many of today’s photographers rush to embrace automation, for many subjects (especially dark ones, light ones, and light ones in the middle of big dark rooms) manual flash often works better.
Furthermore, if you are doing portrait lighting with your flash on a light stand (instead of in the camera’s hot shoe), a mega-dollar flash meter is certainly nice, but piece of rope attached to the flash, with knots in it at 5, 7.5, 10, and 15 feet, can provide exposure information that is just as accurate as the info provided by the few-hundred-buck meter.
While a good flash meter certainly doesn’t cost a million dollars, here’s how to get your $6 “ropemeter” working just right. You’ll need six index cards with 2.8, 4, 5.6, 8, 11, and 16 written on them (use a broad tip marker and make the f-stop numbers large so they are easy to read), a Kodak Gray Scale, a roll of ISO 100 slide film and your flash set on manual.
Pick an average-sized room for your test. Put your flash on a light stand and position the stand so it’s 10 feet from your test subject. Make a series of flash exposures, and in each frame have the subject hold up the gray scale and an index card with an f-stop number on it that corresponds to your lens f-stop setting. Get the film processed normally and look at your results on a light box. Find the slide in which all the gray scale steps are visible and the f-stop number on the card in that frame is the correct exposure for 10 feet. From this one slide with its one bit of information you’re ready to make your meter.
Tie a 15-foot long piece of nylon rope to your flash head, measure off 10 feet of it (from the flash head) and tie a knot in it at that point. Likewise, put knots in the rope at 5, 7.5, and 15 feet. Stretch the piece of rope between the flash head and the subject and note which knot is closest to the subject.
The knots represent distances at which the exposure differs by one f-stop from the previous or next knot. If your 10-foot test shot (on the ISO 100) film produced the best slide at f/8 the knot at 5-feet requires an f/16 exposure, the knot at 7.5-feet requires an f/11 exposure, and the knot at 15-feet (or just the end of the rope) means the exposure is f/5.6. While this exposure info is true for ISO 100 speed film (or digital capture equivalent) extrapolating info for other ISO speeds is not difficult. ISO 160 film means you close the lens down one-half f-stop more and ISO 400 film requires you stop the lens down 2 f-stops more than your ISO 100 exposures.
Likewise ISO 64 film requires that you open the lens up one-half f-stop than the ISO 100 settings and ISO 50 film means you open the lens a full f-stop from the ISO 100 f-stop settings. Lastly, midway distances between the knots (which are easy to estimate) represent one-half f-stop exposure steps.
Even if you have that mega-buck flash meter (and I carry two of them) a ropemeter is a helpful device. Because the ropemeter is based on mathematics and the results must be correct (unless your flash is broken!), a simpler, five-foot-long version of the ropemeter can be used as a test for your flash meter. Although you have to go through the entire 10-foot flash to subject test (because the longer length means slight errors in rope length affect the outcome less) the five-foot version of the ropemeter costs less than two bucks. As a pro, knowing that my flash meter is working properly is priceless…. pretty good deal for two bucks!
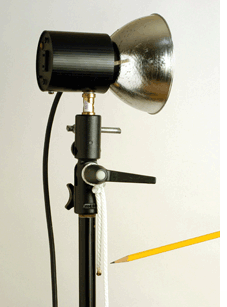 Question: Who would think that a piece of rope (note the pencil pointer) could be an accurate flashmeter?
Answer: YOU, after reading this article!
Note that for the best accuracy you should measure and knot the rope AFTER you tie it to the flash head so that the section of rope used up by the knot tying won’t affect your measurements.
Hang Your Pack and Save Your Back!
An easy way to stabilize a fully extended light stand with a heavy flash head on top of it is to hang a weight from the base of the stand. Since the flash head is often attached to a battery or power pack by a cable anyway you can use either type of pack as your weight.
Some photographers I know use wire cable to make a loop to hang the pack from on the stand; others use large key rings to achieve the same purpose; while others use all sorts of bullet-proof metal hardware designed for mountain climbing! But, in reality, you’re only hanging a pack with a maximum weight of maybe 20 pounds (and that’s for a 2000 WS pack, figure half that for a 1000 or 1200 watt second pack) and a one foot piece of nylon rope (38 cents worth) can do the same bullet-proofing job.
Hanging your power pack from your light stand has another, often overlooked, advantage. In addition to stabilizing your stand, it also raises the power pack off the floor, so you can change settings without having to stoop down to get to the pack’s switches. If you decide the nylon rope loop trick is for you, read the next section on knots before you make your loop.
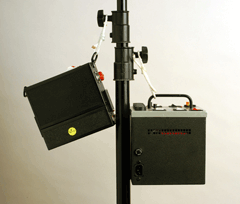 Although I used two different packs hung from a light stand for this photo, it is not a typical real—world situation. But either pack can be a stabilizing influence and has the added benefit of eliminating stooping to change the pack’s settings.
What knot to do?
All of these tricks require that you prepare the nylon rope and use the right knot to get the job done so here are three things to do to insure that your knots and rope don’t loosen or fray (more than your nerves!).
1. Use a match to melt the ends of your nylon rope so it won’t fray. Be very careful not to touch the melted end until it cools completely because melted nylon is VERY hot!
2. When tying two ends of a rope together use a square knot because it won’t slip and send your power pack crashing to the floor. A square knot is a double knot created when you place the left piece of rope over the right piece of rope for the first knot and reverse the process for the second knot (right over left). It can also be tied by starting off with the right side going over the left side followed by the left side going over the right for the second knot.
Although this sounds confusing it is really a very simple kind of knot…. right over left, left over right…. look at the diagram to see what a loosened square knot looks like.
3. It has been said that pro photographers often wear belts and suspenders at the same time because hard-earned experience has taught them that if something can break, it will, and most times this happens at the most inopportune moment. Knowing this to be true, as added insurance against a square knot loosening, I drip a few droplets of Crazy Glue™ on my square knots to secure them forever.
Two caveats are worth noting:
- Work in a well-ventilated area…. Crazy Glue™ gives off toxic fumes you want to avoid inhaling.
- Don’t touch the glued knot until the Crazy Glue™ is completely dry because wet Crazy Glue™ sticks to skin instantaneously.
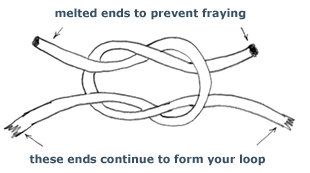 This is a sketch of a loosened square knot. It’s a type of knot worth knowing about if you decide to do some rope tricks.
So there you have it: a light meter, a camera brace, and a back saving, stability-increasing loop. all for less than ten bucks!