If you think all professional YouTubers, podcasters, and videographers have a fancy YouTube studio in the city center, you are deeply mistaken. Most of them work from home, using the smallest of their available rooms or just a quiet corner in a room normally used for other activities. I believe that how much space you have is less important than how well you set up and use it.
As the Danish Hygge philosophy teaches us, simplicity and connection are the foundation of finding contentment and well-being in a space. So, here is what I’ve learned from setting up my own small room as a YouTube studio. I hope it will inspire you to take the first step, even if it may not be the gigantic step you’d imagine.
Embrace the Reality
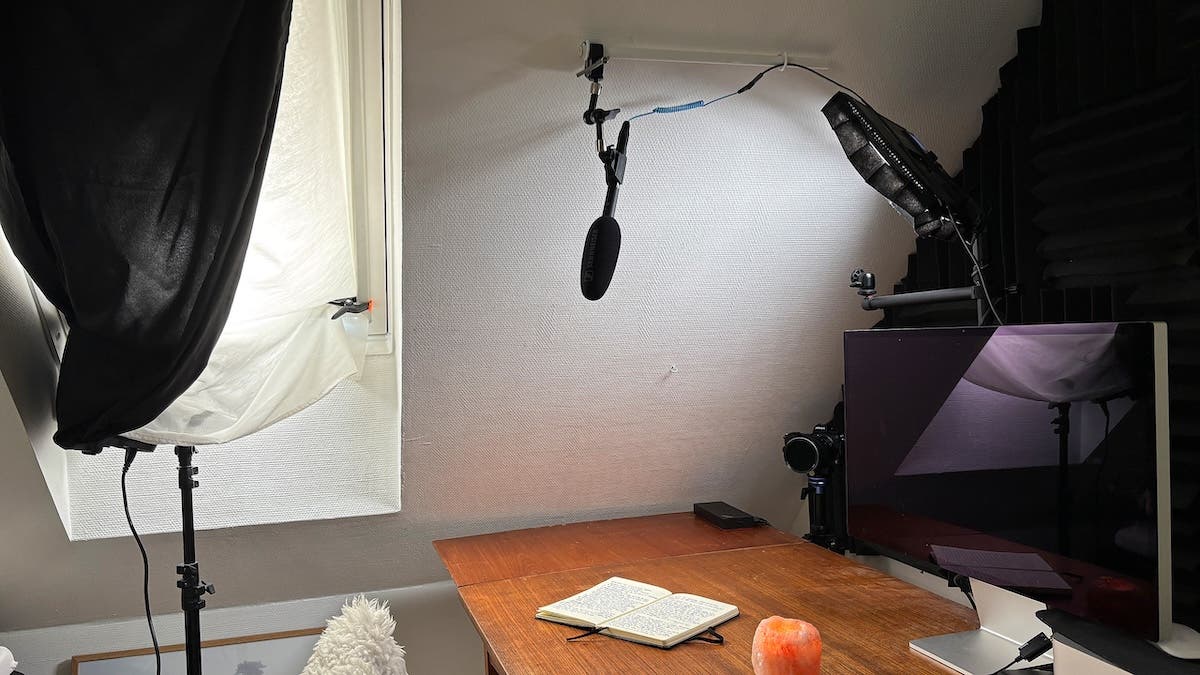
The first thing I had to embrace on my journey was the fact that my YouTube studio wasn’t going to be solely that. It was, and still is, my wife’s home office and a guest room for when people come to visit. It is also the only space in the house for storing my photography equipment. Thus, my YouTube studio functions in several modes depending on who needs it the most. That means I must be well-organized and adaptable. And know at any time where I put my stuff.
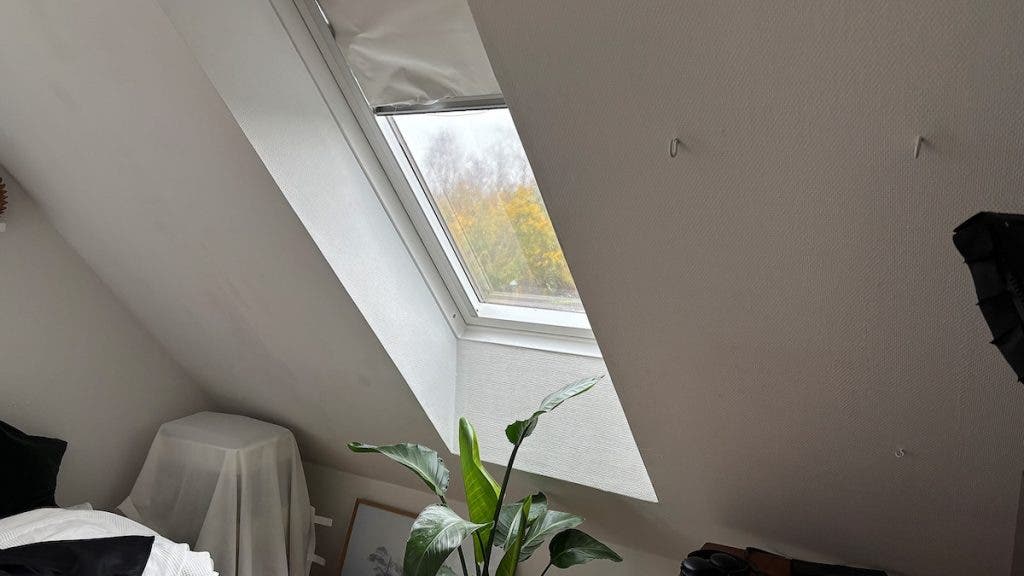
The other things I had to embrace were the room’s size, 12 square meters (129 sq ft), its slanted ceiling, and having windows on two sides. The house’s architecture is a given you have to work with. So rather than fight it, look for comfortable solutions from the beginning. Temporary solutions tend to be a nuisance in the long term.
Consider Possible Camera Angles
If you, like me, have a bed in your designated YouTube studio, it is essential to find at least two camera angles that don’t frame the furniture you prefer not to show or frame it as little as possible.
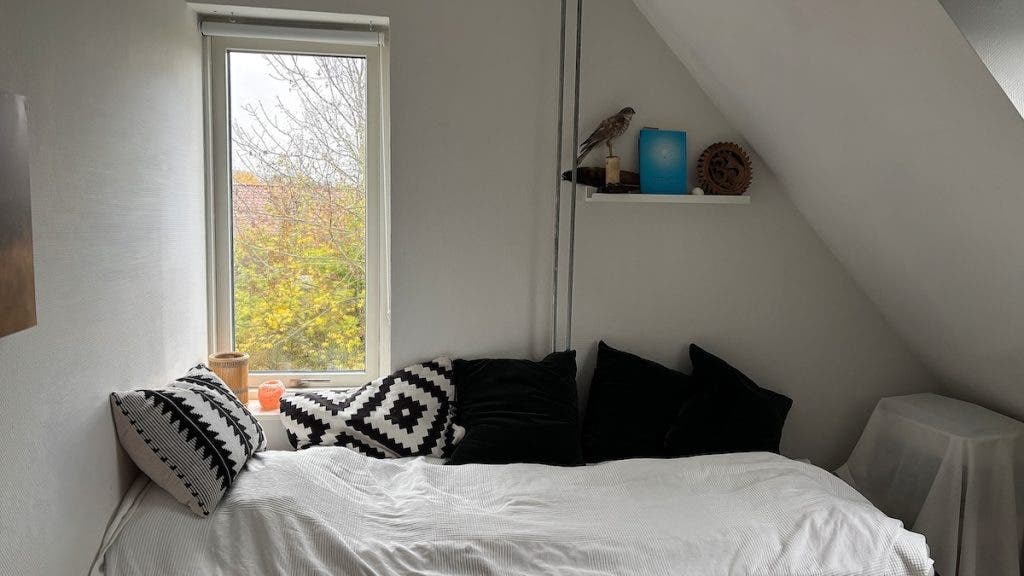
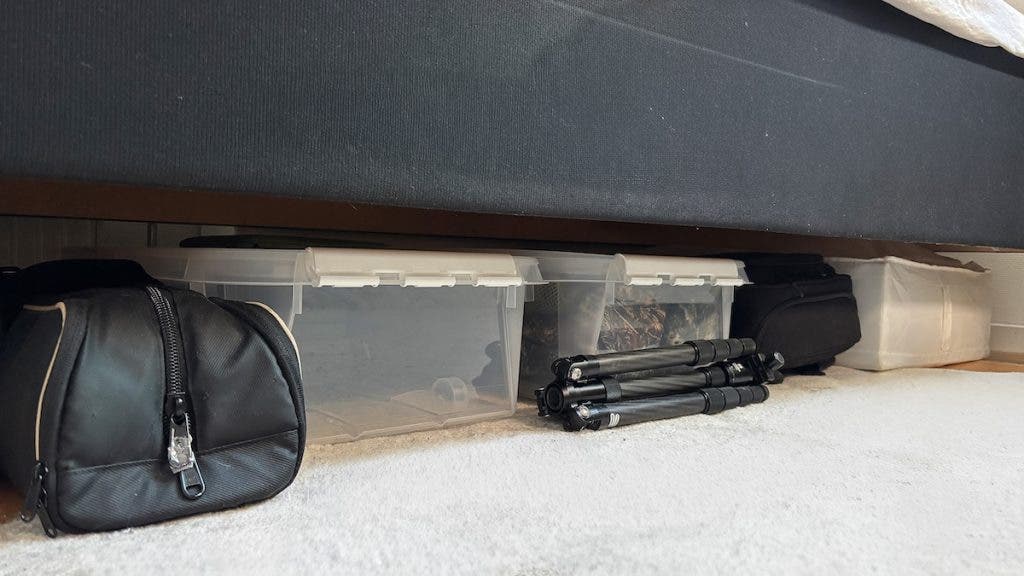
What I do prefer is a camera angle that includes a window because I have natural light even with the curtains closed. I could opt for having the shelves where I keep my camera and photo equipment in the background because they are the means to my art and deserve a place in the frame. However, I’m not always that organized to make the photo gear shelves look great in the frame. However, it’s easy to reach for anything when I record something that needs demonstrating. What I don’t use very often and don’t need to keep at hand is safely stored under the bed, which exonerates itself in this way.
After a bit of fiddling and test recording, I have found my two possible camera angles. One with a window and a small cozy shelf, and the other with my photo gear shelf. I advise you to do the same experiment before moving forward with your YouTube studio. Once you know the camera angles, you can set up lighting, microphones, and additional equipment.
Lighting Design Is Essential
Even though I like natural light, there is no way to record professional videos without artificial lighting. For this, I have a GODOX LEDP260C and a GODOX SL100D. The LEDP260C is a permanent feature of the room, and it functions as a desk light on office days. However, when I record videos, I turn it. So, it bounces into the slated wall and gives a little soft fill light to my face. The SL100D I put out only when I’m recording YouTube videos.
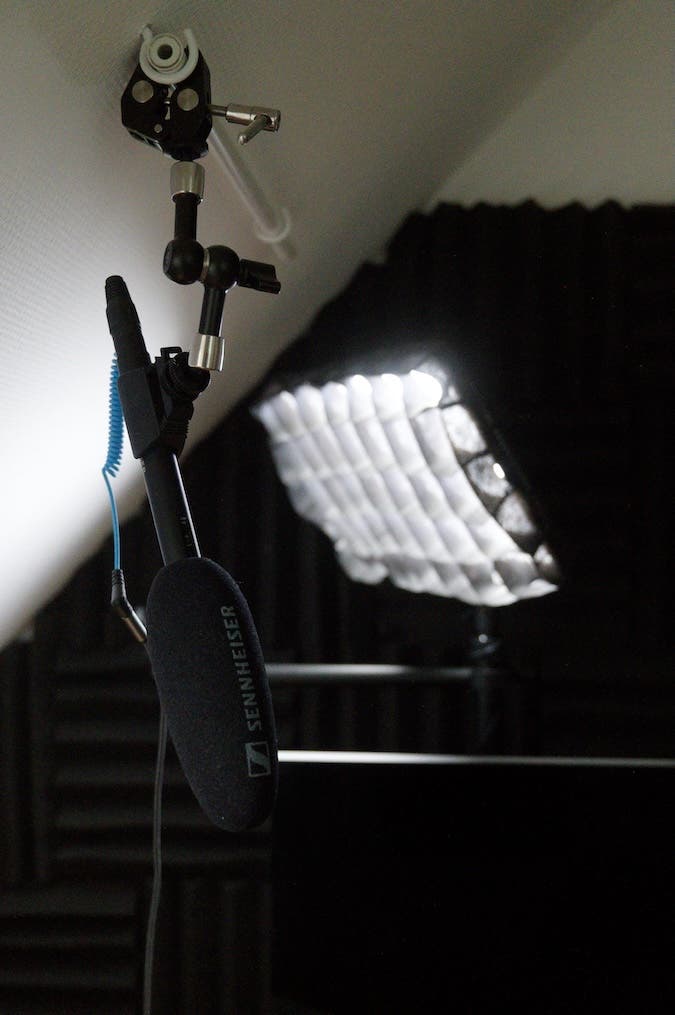
In a studio, you have to think about light direction, intensity, and quality in order to improve your videos. A soft, diffused light is better for filming YouTube content because it produces a more natural-looking finish. It is also better for you because in a small room, there is practically no space between you and the light, and you don’t want to go blind or sweat from the heat coming from the light source. You should always use a diffuser, and for me, the 90cm Octagonal softbox seemed to do the trick.
However, I soon found out that I simply have no space to put it up, which means I must “Improvise, adapt, and overcome,” as Bear Grylls says.
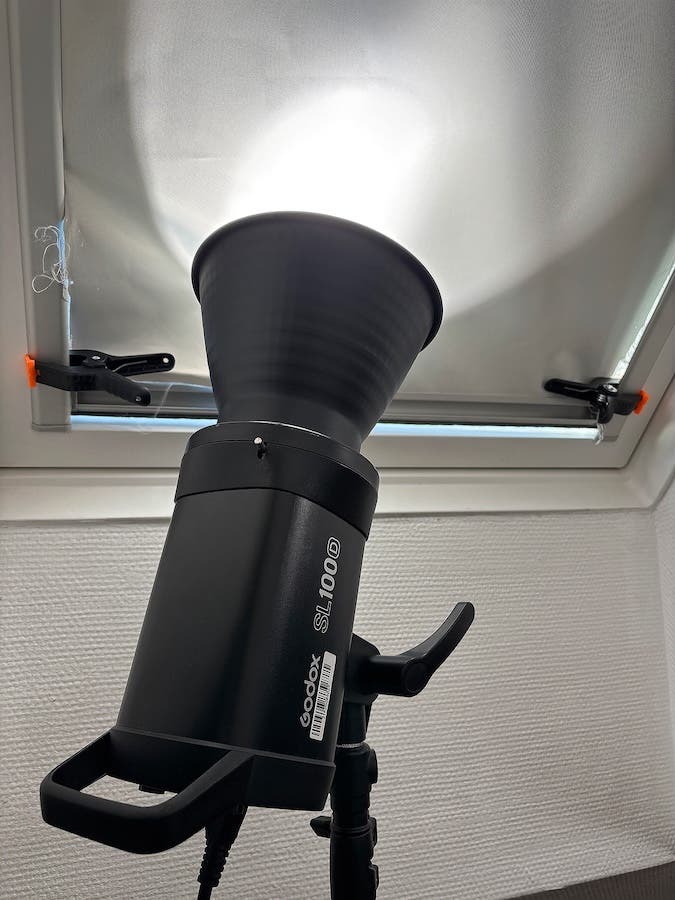
My Lighting Gear Trio
Instead of my glamorous softbox, I currently use three things. Those are the roller blinds, a cheap set of white curtains, and a piece of black fabric. I arrange the SL100D to direct its beam of light into the blinds, which bounce the light back and through the diffusing curtains. This soft light is what reaches me and gets recorded. The black fabric is for making sure the light doesn’t go anywhere else. I don’t want it to spill in the entire room and lose its efficiency.
Of course, you can use a dedicated diffuser, reflector, or blocker instead of all these improvisations, but if they are outside your reach, know you have options.
Soundproof
Sound is also essential for professional YouTube content. Nowadays, many people are just listening to YouTube videos while driving, walking, or on their commute. You really don’t want them to hear whatever happens outside your home studio (e.g., traffic, kids, pets, a TV running somewhere, phones ringing, people talking, etc.).
If you can’t soundproof the entire room, try to soundproof at least the noisiest side (e.g., the street wall). You also don’t want to record any in-studio ambient sounds, such as chair creaking, computer whir, air-conditioning units, or ventilators. Either get rid of the noisy item or move your setup away from it. For a versatile YouTube studio solution, use soundproof panels that you can put away once the recording session is over. It also helps to have heavy furniture blocking the walls and thick carpets on the floor. It reduces the room’s natural resonance.
For my studio, I chose to soundproof the wall behind the computer to reduce rebounding noise and block sounds coming from that part of the house. Sometimes, I pile up a couple of pillows on the desk as well to soundproof it a bit more against vibrations and echo. I live in a quiet area, so outside noise is not an issue, but I’m still careful to have the microphone pick up only my voice. By the way, I use the Sennheiser MKE600.
Bring in the Extras
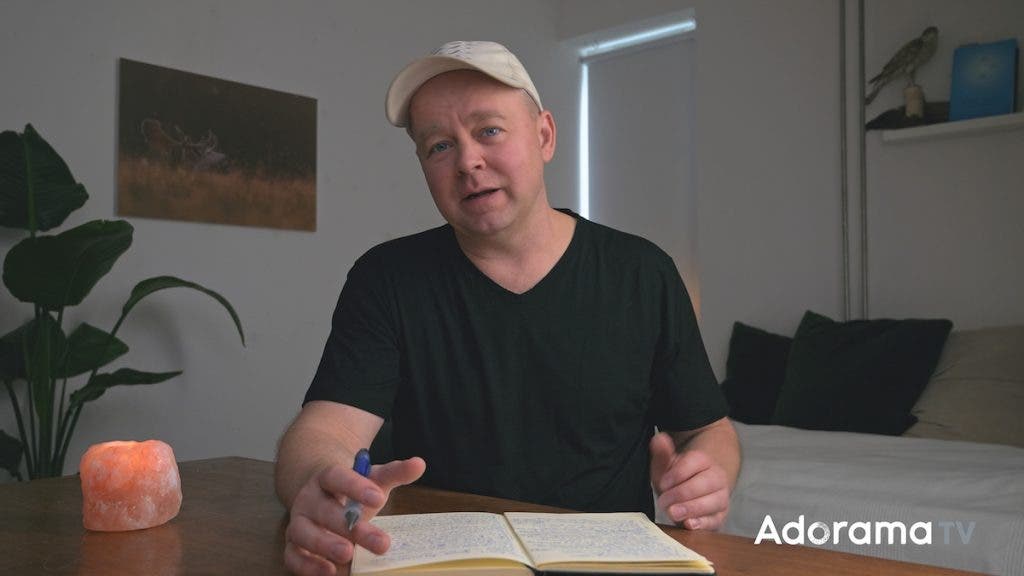
I don’t like to be crowded by gear, but in this case, I find having an external monitor extremely useful. I put it on the desk below the camera so I can see it without having it in the frame. The external monitor allows me to see the exact framing and ensure the gear I show or the demonstration I do is correctly framed. As I often have a camera or lens in my hands while speaking to the camera, it’s important to be sure the details I speak about get in the frame.
This may not be the case for everyone, but I record my YouTube videos sitting at a desk. It’s a personal choice, but it has a few benefits, the main one being that I can have objects lying around. For example, if I speak about how to hold a camera at some point during the video, it helps to have the camera at hand and bring it into the frame at the right moment. I find it helpful to keep my notes close by and ensure I stay on point, follow the narrative, and avoid having to record the same video multiple times or make a lot of cuts. I prefer a classic notebook, but a teleprompter can work as well.
Also, a personal choice, I often have a cup of coffee or tea or a Himalayan salt candle lying around for a bit of atmosphere and friendly vibe. The advantage of a YouTube channel over a TV channel is the bonding experience, and I appreciate the authenticity of my relationship with the audience.
My YouTube Studio 5-minute Setup
In my opinion, it shouldn’t take you more than five minutes to get ready to record a YouTube video in your home studio. Even if I have to move things around before pressing Record, if it takes more than five minutes, it becomes a struggle. So, make sure you set up everything in such a way that it provides a smooth workflow and doesn’t kill your inspiration.
My 5-minute setup includes the following steps, which actually make a pretty good checklist, so feel free to adopt:
- Take out the Godox SL100D from storage, hang out the white curtains and the black fabric. Turn the light on!
- Position the Sennheiser MKE600 microphone as to be just outside the frame. Turn the microphone on!
- Position the camera(s)
- Check lighting and camera settings. Take a last look at framing.
- Arrange the extras and press Record!
Final Thoughts
I hope that by showing you both the technicalities and the improvisations of my home YouTube studio, I help you realize that any small room can work as a studio. You are better off with professional recording and lighting gear in your home than with mediocre gear in an expensive studio rented by the hour. Just so you know how to spend your money. In a way, I like that you can tell that my studio is not a professional one. It makes my content more authentic and brings me closer to my public. However, I am constantly thinking of ways to deal with the space’s limitations and produce the best experience for my viewers. So stress, but don’t overstress.