I frequently discuss wildlife photography mistakes in my videos because I know just how disappointing it is to spend an entire day in the forest or by a lake only to come home without the great shots I want. Back in the day, my photos were okay, but not impressive, which got me thinking that I do 80% of the job right, and only a small 20% keeps me from taking the amazing photos I dream about. So, I assessed my workflow, wildlife photography techniques, and overall approach to wildlife photography and found the mistakes that were keeping me from taking my work to the next level.
As you’ll see, they don’t involve big changes; rather, they nudge you to be more intentional about your photography and open to new ideas and techniques.
Workflow Mistakes
It may seem odd that I start with workflow-related mistakes when any other photographer would focus on gear, but bear with me. I do have a point, and a good one, too. Wildlife photography relies on workflow more than you think. It’s impossible to photograph even a squirrel if you don’t know where to look for it, how close you can get, how it behaves, and what gear you need for this task. This type of wildlife photography mistake has held me back for years.
Holding Back on Going for the Dream Shot
That’s an obvious one: you’ll never take the amazing shot you dream about if you don’t try it. I used to believe that my technical skills were not advanced enough to get me where I wanted to be. So, I didn’t bother to try to take the stunning photo I had in my mind and instead played it safe. The result: unsatisfying, okay shots.
I urge you to try and take the risk. Think about what your dream image looks like. What subject matter, location, light, pose, and background does it have? What gear do you need to take it? Be very specific about it.
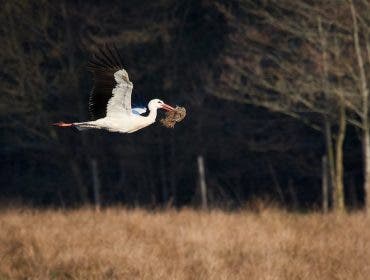
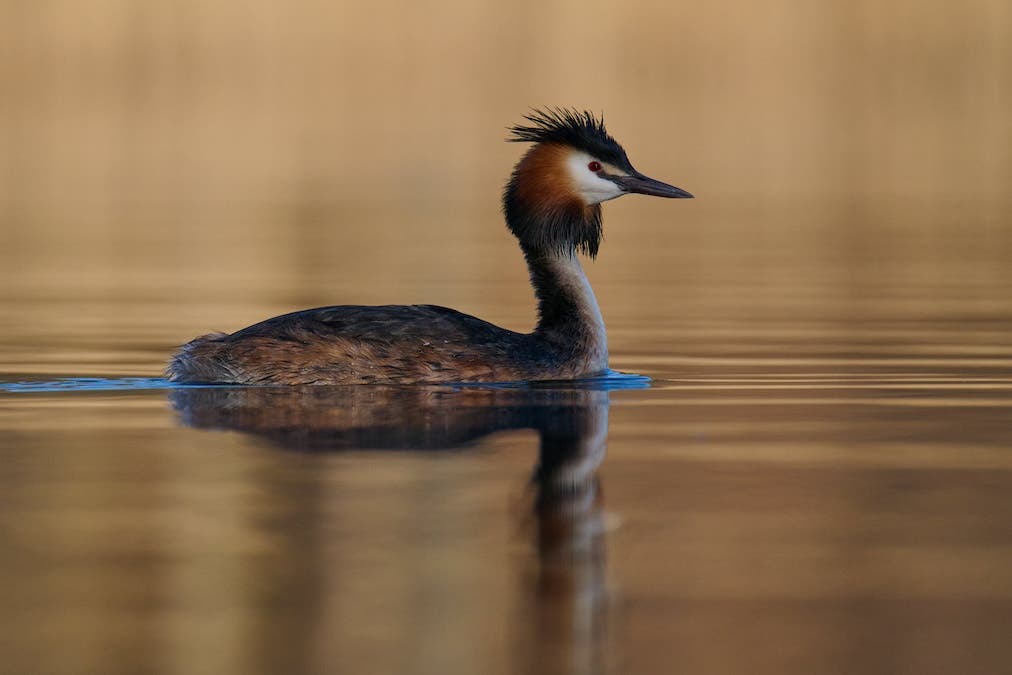
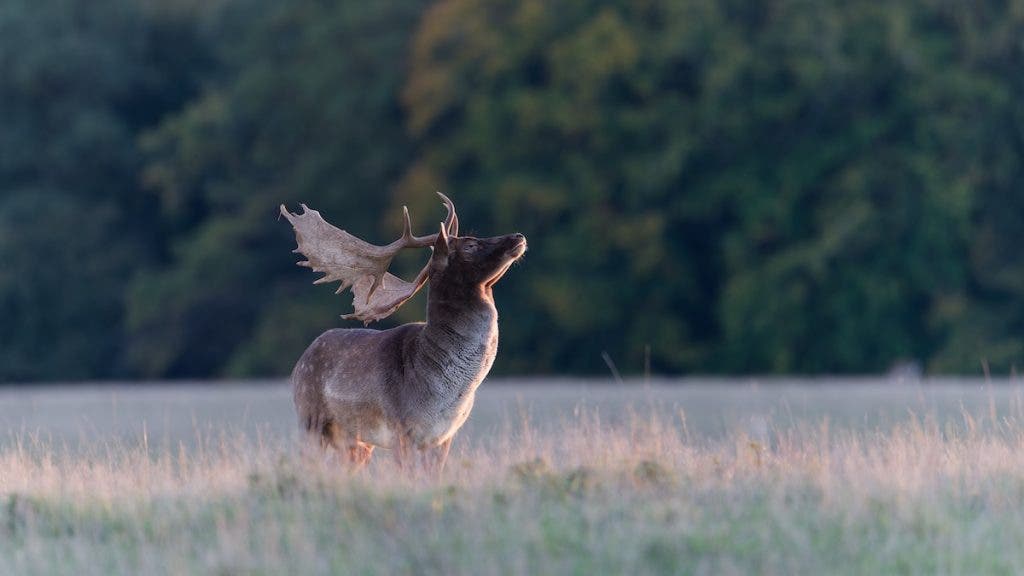
A bird on a lake is not the vision to get you a stunning wildlife photograph. But a grebe swimming in the golden light coming from the reflecting of a yellow building on the other shore makes this shot much more interesting. To get that reflection, I knew I had to be on the eastern side with the sun behind me, and just wait at the spot where I could see the reflection. All I had to do was wait for a bird to swim by.
Once you have a clear image in your head, you can plan for it. You can find the location and choose the time of day. Assess your gear and rent the lens you need. Plan a scouting trip and settle on the logistics. Taking a chance on your dream shot improves your chances and provides a step-by-step process.
Not Anticipating the Animal’s Behavior
Another mistake I used to make a lot was getting into a location and sticking to the one place I thought convenient. I was photographing whatever got into my sight without any anticipation of what the animal was going to do next. I didn’t think I could change my position in time to capture my subject from a better angle and create a more interesting composition.

Learning to anticipate the animal’s behavior gave me the time I needed to respond and take an intentional photograph instead of reacting and pressing the shutter release from where I was standing. It takes some time, but it is worth it. Learn to observe, and you’ll notice that most animals have sequences of gestures they perform again and again. It will give you time to think about composition, light, and storytelling calmly and stay away from the panic mode, “I must take a shot, any shot, to document the fact I was here.”
Seeing Lack of Gear as a Limitation
This is the mistake any beginner photographer makes. We tell ourselves again and again that we don’t have the proper gear to get great shots, which crushes our morale and makes us not even try to improve our photography.
I believe we should see the lack of gear as an opportunity to learn and become better photographers. Instead of focusing on what you can’t do, focus on what you can do. Maybe you can get closer to your subject to compensate for not having a long enough telephoto lens. Perhaps you can learn to camouflage or shoot from a hide if your gear is too heavy to be carried around. Or you can learn new wildlife photography techniques that work around not having a camera that performs well in low-light conditions. Improvise, adapt, create opportunities.
Technique Mistakes
To go to the next level, you must master photography techniques. That’s no way around it. However, I’m not talking about aperture and shutter speed, as I am sure you already know that very well. That’s the 80% that gets you to taking okay shots. I’m talking about that extra 20% that takes you to taking great shots. For wildlife photography, I found this 20% to be in the following:
Holding the Camera Incorrectly
One of the most frequent technical mistakes in photography is holding the camera incorrectly. Any tiny tilt of the horizon means you must edit the photo to straighten it. You may only rotate it by a few degrees, but you still have to crop it to eliminate the dead corners. Therefore, you reduce image resolution and may interfere with framing (e.g., changing the amount of space in the direction of the animal’s gaze).
This mistake has an easy fix. Just turn on the camera’s virtual horizon option. When the line is green, the horizon is straight.
Using the Wrong ISO Setting
A high ISO value helps you take good shots in low-light conditions and maintain a fast shutter speed to freeze motion. You shouldn’t be afraid of using a higher setting. However, a high ISO value also reduces the image’s amount of detail and its dynamic range. You get less data to work with in post-processing. In case your camera is not a top-end one, you may also get ISO noise.
What I’m trying to say is that you should aim for a low ISO value without limiting yourself to low ISO values. A 6400 ISO from time to time is worth trying in order to take your dream shot. Just be aware of its advantages and limitations. Again, be responsive and intentional about the environment instead of reacting based on strict rules, suppositions, and preconceptions.
Lacking Knowledge of how to use Light
Most wildlife photographers pick a location, get their camera, and go for it. The problem is they don’t consider lighting, and, as a result, they create for themselves a challenging photo setup with harsh light and shadows. Although in wildlife photography, all you have is natural light, you still get to choose the lighting design and the light’s features.
For instance, choose beforehand what type of lighting you want. It may be front lighting, subtle side lighting, or rim backlighting. Also, choose the time of the day that provides the quality of light you imagine. I prefer shooting at early hours of the morning or late hours of the evening, during golden and blue hours, because I like that soft, dreamy effect. Think about what you want to say and how you want to go about saying it.
Pixel Peeping
Pixel peeping is the excessive focus on image quality that takes your attention from lighting, composition, and storytelling. As a beginner in wildlife photography techniques, your focus may solely be on getting the shot. You do want sharp images with the animal in focus, but not to obsessively think about image quality.
Instead, you may try to get closer to your subject to avoid having to crop the image in post-processing. That will reduce its quality and trigger your pixel peeping obsession. Other than that, try to remain mindful and invested in storytelling and composition.
The Big Awkward Mistake in Wildlife Photography
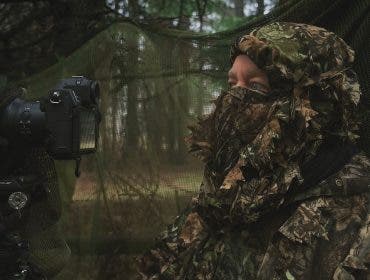
Don’t be afraid to be a geek and look like a fool. Wildlife photography has so many peculiarities that you are allowed to go over the top. For me, the most awkward one was using camouflage. This had held me back for five years, if not more.
When I finally realized the advantages of having a proper hide and placing it in locations where animals like to come, I could get much closer to them, be more relaxed, and take better pictures. At the same time, I could photograph animals that live in the wilderness and get easily startled, not just those living in parks and used to having people around them.
The camouflage also helped me get over the fact that I don’t have the 600mm lens I dream about. My 400mm lens was suddenly good enough for the stunning shots I had in my mind. Instead of an expensive lens, I bought a dry suit and a floating hide. That’s my next adventure.

Final Thoughts
My journey in wildlife photography has taught me that growth comes from acknowledging mistakes, learning from them, and allowing me to do what I love without judgment. You’ll find more examples and tips in my video, so make sure to watch it. But keep in mind that dream shots come with a good understanding of animal behavior, mastering camera settings, and focusing on composition and storytelling.