2015-10-26T14:11:02
Rated 4 out of 5
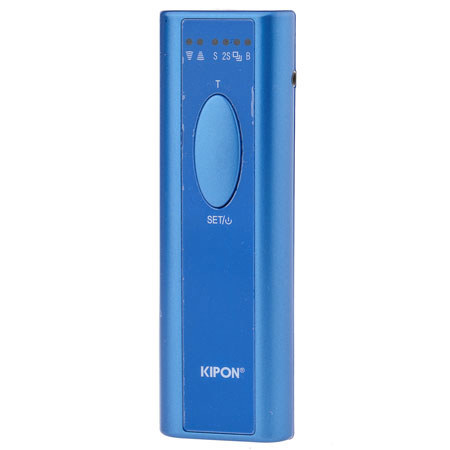
Instructions
FPRC
There are two parts the set, the transmitter and receiver. The receiver is the one with the cold shoe on it. For safety it is a good idea to put the receiver on the camera's hot shoe so it doesn't hang loosely. Or hang it with a lanyard if you prefer. Connect the camera to the receiver with the appropriate wire. To find the correct wire, search FPCBCR* (asterisk) on Adorama
Put the batteries into the receiver with the positive side up in the slot closest to the end of the battery door and the negative side up on the center battery. Close the battery door. Hold down the power button on either unit for a few seconds to power it on or off.
The transmitter features four Modes. You can see which mode you are in by checking the lighted icon on the top of the transmitter. The first mode (S) is standard shutter, use this for regular photography.
To switch modes push down on the bottom part of the button on the transmitter. You will see the red light on top of the transmitter move from one mode to the next.
In standard (S) mode, push down halfway on the top of the button to focus and then fully to fire. To switch to 2S mode press the bottom half of the button.
In 2S mode, after focusing and pushing the shutter the camera will fire two seconds later.
The next mode is Multi Shot mode. Holding down the shutter button on the remote will continuously fire the camera. Make sure to switch the camera to burst mode to get the fasted rate of fire.
The next mode is Bulb mode (for manually controlling the length of long exposures). Set the camera to Bulb mode or change the shutter speed to Bulb depending on your camera model. Half push the button to focus (if you need) to then push down the button fully- this will lock the shutter open in bulb mode. When you have completed your exposure push the button again to release the bulb mode and close the shutter.
Morris G.
2013-02-06T19:00:00
No instructions included, even if there was, I am not sure it would be good. There is not even a box....just comes with plastic encasing.
g8orKris
2013-01-23T19:00:00
I have not been using this remote (no camera cord included). I'll order the Flashpoint camera cord and try it.
Ai H.
2013-01-16T19:00:00
Rated 1 out of 5
I Don't Know Anything
I have not used the product. It came in a little plastic zipper bag without instructions, with no information about what it is (no useful labels, even). I haven't been able to find anything online about the necessary cable, either. Didn't even sport a brand name to help me dig for the cable, so it was good to have this review request so I could recall the brand name. So far, it's just a useless product.
Stanley H.