Flashpoint Firmware Download
Please select your item below
For all Flashpoint Firmware Updates Please Click Link Below
Instructions
Please download the F1, F2 or F3 Installer Software Package and then choose your product to download the latest firmware updates and install them.
- All firmware updates require a MICRO usb cable (OR USB-C cable)
- Make sure all units are powered off with batteries removed before trying to connect them.
- Make sure to run the installer AND the program (from the icon) by right clicking and choosing Run as Administrator. Only connect the unit by USB to the computer AFTER running the installer and opening the program.
- Make sure to choose the correct firmware file for your model of R2 unit, installing the wrong firmware will render the unit inoperable until the firmware is re-loaded.
- DFU files require the F2 tool, FRI files require the F1 tool
- If the computer is not recognizing the light, you need a better USB cable. A lot of USB cables don’t have the right quality and won't work, try a few and you will find one that will. An original name brand phone cable (Samsung, Motorola, etc.) will probably work best.
- Currently the "F1 and the "F2" firmware tool is available for PC only. A Mac version is in the works, but we have no ETA. Even an older Windows computer can do it; it doesn’t need to be high end by any stretch, The "F3" is available for Mac too.
If you come into the store we CAN update it for you in person.
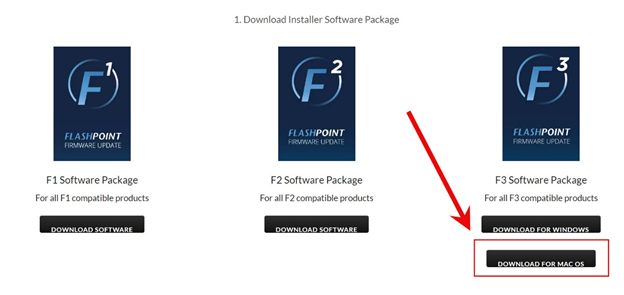
1. Download Installer Software Package


Windows 10 Users
Windows 10 users may need to disable Signed Driver Enforcement. To disable Signed Driver Enforcement:
- Press Windows Key + X to open Power User Menu. Select Command Prompt (Admin) from the menu. Once the Command Prompt opens, enter bcdedit.exe /set nointegritychecks on and press Enter.
- Optional: To enable driver signature enforcement back again, open the Command Prompt as administrator and enter bcdedit.exe /set nointegritychecks off
- If the Command Prompt doesn’t work, you can disable driver signature enforcement for one session of windows.
This is the simplest way to disable driver signature enforcement on Windows 10, but bear in mind that this method will only disable driver signature until the next shutdown/restart . After you restart your computer driver signature enforcement will automatically turn itself on. To disable driver signature enforcement as a onetime trick, do the following:
1. Press and hold the Shift key on your keyboard and click the Restart button.
2. Choose Troubleshoot > Advanced options > Startup Settings and click the Restart button.
3. When your computer restarts you’ll see a list of options. Press F7 on your keyboard to select Disable driver signature enforcement.
4. Your computer will now restart and you’ll be able to install unsigned drivers. - Now install the F1 tool AS AN ADMINISTRATOR (right click and choose Run as ADMINISTRATOR) Also run it from the Desktop AS AN ADMINISTRATOR after installing it with driver signature enforcement disabled.
Update Tips
- Make sure to run the installer AND the program (from the icon) by right clicking and choosing Run as Administrator. Only connect the unit by USB to the computer AFTER running the installer and opening the program.
- Make sure all units are powered off with batteries removed before trying to connect them.
- Make sure to choose the correct firmware file for your model of R2 unit, installing the wrong firmware will render the unit inoperable until the firmware is re-loaded.
- If the computer is not recognizing the light, you need a better USB cable. A lot of USB cables don’t have the right quality and won't work, try a few and you will find on that will. An original name brand phone cable (Samsung, Motorola, etc.) will probably work best.
- Currently the firmware tool is available for PC only. A Mac version is in the works, but we have no ETA. Even an older Windows computer can do it; it doesn’t need to be high end by any stretch.
- If you need help with running the installer on a Windows computer Flashpoint Tech support can walk you through it, and of course if you come into the store we can update it for you in person.
- All firmware updates require a MICRO usb cable OR USB C cable.

Get Technical Assistance
Need technical assistance for our in-house brands?
We'd love to help. Contact us online or choose your favorite method of communication below and we'll connect. Talk soon!
Email us: brands@adorama.com
Call us: 212-647-9300
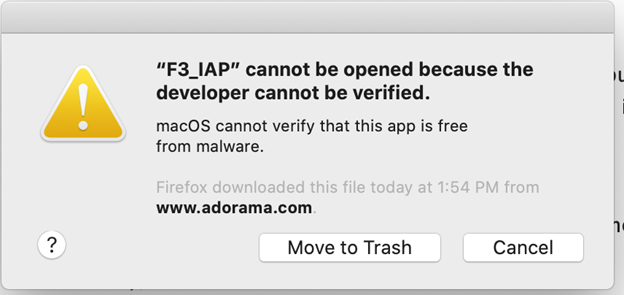
F3 Installer Instructions for Mac OS
If you have Catalina OS or newer, you will need the Godox G3 Installer, available ->HERE<-
The download is about halfway down on the webpage (see screenshot reference below).
The Flashpoint F3 Installer needs to be updated for Catalina and Big Sur OS' (Adorama is waiting for an update from Godox).
Make sure that the USB cable that you are using is USB-C to USB-A (not USB-C to USB-C).
The usb logic for the firmware updater is configured for a USB-C to USB-A cable.
One you open the F3/G3 Installer, the software will run you though prompts for the process.
BEFORE YOU BEGIN:
- Remove the batteries from the device before you connect it to your computer.
- Make sure that the USB cable that you are using is USB-C to USB-A (not USB-C to USB-C).The usb logic for the firmware updater is configured for a USB-C to USB-A cable.
- The included USB cable for the Flashpoint Zoom Li-on X Round Head flash's battery charger works fine.
- DO NOT disconnect the device's USB cord before the new file is 100 percent copied over and the Installer software is quit.
- The first step is to connect the device. Once connected the Installer will confirm the device connection.
- Then click "Open File" and select the corresponding firmware file for your device.
- There will be a progress bar displayed during the update process. Do not touch the device during the update process.
- Once the update is complete, a message that reads "update device success."
- You now can exit the Installer and unplug the device.
- If an e9 error device is displayed you either selected the wrong file or the updater was interrupted. Repeat the firmware update process again.