One of the beautiful things about photography is the multitude of techniques one can employ to make magnificent imagery, ranging from very traditional to highly experimental. One of my personal favorites is the multiple exposure (most commonly a double exposure), a process which originally started in the film era, and has since transitioned to the digital cameras we use today. For those of you unfamiliar with this kind of photography, a multiple exposure is essentially exposing your negative once, and then re-exposing it again with different imagery, creating a blended image of both scenes together.
There are many ways to create multiple exposures: from the traditional in-camera film technique to using a scanner with negatives, to digitally composing one in Photoshop. Today I’ll explain two methods for creating double exposures: digitally in camera, and artificially in Photoshop.
IN CAMERA TECHNIQUE

For shooting double exposures in camera, most DSLRs now have a setting for double exposures, if you just know where to look for it. On my Nikon D610, it can be found under the shooting menu, listed as multiple exposure, with an off/on toggle. To begin experimenting with producing shots in camera, simply switch the setting from off to on, and be mindful of choosing On (series) rather than On (single photo) or after every two shots, you will have to continually turn the setting back on. You should also determine if you want to turn on auto gain or not, which essentially either ensures that the exposures of the images you take that will expose together are exposed identically, or with different exposure values. I tend to shoot with Auto Gain on, as it prevents accidentally ending up with a terribly overexposed image.
Once you’ve made your selections for your settings, now comes the fun part; shooting and experimenting! Oftentimes finding something to silhouette produces the strongest results, as a stark contrast produces the most idealistic blend. This also is where color can become a major player in making unique and striking imagery.

Because this is all without the use of Photoshop, however, learning to remember your framing becomes a critical skill, as you can’t see how the images will overlay until after you’ve taken both shots. This takes some trial and error, but with practice, you’ll quickly learn what works for you and what works against you.
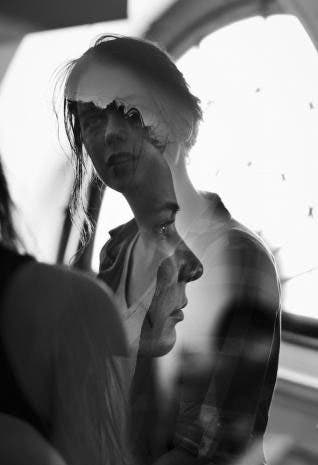
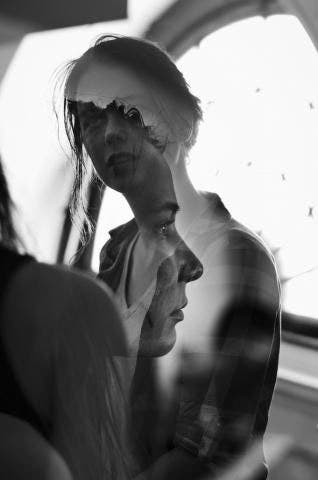
Here are some examples of in-camera black and white images I took when first discovering this technique.


PHOTOSHOP TECHNIQUES
Creating a double exposure in Photoshop is a delicate process, as each set of images will blend together differently based on the composition of light and dark. Essentially, the dark parts of the top image are where the underlying image will show through, while the light parts will maintain the characteristics of the top image. I have two different techniques for creating this effect in Photoshop, both of which work best with black and white images, but can be adapted for color with a little tweaking.
My first technique is much more temperamental, but leaves room for really interesting results when the images pair well together.
First, try to find two images that would engage in interesting ways if blended together. I often find blending portraits with landscapes or still life yields unique results, such as these two.


You may find that when joined together, they won’t work the way you thought, but it’s just a matter of patience and experimenting until you find a winning combination. For this reason, I simply reduce the opacity of one image on top of another before really blending together to determine composition first.
Once you’ve found your two images that you’d like to join, start with a black background layer to place both of your images on. Drag and drop your first image onto the canvas, and set it to about 75%-85% opacity.

Then bring in your second image, and set to the Pin Light blending mode at 100%.

Feel free to swap the images, as the effect will completely change based on which image is the bottom layer. Once you’ve determined if the images are working, you can then tweak a little further as necessary.

Using duplicated layers of whichever image you want to bring into the composition more onLighten mode at about 10% always seems to work well for me and I find that a small curve to enhance brightness can go a long way.


The other technique I use it a bit more reliable and easier to control, but requires a fair bit of trial and error with adjusting opacity and blending modes.

Once again, after determining if two images create a strong image joined together, set one image as your base layer.

Then drag and drop your second image in, set as the Soft Light blending mode at 100%.

Then duplicate that layer, and change the blending mode to Darken at 75%

At this point I like to bring the bottom image back in by duplicating it and setting it to either the Color Burn or Lighten blending mode, depending on if your image needs to brighten up or darken, and the opacity can range anywhere from 10-40%

(in this image, for instance, I used Color Burn at 10%. Here’s another image where Lighten at 40% was a better adjustment to use).

After that, I alternate between both images by duplicating layers and using Overlay, Vivid Light, and Soft Light at very low opacities, ideally between 10-15%.

Creating a successful double exposure can be a difficult process, but well worth the challenge if you can reap the rewards. Hopefully these techniques will help you achieve your vision and inspire new work!