Life is made up of moments. Our goal as photographers is to capture those small slices of life in a way that tells a great story. Traditionally photographers have used fast shutter speeds to freeze moments. Henri Cartier-Bresson’s Derrière la gare Saint-Lazare and his book, The Decisive Moment, set the standard for generations. The concept was simple; compose the shot and then use a fast shutter speed at just the right moment to freeze the action.
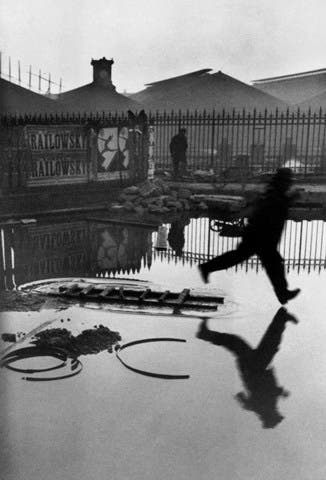
Derrière la gare Saint-Lazare, Paris, France, 1932, Bibliothèquenationale de France, Paris © Henri Cartier-Bresson / Magnum Photos, courtesy Foundation Henri Cartier-Bresson
“To me, photography is the simultaneous recognition, in a fraction of a second, of the significance of an event as well as of a precise organization of forms which give that event its proper expression.” – Henri Cartier-Bresson
There is another way to capture moments, and that is to use slow shutter speeds to show motion. Showing motion gives the viewer a sense of pace, it shows the transition of time, and it creates emotion. When we slow down the shutter we introduce blur into the photo. Blur happens when things move while our shutter is open. The longer the shutter is open the more things move, and the more things move the more blur we have.
Showing motion can create images that are more interesting and help tell a better story. Take a look at these two photos of the iconic Moulin Rouge in Paris, France.

This photo is just boring. Sure we have a picture of a historic site, but it doesn’t capture the feeling of the place. 35mm @ 1/25 of a second.

Much better! The place is alive and things are happening. Just a small touch of movement makes all the difference. 35mm @ 2 seconds.
Panning
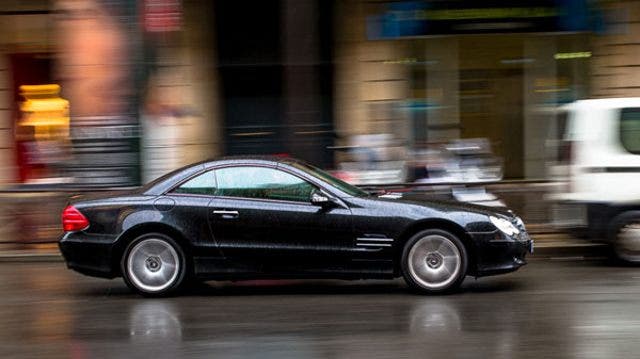
Panning shot of a car. 50mm lens at 1/25 of a second.
Panning allows you to freeze a moving subject while blurring the background. Here’s how you do it.
1.Shoot side to side
Panning only works on subjects that are moving side to side. It does not work for subjects that are moving toward or away from the camera. Follow your subject with your camera and take photos as you move.
2.Shoot handheld.
For panning to work you need to be able to move the camera side to side (left to right or right to left). Hold your camera to your eye and swivel your body as you follow your subject. It’s a good idea to plant your feet and swivel at the hips.
3.Use a long lens
Panning works best when you use a lens that’s at least 50mm. I prefer to use shoot in the 70-200mm range. A longer lens will narrow the field of view and force the camera to move more to keep up with the subject. This will create a more dramatic blur in the background and keep the focus on the subject.
4.Fill the frame with your subject
If you can’t fill the frame with your subject you’re probably too far away or using a lens that’s too wide. The smaller the subject in the frame the less movement you’ll get. Less movement means less drama. Get closer or use a longer lens – you’ll see an immediate improvement in your panning photos.
5.Use shutter priority mode
Panning is all about shutter speed. Use shutter priority mode to set the shutter speed and let the camera adjust the aperture for a proper exposure.
6.Use slow shutter speed
It seems counterintuitive to use a slow shutter speed to freeze action, but the action is frozen by keeping the camera and subject moving in sync. The slow shutter will allow the background to be blurred.
No specific shutter speed works for everything. You need to set a shutter speed depending on the speed you subject is moving. With a very fast subject you’ll be moving your camera very quickly and you’ll need a faster shutter speed. The same is true of a slow moving subject.
If you’re shooting racecars going 200 miles per hour you’ll need a shutter speed around 1/100, if you’re taking photos of a child on a bicycle 1/15 might work just fine. You’ll have to experiment with your subject and lens to determine the correct speed.
I suggest you start with 1/30 of a second and increase or decrease your speed from there. If everything is blurry speed up your shutter. If nothing is blurry slow down your shutter.
With a bit of practice, you’ll learn what works and will be able dial things in very quickly in the future.
7.Use continuous autofocus mode.
If your camera has autofocus make sure you’ve selected continuous autofocus mode (AI Servo on Canon cameras). This will make sure your camera continues to focus as your subject moves.
8.Use the center autofocus point
The center autofocus point allows your camera to focus faster. It can also be used to help you track your subject. Keep your autofocus point on your subject from start to finish. And make sure you follow through, don’t stop moving your camera to take the photo. Keep moving and follow through, just like a good golfer.
9.Use continuous drive mode
When you press the shutter release you need your camera to take several photos as you track your subject. It’s best to capture your subject when it’s perpendicular to the camera. That can be very tricky. You’ll increase your odds of success by taking several very quick shots as you track your subject.
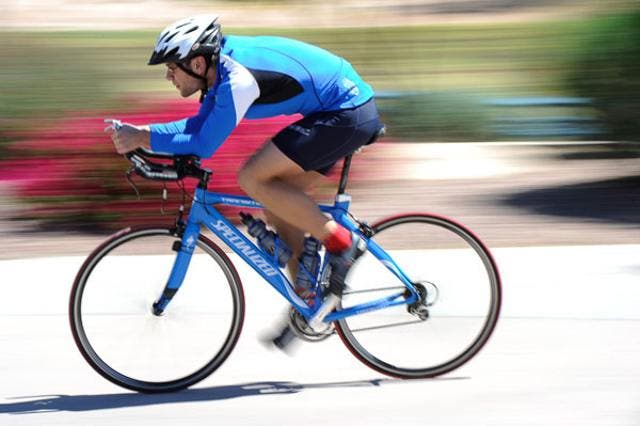
A panning shot of a cyclist. Shot at 175mm and 1/30 of a second.
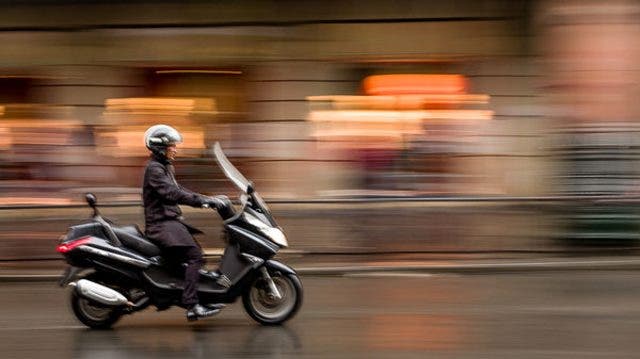
This scooter isn’t as crisp as it could be. I stopped moving the camera toward the end of the photo and that blurred the scooter and the background. Try your best to keep the camera and subject moving before, during, and after pressing the shutter. Shot with a 50mm @ 1/15.
Move the camera with the subject
Another very simple way to show movement is to keep the camera and subject moving at the same speed. Shots like these don’t require long lenses or the complicated steps involved in panning. Just keep the camera and subject moving together and you’ll succeed.
I shot this photo while I was in a car moving at the same speed as the motorcycle. This looks very similar to a panning shot but it’s much easier to accomplish. I just slowed down the shutter and pointed the camera out the window. Shot with a 35mm lens at 1/25 of a second.

I mounted my camera to a broom using a Manfrotto Magic Arm and swung the broom around. This was shot with a 16mm lens at 1/15 of a second.
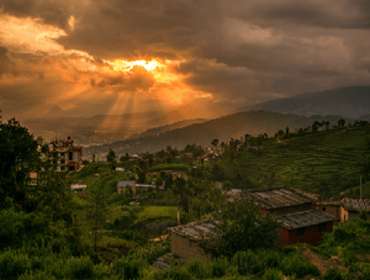
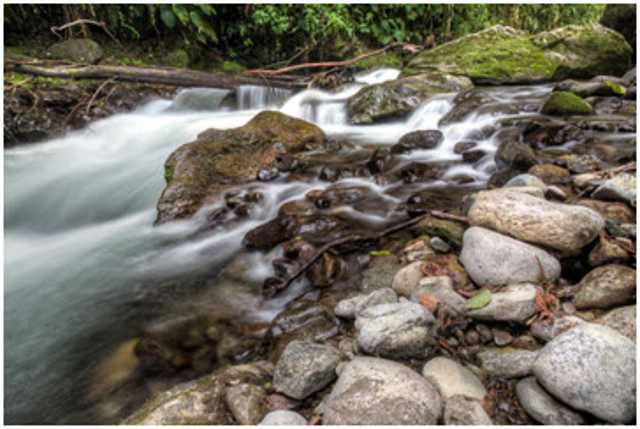
Freeze the environment, show the motion
This is perhaps the easiest way to show motion. Simply place your camera on a tripod and frame the environment. Since the camera and environment aren’t moving you can have a very slow shutter speed and the environment will be completely sharp. Only the things that move within the environment will become blurred.
You can easily play with your shutter to show more or less blur in the photo. Experiment with different speeds until you get the results that you want.
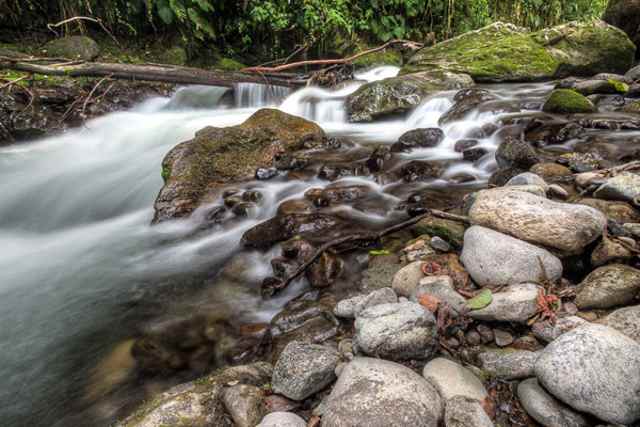
The long exposure allows the water to become blurred but the tripod makes sure the surrounding environment stays sharp. Shot with a 16mm lens at 2.5 seconds. A neutral density filter was used since this was shot in daylight.
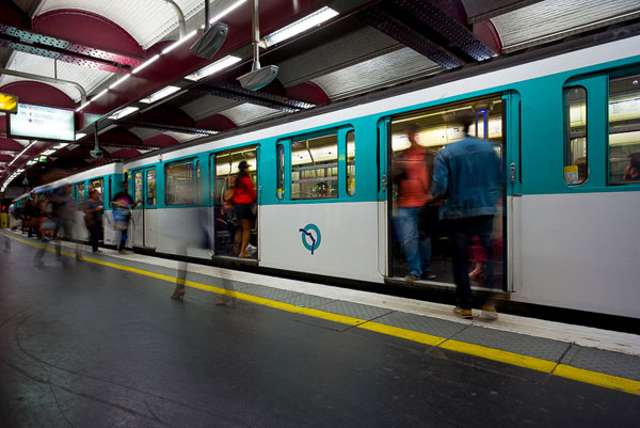
The hustle and bustle of the Paris Metro. Shot with a 21mm lens at .5 seconds.
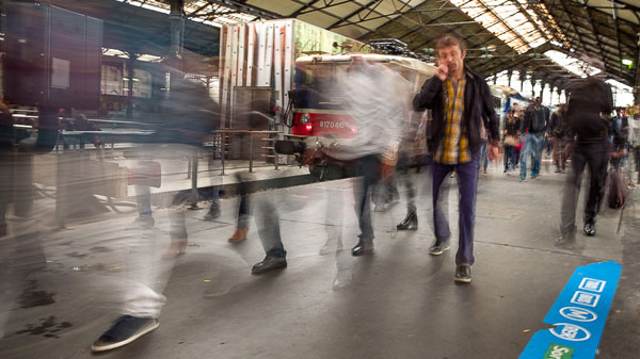
Commuters at gare Saint-Lazare in Paris. This photo may be a bit too blurry for most people, but I liked it. Since people’s feet are moving slower than their bodies it gives the commuters a ghostly appearance. The man on the phone stopped just long enough to become a focal point in the photo. Shot with a 21mm lens at .7 seconds.
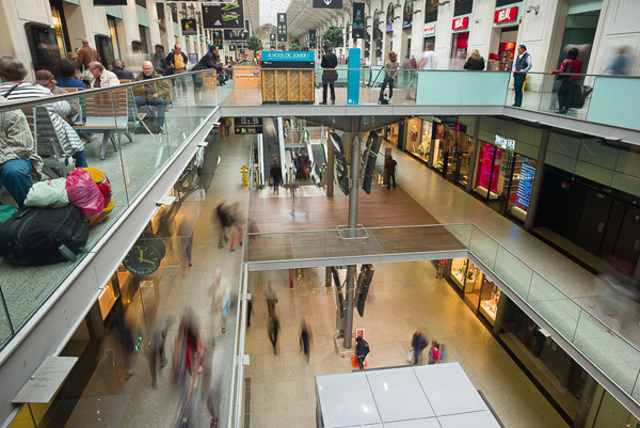
Inside gare Saint-Lazare. Notice how we have some people frozen while others are completely blurred. This helps tell the story of the train station. Some people are bored while others are making a mad dash to catch their connection. The motion tells a different story for each person. Shot with a 21mm @ 1 second. A Neutral Density filter was used in this shot.
Slow your shutter using a neutral density filter
If you find that your images are overexposed when shooting in daylight you may need to use a neutral density filter (also known as an ND filter). These filters are like sunglasses for your lens, they reduce the light by up to 9 stops depending on the filter you buy.
I prefer variable neutral density filters. These ND filters can be rotated to become darker or lighter. This gives you the most flexibility when shooting. You can set your shutter speed and then rotate the filter until you get an aperture value that you like. This is perfect if you want blur and shallow depth of field.
It’s all relative
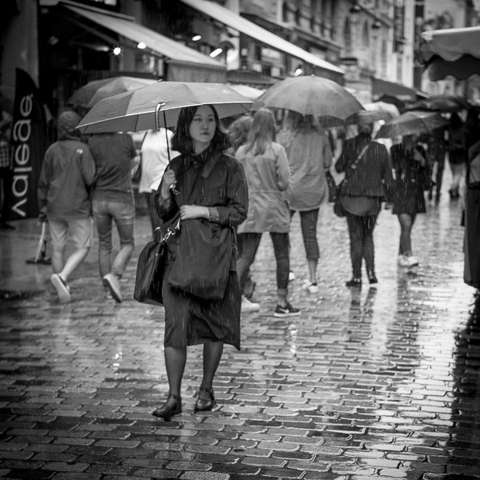
I shot this photo without a tripod at 1/180 of a second. That shutter speed is fast enough to shoot handheld but it still wasn’t fast enough to freeze the motion of the rain. Just remember that the faster things are moving the faster your shutter has to be to freeze that movement.
Showing motion takes a bit of practice but once you master slow shutter photography you’ll open new worlds of creative possibilities.
Bonus Content from AdoramaTV
Slow Shutter Magic
https://www.youtube.com/watch?v=hAI-azmqokA
Panning
https://www.youtube.com/watch?v=wI3ca72W3eM
Capture Motion Blur with ND filters
https://www.youtube.com/watch?v=Jxdw79OWaI0
Freezing Motion Using a Fast Shutter
https://www.youtube.com/watch?v=x25oqcFXnjs
Smash, Flash and Freeze
https://www.youtube.com/watch?v=_jTvZ20K9fU
Autofocus Points
https://www.youtube.com/watch?v=e6bpyR2og-c
Autofocus Basics
https://www.youtube.com/watch?v=ar85EOXD9PU