We’ve all been there. You capture an amazing image in the field that you can’t wait to get home and edit. You get home, edit the photo, and it just doesn’t look right. There is a good chance you’ve made a mistake in post production. Lucky for you, most mistakes made during post production have very quick fixes. Even if you don’t think you’ve made a mistake, check over this list before you publish your next image!

Crooked horizon
Few things can ruin a photo quicker than a crooked horizon. Ideally, this is something that you correct in the field with the level on your camera. Although, if not, you can also do this in post production. In Lightroom, you can easily straighten the horizon by clicking on the crop tool and rotating your photo from there. You can also draw a line across the horizon, which will allow Lightroom to automatically straighten the horizon for you.
Incorrect white balance
Temperature and tint make up the white balance in your image. Most photographers shoot with their white balance set to Auto in the field. This works the majority of the time. However, there are always situations where the white balance is incorrect. You should always adjust the white balance when editing your image to find the best settings for both the temperature and tint. The best way to tell if your white balance is correct is to look at something in your scene which should be a neutral color. Oftentimes, this can be a tree or a rock. Then, adjust the white balance until this object is neutral. Even during a great sunset or sunrise, neutral objects should not be deep in color.
Forgetting to use spot healing
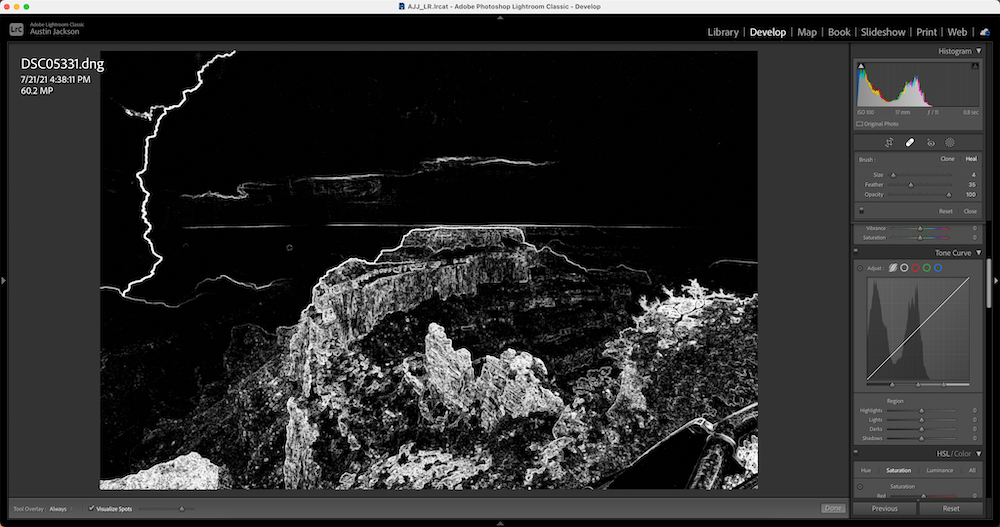
Don’t forget the fine details! Spot healing is so important, and something that most photographers use on every single photo. Most photos have some sort of imperfections that need to be corrected. Oftentimes, this can be dust spots, a person in your image, or even small imperfections in your scene. All of these problems can easily be resolved in Lightroom using the Spot Removal Tool. Once selected, simply click on anything you’d like to heal in the image. If you need to remove dust spots, check the Visualize Spots box in the bottom left of Lightroom to see the dust spots more clearly.

Overly saturated
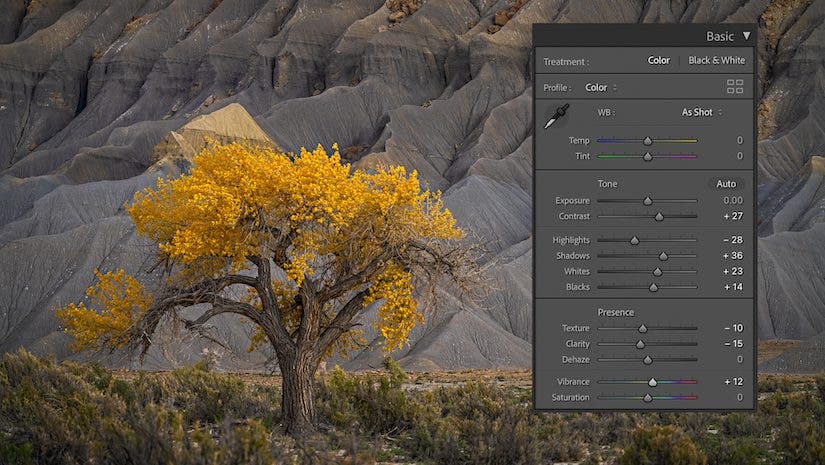
One of the biggest mistakes that amateur photographers make is to oversaturate their images. If you think this might be you, try using the vibrance slider instead of saturation. The saturation slider increases saturation of everything in the image equally. Meanwhile, the vibrance slider targets undersaturated colors. Better yet, try using the HSL Color sliders. These sliders allow you to target specific colors, so you can just enhance certain parts of your image.
Too much HDR
HDR (high dynamic range) is a popular technique used by photographers where you take multiple images at different exposures. Then, you combine the photos in post production to maintain the most dynamic range possible. This technique is often used to help keep the brights from becoming overexposed or the darks from being so dark that they lose detail. However, this technique is often overdone. Many amateur photographers will make the mistake of bringing up the brightness of the shadows too much, and darkening down the highlights. This creates a very unrealistic looking image. The best way to avoid this is to make sure that the highlights of your image remain bright, and the shadows remain dark. The best images have a large amount of range between the highlights and shadows.

Sharpening – too much or too little
Sharpening is one of those post production techniques that is more often overdone, than underdone. Many different softwares have many different ways of sharpening. Generally speaking, the best sharpness can hardly be seen when an image takes up a full computer screen, but can be seen when zoomed in. The best way to apply sharpening is to decide what you are doing with the image first. Are you printing it large for the wall? Are you displaying it on social media through a smartphone? When sharpening, view the image at the size you’ll be using the image for. Lastly, make sure that you aren’t adding noise to your image. Instead, you are just adding sharpness to the edges of objects in your image.
Poor noise reduction techniques
When a photographer is lacking light in their image, this can often result in noise. Noise makes a photograph appear grainy and may even obscure details. Luckily, there are hundreds of different ways to effectively reduce noise. If your image contains a lot of noise, make sure to use a noise reduction technique. However, you should use it sparingly. Many photographers overuse these techniques to reduce the noise, but also reduce the detail in your image. The best way to apply noise reduction is with a mask, so that you can just mask the noise reduction into areas of high noise. For example, if the sky has noise in it, you can remove it very aggressively because the sky should be smooth and free of noise. However, if you want to remove noise from a rock in your foreground, you need to be more careful. Removing noise reduces detail in the rock, so remove selectively!
If you can manage to avoid these mistakes in post production, it’ll help you create better images.


