Adobe Photoshop Elements has become much more sophisticated through the years, and for many people it is an attractive, economic alternative to full-fledged Photoshop.
Photoshop Elements suits the needs of casual photographers and many amateurs, and its evolution continues with the recently released Photoshop Elements 10. (For simplicity, I’ll use the term Photoshop to refer to the full-fledged product and Elements to refer to Photoshop Elements 10.) Let’s take a closer look at this powerful image editing and organizing software.
Photoshop CS5, the current edition for Windows or Mac, lists for about $650 for a first-time buyer. If you have CS2 or later, you can upgrade for less than $199 but this does not apply to an Academic Version. Photoshop Elements and its companion video editor, Premiere Elements, list separately for below $100 and can often be found at a discount. Their upgrade price is $80 each. Photoshop and Premiere Elements can be bundled for under $150, with the bundled upgrade for less than $120. With the smallest pocket cameras shooting video these days, if you haven’t gotten into it yet it may just be a matter of time until you will.
Photoshop Elements includes a basic version of the Adobe Camera RAW converter used by Photoshop and Lightroom, but it’s quite adequate for many users. It also has an Organizer that lets you manage your photos and videos. You can locate your files by many different criteria, including recognition of faces or objects; you can upload and share; and you can make many types of corrections to improve photos and apply creative effects. (The Organizer was new to the Mac platform in Elements 9.) The last piece of the package is an Editor that lets you do more sophisticated work on your images.
With its default color management setting (in Edit > Color Settings), Elements frees most users from dealing with color management, at the expense of working on 8 bit images in the sRGB space. This somewhat limits color range and how far tonal values can be manipulated without posterization, compared to 16 bit files in AdobeRGB or ProPhoto RGB. But if images are adjusted properly in RAW conversion, this limitation isn’t an issue for most users. If you’re shooting JPEGs, your camera is probably set to the sRGB color space by default, and JPEGs are limited to 8 bits anyway.
With the default setting, shown below, if you open an image in Elements that is in the larger color space of AdobeRGB or ProPhotoRGB, it will be converted to sRGB, thus retaining its color appearance within the limits of the smaller color space. The various choices are well explained in the dialog window.
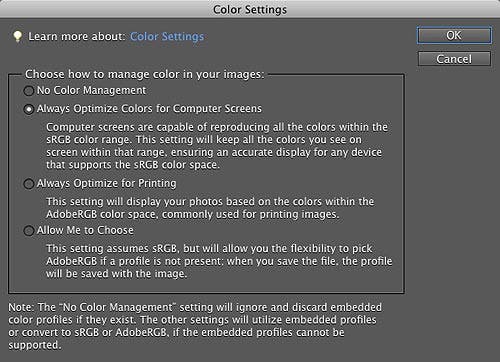
The sRGB color space is the proper choice, anyway, for images going to any web source or being viewed in a program without color management such as email.
Installation of Elements is very straightforward. You can access Preferences from the menu bar but the defaults are just fine for almost all users. (This may be the first time I’ve ever said that!)
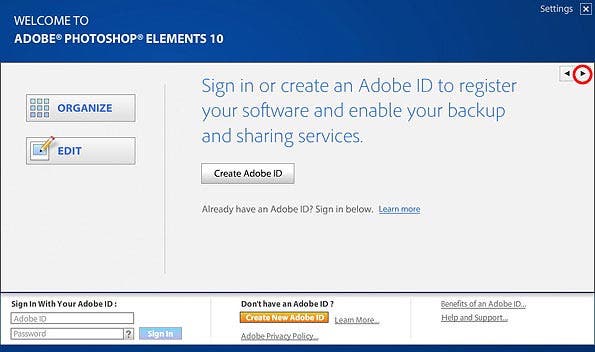
On launch it displays a screen that gives you a choice to launch the Organizer or the Editor. The offer you will see there of obtaining an Adobe ID is only necessary if you want to use the backup and sharing services. You can click the right-facing arrow in the upper right of that screen to go to some tutorials.
Elements will copy photos from your camera to a location you choose on your hard drive and will simultaneously “import” them into the Organizer. The import process is merely a matter of building a database containing thumbnails of the images and information about them such as the camera’s metadata (date and time shot, etc.) and information you can add such as keywords. The Organizer uses this information to let you locate and organize your files. And photos you already have on your computer can be imported into the Organizer without disturbing them or their location. In contrast, Adobe Bridge is simply a folder viewer.
Importing files from your camera
To import files and copy them to your computer, put a camera card in a card reader or attach the camera to the computer. The first is a safer method; if you attach the camera directly make sure you have plenty of battery charge. If the battery runs down during the copy process you could loose photos. To start the download, go to the menu and click on File > Get Photos and Videos > From Camera or Card Reader.
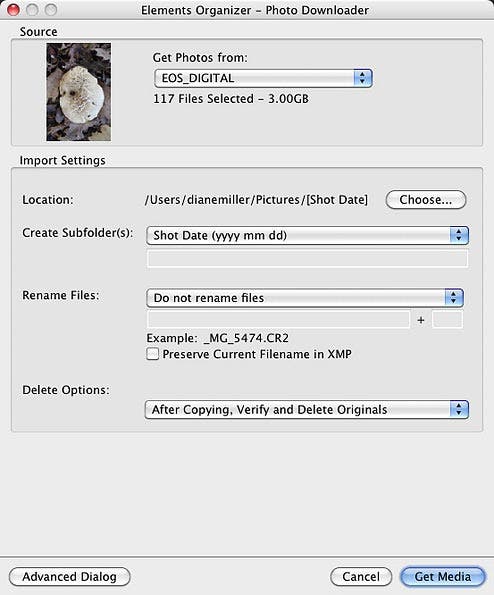
In this dialog you should specify how you want the folders organized. In the last item, Delete Options, I recommend against deleting the originals on your card at this stage. That’s best done in the camera by re-formatting the card, well after you are certain you have everything copied and organized as you wish. When the settings are correct, click Get Media.
Importing existing files
In the left column of the Organizer you can browse to an existing image folder on any of your hard drives and select it. If you don’t see the Folders panel on the left side of your screen, click the dropdown arrow to the right of the Display icon, circled in red in the figure below:
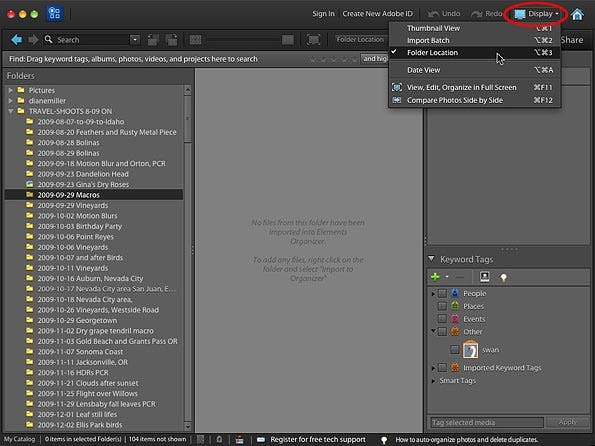
When you click on a folder, if no images have been imported the text in the center screen will read: “No files for this folder have been imported into Elements Organizer. To add any files, right click on the folder and select ‘Import to Organizer’.” Or you can go to the menu bar and click File > Get Photos and Videos > From Files and Folders.
The Organizer screen
When the import is done you will be in the Organizer screen. You will also get a reminder that you are only looking at the images from the last import. To see the entire catalog of imported images, click Show All, circled in red in the figure below. Immediately above it is a slider for the thumbnail size.
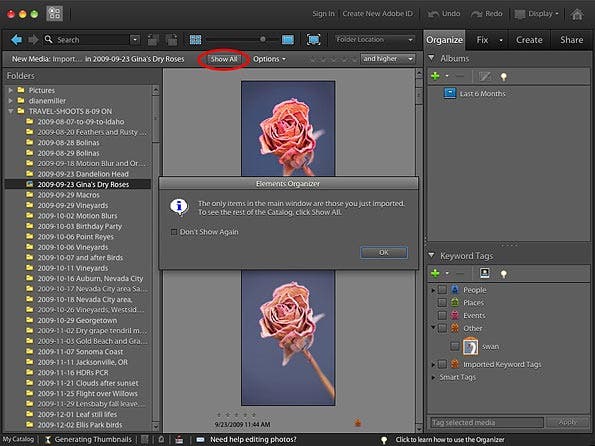
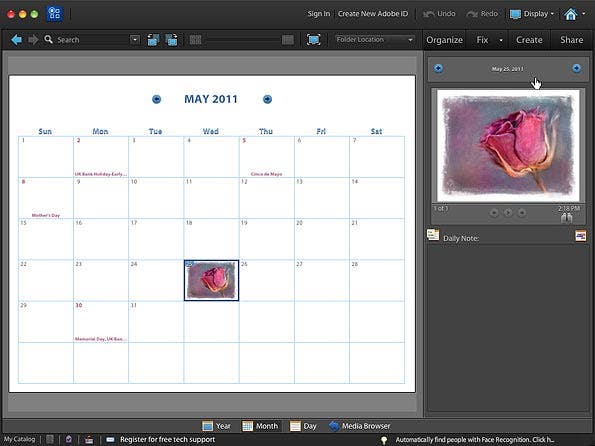
In the top right there is a dropdown named Display. When you click the list, one option is Date View. This shows you a calendar with your image appearing on the proper page. At the bottom of the screen you can choose a day, month or year view. To return to the previous screen, go back to the Display dropdown and choose one of the options. To return to the above screen, choose Media Browser.
Visual Similarity Search
There is a powerful search function in the Organizer that lets you find other pictures similar to one you have selected. There is a Search dropdown in the upper left that gives you several options. You can choose Visual Similarity Search to find, well… visually similar photos, such as sunsets. Another option is Object Search. You can outline an object that is part of the image and the Organizer will try to find all pictures with that object. There is a Refine Search icon, too.
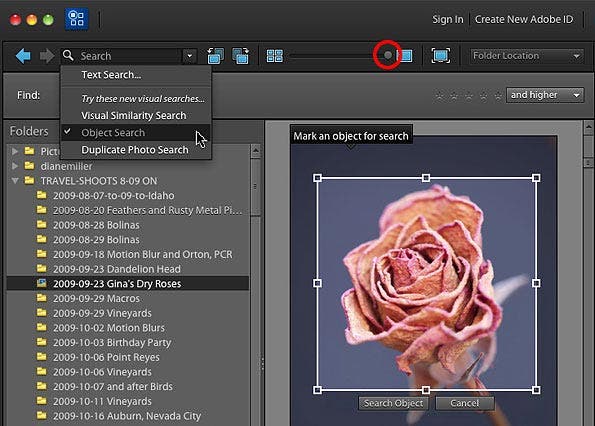
Once you have gone to an enlarged view of a single picture, you can return to seeing several smaller ones by using the thumbnail size slider, circled in red above or by double-clicking the image again.
You’ll also want to enlarge to a full-screen view (or larger, to judge sharpness) to assign ratings to mark your best images. Double click a picture to enlarge it to full-screen. To hide the Organizer interface and have just the picture on your screen, click the full screen icon above the picture, to the right of the thumbnail size slider. Ctrl + (Cmd + for Mac) will enlarge it further. Esc will return you to the interface view.
To assign a rating just type a number from 0 to 5. If the rating doesn’t show in the Organizer, click View > Details. There is also a place under the image to enter a caption.
To delete any bad images from your computer, just do a Ctrl-Delete (Cmd for Mac).
Keywords
There is a Keywords Tags panel in the lower right of the Organizer screen. You can use the suggested folder structure for the keywords or make your own. The minus icon will delete a keyword or folder, the plus one will let you add one. There is a dropdown to the right of the plus icon to let you choose what to add. You can simply drag a keyword from the list onto the image(s) it applies to, or drag the images(s) onto the keyword. You can use Ctrl to select multiple images.
You can filter by keywords by checking the small box to the left of the keyword; uncheck it to toggle back to the unfiltered view. Or you can drag a keyword from the list in the Keyword panel to the Find bar above the picture. You can also drag an image to the Find bar to locate similar ones.
You can click in the Search field in the upper left of the Organizer screen and type a keyword or description to see all the images that have it assigned. You can even use logic to filter for something like “Flower not Rose.”
There is an Albums tab just below the Organize tab, where you can add pictures to an album. And there is a wonderful feature called Smart Albums. You can specify a set of metadata criteria such as a keywords, date ranges, ratings, etc. and any picture meeting those criteria will be added to that Smart Album. As you add new pictures or change keywords, etc. the corresponding pictures will be added as appropriate and if you delete data or pictures they will be removed from the Smart Album. A great use for a Smart Album is to contain your favorite photos, a collection that will probably be somewhat fluid as you keep shooting newer and better ones.
We have been in the Organizer module up to now, and it’s time to take a look at how the program itself is organized.
Into the Editor
As you have seen, the main Elements screen, the first figure in this article, branches to either the Organizer or Editor modules. The Organizer module branches (with tabs in the upper right) to Organize, Fix, Create and Share. The Fix tab lets you do several quick fixes right in the Organizer or to choose Edit Photos to do more sophisticated edits. That option takes you into the Editor module, which you can also access directly from the first Elements screen. The Editor has tabs for Edit, Create and Share. Under the Edit tab there are Full, Quick and Guided tabs. To return to the Organizer module, click its button in the far upper right.
You might choose to go straight to the Editor in the first screen if you want to work directly on images. You can even work on ones that have not been imported. They can be opened with File > Open from the top menu bar.
The Fix tab
The Fix tab gives you some options for making quick adjustments to your images without going to the full Editor. There are a number of quick fixes, shown in the figure below.
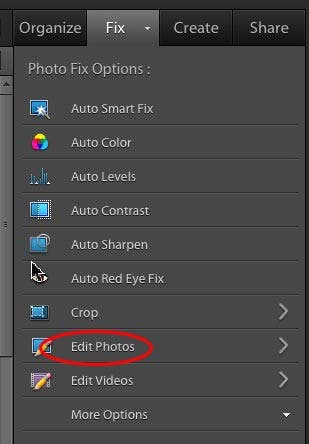
Clicking the Edit Photos option will open an easy-to-use image editor. If the file is a RAW one, you will be taken first into the RAW editor, which lets you do much more sophisticated adjustments than you can do to a JPEG. The starting positions of the tabs should represent generic settings and will not be specific to each image, so they will need to be adjusted to get the optimum image. You can see an Auto adjustment by clicking the Auto setting, above the Exposure slider. It will give you a suggestion, but in most cases it should be tweaked to taste.
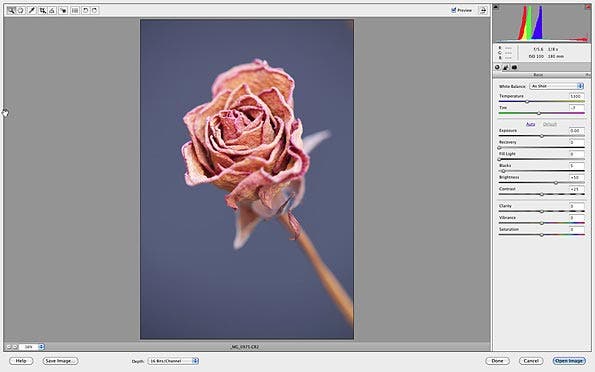
On the top left are tools for (left to right) zooming in, moving around in a zoomed-in view, setting white balance, cropping, rotating, correcting red eye, setting preferences and rotating 90 degrees clockwise or counterclockwise. The color and tonal adjustments are in the panel on the right and are best made from the top down, but you can go back and tweak them in any order.
Here’s a larger view:
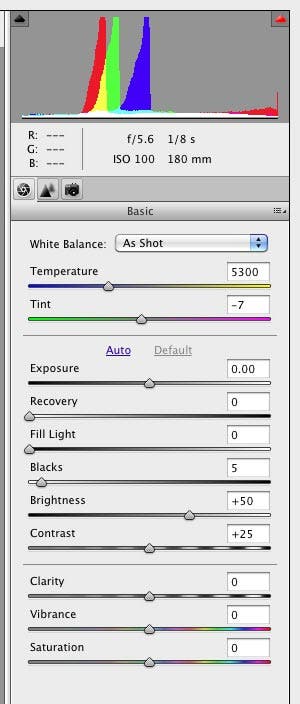
In the top sliders you can tweak the temperature (how cool or warm the image is, basically blue to yellow) and a green-magenta tint adjustment. There is also a dropdown to give you other choices than the default As Shot. Auto can be a good one to check but I find the others are usually not good. Then the sliders in the main section let you control the tonalities. They are indicated by the histogram, and it is a far more accurate indication than your screen, which may not be accurate if it is not correctly calibrated and profiled. If you’re new to histograms, see my prior tutorial, “How to Read a Histogram.” For information on calibrating and profiling, see my tutorial, “Getting Consistent Color From Monitor to Print.”
In the RAW converter you should adjust the Exposure slider while paying attention to the right end of the histogram, so as not to blow out detail by pushing the histogram up against the right wall. You can recover slightly blown-out areas by moving the Exposure slider left. The Fill Light slider recovers detail in the dark areas and you use the Black slider to set the left end of the histogram. In most images you just want it touching the left edge of the scale. The Recovery slider darkens the brightest tones a little and can sometimes bring more detail into the lightest areas. A mix of too much Fill and Recovery can cause artifacts at slightly soft edges of objects and shadows. Zoom in and look around at 100%.
The Brightness and Contrast sliders do the same things as the four sliders above them, but with less control. The Clarity slider controls midtone contrast, and can add a nice punch to an image. And Vibrance is a variation of Saturation that saturates cooler tones before warmer tones.
Editing an image
When you are done making RAW adjustments, click Open Image to get into the main Editor window. If you are shooting JPEGs, just select your photo and click the Fix tab and choose Edit Photos.
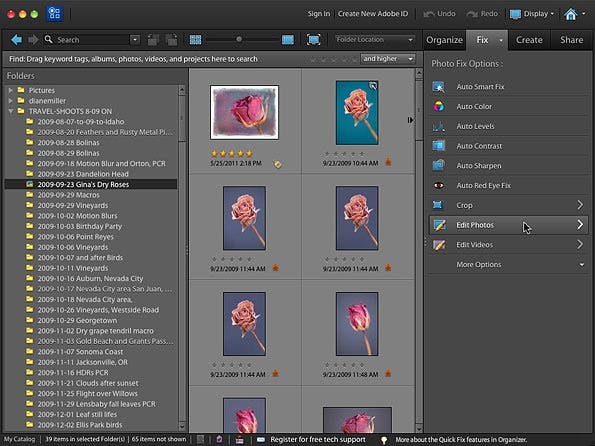
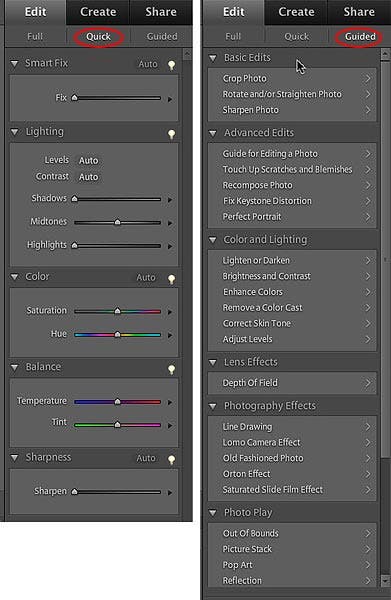
There are three tabs in the Editor, on the right side of the screen, for Full, Quick and Guided edits. If you are new at image editing you will find the Quick and Guided screens are the place to start. They offer some easy options, but bear in mind that auto corrections may not always be ideal for every image.
Below is the screen for the Full editor.
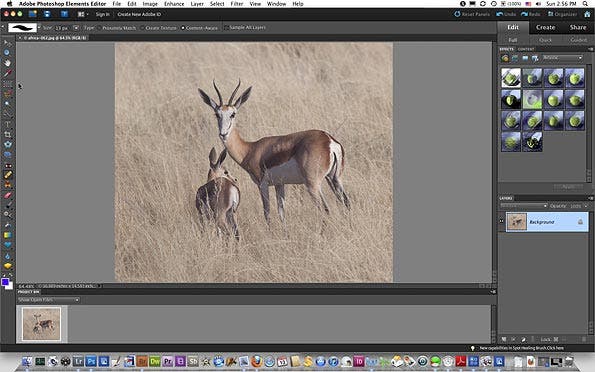
Before editing I would recommend making a duplicate copy of your Background layer (which represents the starting point of your original image) because many of the simpler adjustments you can make will be “baked in” to the image. If you have the original you can make on-the-fly comparisons by toggling the eyeball icon (visibility) of an adjusted layer. To make a copy, click the stealthy menu circled in red below and choose Duplicate Layer.
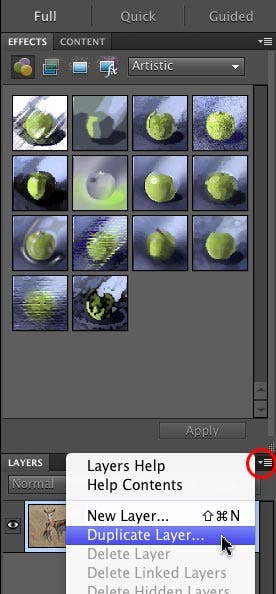
Make sure that duplicate layer is the active one (highlighted) when you make adjustments. The Layers panel will look like this with the duplicate layer active:
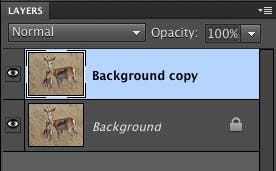
After you have made an adjustment on the duplicate layer you can add a mask by clicking the second icon from the left at the bottom of the Layers panel. With the mask active (click on it and you will see a subtle outline on the mask thumbnail) choose a brush with the Foreground color set to black to “erase” part of it, thus hiding part of that layer and letting the layer below show through. A white brush will restore the erased parts. You can change the brush color with the black and white squares at the bottom of the Toolbar. The one on top of the pair will be the brush color.
The brush tool is about two-thirds of the way down the Toolbar. You can choose different brushes in the brush options at the top left of the screen. You can change the size with the square bracket keys. You can change the hardness by clicking the brush icon in the Options bar at the top of the screen and using the Harness slider in the dialog that will come up.
Among the more obvious adjustments is the ability to crop an image, but it appears this has to be done in the Organizer. Using the 12th tool down in the Toolbar on the left side of the screen, you can rotate an image, to correct horizons and verticals that are off. Just draw a line parallel to the offending object and the rotation will be corrected.
You can adjust exposure and colors with many of the options in the Quick and Guided edits tabs. In the full editor, for color adjustments click the half-black/half-white icon at the bottom of the Layers panel and add an adjustment layer for Hue/Saturation. For exposure and color tweaks, use Levels. For exposure, use the default RGB channel, and for color tweaks, go to the color channels, which are accessible with the dropdown just above the histogram. You can move the middle slider for midtones and use the end sliders to bias the correction to darks or lights.
There is a Spot Healing Brush tool about halfway down the Toolbar. (It looks like a band-aid.) Be sure you have a pixel layer highlighted, and not an adjustment layer. You can change the size of the brush with the square brackets on the keyboard (as you can with many tools). Paint over the area to be removed and when you let go, it will be filled in with information from surrounding areas. There will be a few cases where it doesn’t work, depending on the immediate surroundings, but when it does, it’s magic. Look at the Options bar, right above the image, for some settings you can change. The default of Content-Aware is usually the best.
There is also a Smart Brush in the Toolbar that lets you brush on effects and patterns in certain areas. It will do a good job of picking out a distracting background and replacing it with a pattern, or of turning people into pencil sketches.
You can also add very sophisticated text effects that are beyond the scope of this review. You’ll find many tutorials online.
Panoramas!
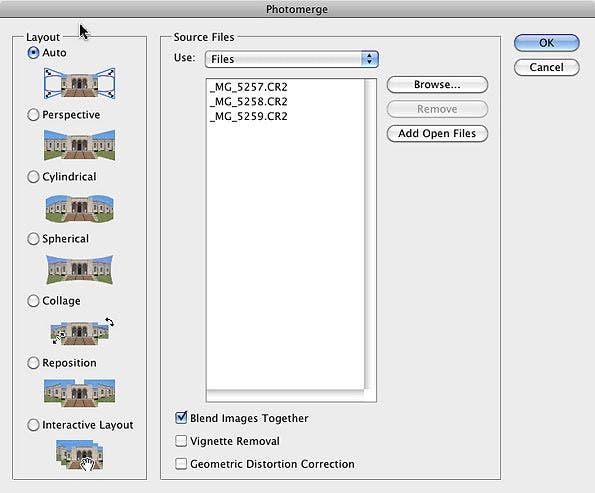
You can merge a sequence of overlapping shots into a panorama. In either the Editor or the Organizer go to File > New > Photomerge Panorama and in the dialog box that comes up choose the appropriate files or choose Add Open Files if you already have a set open in the Editor. Among the layout options, Auto will usually do the best job. If it doesn’t, try the others.
Elements allows you to do certain adjustments using an adjustment layer. This layer acts as a filter to adjust the composite of all the layers below it. Click the icon at bottom of the Layers panel, shown in the figure below, and you will create an adjustment layer.
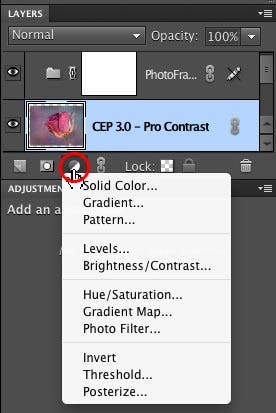
The adjustment’s dialog window will appear in the panel below the Layers panel, as shown below.
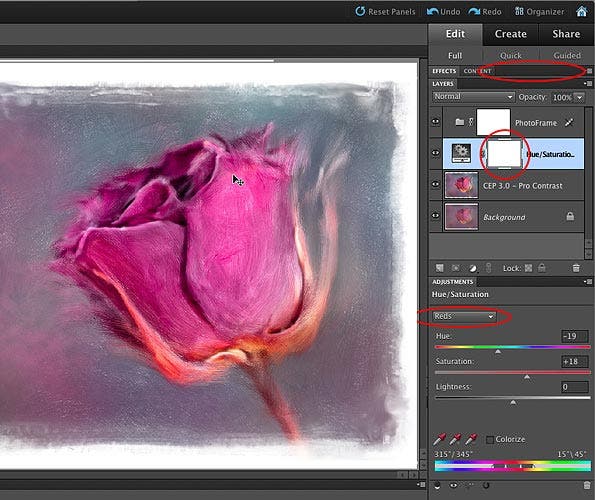
Create more room for the Layers and Filters panels by clicking on the top of the Effects and Content panel (marked above by a red ellipse) to collapse it until you need it. Here I created a Hue/Saturation adjustment layer and chose only the Red channel (circled in red). I increased saturation slightly and moved the hue to a cooler color. If the adjustment had affected parts of the image I didn’t want to change I could paint them out by clicking the mask icon for that adjustment (circled in red to the right of its thumbnail) and painting right over the image with a black brush where I didn’t want the adjustment.
You can create panoramas from several shots made across a scene. Make sure the camera stays level and there is a 30 to 50 percent overlap in the frames. Select them and go to File > New > Photomerge Panorama.
The Quick editor has some very powerful sliders and is all many people will want or need. Pull up an image and try moving the sliders in the Smart Fix and Lighting sections.

The Guided Edit screen lets you choose from a list of options. The last three, Lens Effects, Photography Effects and Photo Play are in the creative realm and are really fun to play with.

The Create tab
Here you can make prints, photo books, cards, calendars, collages, stamps and more.
The Share Tab
Sharing gives you an easy way to export your photos to online albums or to locations such as YouTube and Facebook.
Plugins
Many popular plugins to create artistic effects will work with Elements just as they do with full-fledged Photoshop. Some of my favorites are OnOne PhotoFrame; Nik’s Color Efex Pro, Silver Efex Pro, Viveza and HDR Efex Pro; and DxO Film Pack. There are many others I haven’t had experience with, such as Tiffen DFX; Alien Skin’s Exposure, Snap Art, Blow Up, Eye Candy and Bokeh; and OnOne’s Perfect Portrait, Perfect Layers, Perfect Effects, Perfect Mask, Perfect Resize, PhotoTools and PhotoTune. They also have a new Photo Essentials just for Elements.
I’m sure I’ve left some out. I know these from the world of Photoshop but I’d bet most if not all will work with Elements.
This is just a quick-start guide, but for many of you, Photoshop Elements may be worth a look. It is useful, easy and fun. For further resources, there are many video tutorials on the web, and you can subscribe to “Adobe Photoshop Elements Techniques” magazine on the Elements web site.
You can download a 30-day free trial (fully functioning) and if you like it you can buy the license code that unlocks it.
