


See Options
Need help? Ask our experts.
The Studio V3 offers all of the features of the original Tube MP with versatile onboard presets to easily dial in a great tone.
V3 stands for Variable Valve Voicing, and refers to the sixteen presets in three overlapping groups: Neutral, Warm, and OPL. Each has a precisely voiced EQ curve, Warm presets add tube saturation, and OPL presets engage Output Protection Limiting for dynamic control of loud signals and big transients.
Each preset has a suggested application, but they all have a unique character, so any could be an inspiring match for your performance. Theres also a Flat preset for the classic sound of the original Tube MP.
Like the original, the Tube MP Studio V3 has XLR and 1/4 connections with variable gain and switchable boost, phantom power, and phase reversal.
Fast and flexible, the Tube MP Studio V3 is a mic preamp and instrument DI designed for maximum tone with minimum tweaking.
AC Power Hookup
The Tube MP Studio V3 has a universal external power supply designed to operate at 100 to 240V AC - 50/60 Hz. Only use the adapter that came with the Tube MP Studio V3. If the adapter becomes lost or damaged, contact ART Customer Service for replacement. If you need to purchase one locally, please refer to the label on the adapter or the specifications later in this manual for the appropriate power specifications.
Audio Connections
Audio connections to and from the Tube MP Studio V3 are balanced XLR (Pin 2 = Hot (+), Pin 3 = Cold (-), Pin 1 = Ground) and unbalanced 1/4 inch (Tip = Hot (+), Sleeve = Ground). We recommend that you switch off the +48V Phantom Power whenever changing connections to the XLR input.
Controls & Indicators
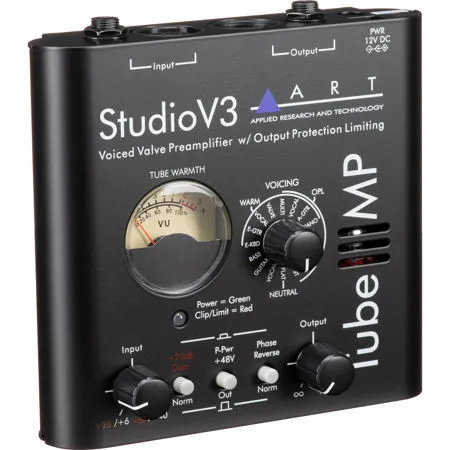
Input control
The Input Control sets the amount of input gain of the Tube MP Studio V3. Turn the control clockwise to increase gain and counterclockwise to decrease gain. You may control two ranges of gain with this control, +26 to +60dB and +6 to +40dB. Selection of the gain range is made with the +20dB gain switch.
+20db gain switch
Use the +20dB Gain Switch to set the gain range of the input control. When the switch is out, the Tube MP Studio V3 operates in Normal mode. Depressing the switch adds 20dB of gain. This mode is indicated by the labeling in red and corresponds directly to the input control's red gain range labeling. For microphone applications, where more gain is needed, push the switch in. For hot line level inputs, set the switch in the out position.
Phantom power +48v switch
The Tube MP Studio V3 can power any microphone needing +48 volts DC Phantom power. Phantom power is supplied to pins 2 and 3 of the XLR Input jack when this switch is depressed. The Tube MP Studio V3 s lowly applies and removes the +48volts, to prevent damage to microphones.
Be sure to turn down or mute the output of the Tube MP Studio V3 when engaging or disengaging Phantom power. Additionally, when disengaging, allow 30 to 45 seconds for the power to completely discharge. Most microphones will make a sound like air leaking from a tire when Phantom power is disconnected, but some can make some very nasty low rumbles and whines as well.
Dynamic microphones should not be affected or damaged if they are plugged into a line where Phantom power is present. However, if the mic doesn't need it, do not use it. Some things are best left untested!
Phase reverse switch
The Phase Reverse switch is provided to reverse the phase of the signal. This switch works on Pins 2 and 3 of the XLR output jack and also reverses the polarity of the 1/4-inch output jack. In the Normal position, the signal is in-phase. In the Reverse (or "in") position, Pins 2 and 3 are reversed and the signal is changed to 180 degrees out of phase.
In multiple microphone applications, mic placement can affect the phase of the signals. If two microphones pick up the same signal from different locations, the result can be a hollow or frequency "shifted" sound. In some cases, it may sound as if an instrument disappears if it happens to be 180 degrees out of phase. Depressing the Phase switch can remedy this. In general, if your sound is "thin" or "out of position", try reversing the phase to correct the problem.
V3 - Variable Valve VOICING Control
This Tube MP Studio V3 features ART's proprietary V3 technology. V3 (which stands for Variable Valve Voicing), provides optimized reference points to begin the recording process for guitars, bass guitars, synths, acoustic instruments, percussion and more.
ART engineers ran our preamplification circuit through a battery of tests and real-life studio conditions. Our goal was to create a processor that would allow a user to have presets that were optimized for specific recording applications. We set out to create a preamp that would be nimble enough to handle both violins and kick drums, and nearly everything in between.
We wanted to take the guessing out of the equation - and that is how we developed V3. It's simple, easy and it works really well.
This means that it is now quicker and easier than ever to make great recordings! Musicians want to play, not spend hours adjusting knobs. No other microphone preamp is as user-friendly as the Tube MP Studio V3.
Power/clip/limit led
The bi-color Power/Clip/Limit LED lights green after power is applied and with lower level signals. If OPL is not being used, then the LED will serve as a signal clip indicator. It will light red whenever the signal at the tube's output is about to clip. If the LED is constantly lit, reduce the signal level with the Input gain control, or activate the OPL circuitry.
When the OPL circuit is engaged, the LED will turn red whenever the output signal peaks exceed the limiter's threshold, at which point the limiter will reduce gain automatically, to prevent output clipping.
VU meter
The Tube Warmth VU meter displays the signal level at the output of the tube section, before the output level control. As the signal level increases you get more warmth. In the Black region of the meter (-20 to -3dB) you will get a cleaner sound. In the Red region, you will be able to hear the warmth better. The Signal/Clip indicator will light RED as the tube saturates IF OPL is OFF.
Note: The OPL (limiter) keeps the tube running clean.
It is normal to see the Tube Warmth meter read no higher than -3 VU when OPL is engaged.
You can estimate the output level of the unit using the meter by looking at the position of the output knob. If the knob is at "0", 0 VU on the meter corresponds to -4dBu unbalanced and +2dBu Balanced on the output jack.
Output control
The Output Control sets the output level of the Tube MP Studio V3. When the control is fully counterclockwise, there is no output.
Connections
Despite the Tube MP Studio V3's sophistication, it is easy to interface the unit with a wide variety of equipment. All inputs and outputs are located on the rear panel. Standard 1/4-inch and XLR inputs and outputs make patching simple.
1/4-inch Input jack
The 1/4-inch Input jack is for instrument and line level inputs. It has a high input impedance to minimize any loading effects on instrument pickups. It can also handle up to +22dBu signals for line level signals.
Though not normally suggested, both input jacks can be used simultaneously, in a pinch, to sum two signals. The signal present at the XLR jack will tend to attenuate the signal of the 1/4-inch input.
XLR input jack
The XLR Input jack is primarily intended for microphone input, and as such can furnish Phantom Power when needed. It can handle up to +14dBu signals, which is the hottest signal you would get out of any microphone. For even hotter input signals, you should use the 1/4-inch input jack. The XLR Input jacks medium input impedance is extremely flat over a wide frequency range, which allows it to be musically neutral to virtually any microphone (one of the Tube MP Studio V3's lesser-known secrets).
XLR output jack
The XLR Output jack of the Tube MP Studio V3 is active balanced. You may use it in an unbalanced configuration without harm to the output circuitry. The XLR output can provide a hefty signal level (+28dBu) at a low impedance, so make sure that you do not overdrive equipment with sensitive inputs. When using it on the front end of a mixer, go into the mixer's line in or insert inputs and not necessarily into the mixer's microphone input, unless the mixer can pad that input's level.
1/4-inch output jack
The 1/4-inch Output jack is unbalanced and should be used for sending signals to amps, processors, or other unbalanced configurations.
Both balanced and unbalanced output connections may be used simultaneously. This is particularly useful when using the Tube MP Studio V3 as a direct box for instruments or line level signals. Make sure that both pieces of equipment connected to the Tube MP Studio V3's outputs are connected to the same earth ground, beforehand, to avoid electrical shock.
If you experience a grounding hum when using both output connectors (one to a console, one to an instrument amp) simultaneously, a ground loop may be the problem. To remedy this problem, disconnect the ground wire (pin 1) from the XLR cable plugged into the Tube MP Studio V3's output. This interrupts the ground path and therefore breaks the loop.