Celestron NexImage 5, Solar System Imager (5 Megapixel)

SKU: CNNI5

This item is no longer available.

Overview
Compare
Accessories
Specs
Protection
Q&A

Questions & Answers

Shopper : Is this a C or CS mount?MICHAEL P : I'm not sure what you mean by C or CS mount. I use this camera on my refractor telescope and it does a remarkable job. I looked in my users manual and it doesn't say anything about a C or CS mount. But it does picture a reflector telescope as well as a refractor. it should work just fine for you. I hope this helps you. Regards, Michael P
Joseph H : What computer platform does it require?Thomas B : Windows is the easiest to use with this camera. If you speak to sales reps from Celestron they will tell you that you can run the software on a Mac as well. But to run the CCD software on a Mac you have to use Bootcamp, regardless of what anyone tells you. Bootcamp is a Mac App that basically instructs you to turn a portion of your Mac into a Windows format computer! Why would anyone do that? I would never do this to my Macbook Pro! So I purchased a refurbished HP Pavilion dv7 and use it as dedicated laptop for all my astronomical needs as most all software for CCD's are Windows very little astronomical software available for Mac! The software that comes with Neximage 5 runs perfectly in the HP dv7 with Windows 7 Home Premium and I'm very satisfied with its function. I hope this helps.KAREN S : I believe the NexImage requires Windows. I have heard issues with it not working on AMD chips, and that it requires Intel. I had it working on a Windows 7 machine, 64 bit. It was an intel system, so I didn't see the issues that people have reported with AMD. I think on a Mac you have to use some sort of windows compatibility mode. Try using a search engine such as google and type in Neximage 5 and then the operating system or computer type you want to use followed by the word problem and see if it brings up any issues with the type of system you want to use. Good luck.LAWRENCE F : I've run it on both a small netbook with Atom N450 processor and 2GB of RAM and an i3 Windows 7 machine with 6 GB RAM. It wants a USB 2.0 port. It doesn't need a huge amount of memory although the faster and larger your machine, the more you can use the very large pixel aspects. This is a very easy to use, well-priced color camera for lunar and planetary imaging, especially if you are just getting into the hobby.DON L : WindowsSTEVE E : windows XP, Windows Vista, and Windows 7. (32 & 64 bit)PATRICK D : Hello. According to the user manual, the NexImage 5 is compatible with Win XP, Win Vista, and Win 7 (both 32 bit and 64 bit). DirectX 9.0c is also specified, as is a Pentium IV 2.0 Ghz CPU, 24 bit/32 bit graphics card, and 1 GB of system RAM. I use my Neximage 5 on a Vista 32 bit laptop (HP Pavilion DV series)with an AMD Athlon processor, 3 GB of system RAM, and Nvidia graphics. The NexImage 5 works great. Best to double-check with Celestron tech support via email. I have heard that some graphics cards may have issues, but don't have specific details. Celestron tech support is always very responsive. Hope this helps!
Ky M : I am having trouble focusing the camera, I have tried it in two of my telescopes. All I see is blue and red dots. How do I get it to focus?WILLIAM P : The camera needs about a half inch more in-travel than an eyepiece to reach focus. Try removing the star diagonal and mounting it where it was. Practice in daylight... looking at a distant tree or tower, then the moon.MICHAEL P : One thing to check may be the gain setting. It sounds like it' s set way too high.PATRICK D : Kyleigh, what kind of telescopes have you tried the 5MP with, and what targets (e.g. Jupiter, Moon, etc.) have you tried? The 5MP has a focal length of about 7mm, so you need to have your target well centered with a visual eyepiece first - before butting the 5MP into your scope. I have a Celestron NexStar 8se Schmidt Cassegrain Telescope (SCT). Depending on the last eyepiece I use before putting the 5MP into the scope, I may have to turn the focuser a few full revolutions before getting an image focused. Sometimes, it takes a full turn or more just to see something on the screen. Exposure and gain are important also. For Jupiter, I use a 1/120th sec exposure and a gain of 63. The stacked image comes out good. You want the exposure set so that the object is a little more dim than you would want for viewing. When you stack multiple images later in the process, they will get brighter. If possible, start with brighter objects like the Moon, or even daytime objects. It will help you get the feel. Hope this is helpful to you.MICHAEL R : Best way to obtain focus with your scope and camera is "during the day time". Set your scope up during the daylight and use a regular low power eyepice, find an object thats over 300 feet away and point your scope at this daylight land object in your "finderscope" or pointing devise. Then obtain focus thru the scopes eyepiece.When thats done, remove the eyepiece, insert the NexImage5 into the focuser. Attaching the camera to a computer and bring the NexImage program up, with it's "live view screen". Now turn the scopes focuser until the "land object" is dispalyed on the computer screen. You can change the "brightness" by adjusting the "sliders-fro brightness and contrast" on the displayed screen. This will allow you to become familiar with the careas settings. When using at night, the "Best Object" to start with is the "Moon". It's big-bright and easy to focus on, and easy to adjust the brightness and contrast sliders, to get a good image on your computer screen. Hope this helps, MikeGREG H : I had no trouble focusing the camera after first focusing my telescope using a 25 mm eyepiece. It very possible there is something wrong with the Neximage 5. I had an Orion Starshoot Solar System Color Imaging Camera II die on me the first time I tried using it.DAVID S : Hi Kyleigh. When I received the N5 camera, first thing I did was set it up in the house where I could work with it during the day using one of my smaller C5 telescopes. Once I had all the settings understood, I moved out doors and performed the following. Set up your scope during the day on a distant tree and it's leaves, a bird in a tree, just something with lots of contrast, using a normal eyepiece. Start with a 15mm and work down to a 7 or 5mm. Note the camera performs like a 5mm. eyepiece. Once you got your image focused, put the camera in and with settings in auto and binding at 4, you should be able to focus. If so, reduce the binding and see the affects. If still no fucus, try loosening the camera and sliding it back and forth in the focus tube to make sure you have enough focus travel (not knowing what telescope you have, I through this statement in). Once you get use to the settings during the day, move to night viewing and you should be on your way. This camera only works good with planets and the moon. It is not a deep space camera.... Hope this all helps...and good luck... .LAWRENCE F : It can be difficult to find focus. One technique is to aim at a very bright star and get that to be the smallest size. You can't use the camera for deep sky objects, just planets or the Moon (or the sun with a properly filtered scope). But it will show a bright star and that's a good way to start. Start without any Barlows or other extra magnification. The chip is small, and is equivalent to a 6 or 7 mm eyepiece, so the field is quite small. Get it in the center of a high-power eyepiece then switch to the camera. The focus will be off, but at least you will have something to focus on. You can then do the same thing with planets or the moon, and you'll have an idea about whether you have to rack the focus in or out...it will be the same each time. Make sure the exposure and gain are neither to high or low...you have to experiment. For the moon or sun, try finding the limb. You can look at some articles on the web if you Google on "focusing a webcam". You have to be patient and play with the controls and fiddle with the telescope pointing. Once you get it, it will be easier.Thomas B : You don't focus the camera you focus the telescope. Watch the monitor of you laptop while adjusting the focus of the telescope. Start out with the moon to get used to using the image capture tools provided with the camera soft ware.KAREN S : I am guessing that the exposure is set incorrectly, or you don't have the planet in your field of view. You should see a very bright planet even if it is out of focus. AMaybe try it out on the moon first because that is easier to be sure it's in your field of view. Then play with the exposure settings until you see where they should be. You can also point the camera at your computer screen just to be sure light is getting through. Until you can see the object through the camera, focus isn't likely to be the problem. If you focus your telescope through the eyepiece and then put the camera in, you should be enough in focus to see the planet or moon, though it will be out of focus. Good luck.NEIL D : First I would recommend practice during the day this will also determine if your scope will allow the amount of back focus or in focus to obtain focus. Start with Bin on 1 You can use the auto settings during the daytime. The eyepiece and the camera focus at different focus settings, use a higher power eyepiece that is close to be in focus at the same setting as the camera(Again Practice during daylight) Once you have focus... then change the bin setting to learn the impact on the image. Now for night time I would start with the moon, The exposure setting need to be changed to manual. Adjust the Gain to about 20% and then the Exposure to @ 1/60th sec... adjust for brightness and focus. Remember you are using the camera in the manual mode so as you go to dimmer objects one needs to increase the gain(Never over 50%) and decrease the shutter speed to get the correct exposure. Remember also that the camera is like using a very high powered eyepiece, if the object is not perfectly centered in the field of view then it will not be on the sensor of the camera, Jupiter works good for the next challenge after the Moon. Use the same basics as you would with a fully manual exposure camera and you will get better results quickly. Personally I use a Cross hair eyepiece to center and then put the imager in once the object is perfectly centered. If you are not using a GOTO scope with precise alignment you will not have much success, by the time the eyepiece is removed and the imager installed the object will not be in the field of view. The green and blue dots show up on mine if on Bin 4 and the exposure is too short and the gain turned down, so it does not seem that the imager is defective but just the manual settings are not correct. A Bahtinov Focus Mask will make focusing very simple once you have the imager close to focus. Remember that if you are way out of focus especially at night the image is so diffused that there is no light for the camera to collect

Reviews about this item

Review Summary

2021-11-08T02:27:53

Rated 5 out of 5

Great little imager for just starting out.

Great Imager for somebody just starting out like myself. Easy instructions to follow and not bad pictures. Nothing like someone who spends thousands on taking pictures of the skies but not bad for someone who is starting out.

James H.

2021-08-19T08:45:44

Rated 4 out of 5

Good camera for beginner

Works well but the software provided needed updating at celestron web page.

PHILIP I.

2021-07-13T08:28:23

Rated 1 out of 5

Unable to use

Unable to use, the computer I have is an apple and not windows compatible. If there is a way to use on apple I would like to know

KURT M.

2020-12-17T08:48:59

Rated 5 out of 5

Awesome camera

This is an absolutely fantastic camera. Very easy to set up and shoot with

COLE W.

2020-10-12T08:39:06

Rated 3 out of 5

planet Camera

very good web camera for planets, 5 Mega compared to ZWO 1.5 mega

GARY G.

2017-11-19T13:47:14

Rated 5 out of 5

Good

Working good, great images

MARIO T.

2017-09-10T08:41:37

Rated 1 out of 5

Poorly Designed USB Connector

The USB Connector is of very poor quality!!! The USB cable provided with the camera does not work at all.; When I used a different USB cable, the camera would work but then disconnected when the cable was touched. I returned the camera and Adorama kindly replaced it with a brand new unit which also exhibited the same defect.

MICHAEL M.

2016-09-13T06:43:39

Rated 1 out of 5

Just bad

Can't get camera to work software and driver are bad sent back to manufacture and got a new one same thing waste of money don't buy

Peter K.

2013-04-28T21:00:00

Rated 5 out of 5

Great camera for the money

This is a complete Solar System imaging package. There is the normal learning curve, focus can be touchy, but learning the capturing process you'll capture some Great images. For me and my scopes this is a real performer.

MICHAEL R.

2013-03-06T19:00:00

Rated 4 out of 5

not what i wished for

i found out to my dismay this camera is not really compatible with the processor in my computer. i got it to work once or twice, but it's a known issue that the manufacturer doesn't really disclose. Adorama accepted it back and promptly refunded my money. i was also astonished by the speed with which this was delivered. i opted for two day shipping, ordered it on a wednesday and it was delivered the next afternoon. i'm sorry i couldn't use it as it has a good reputation.

DAVID W.

Select a plan in the Add Protection section above and purchase with this product by clicking “Add to Cart”.

image-protection

TRUSTED PROTECTION PLANS, EXCEPTIONAL SERVICE.

Invest In Your Gear and Peace Of Mind!

Accidents happen. Protect your favorite Adorama products and purchase a protection plan to stay covered from accidental damage, mechanical or electrical failures, and more.

Repair or Replacement

Repair or Replacement

If we can’t fix it, we’ll replace it at no additional cost.

Accidental Damage

Accidental Damage

Protect your product from drops, spills, and more.

Peace of Mind

Peace of Mind

Enjoy your gear without fear. We have you covered!

Failure Protection

Failure Protection

When regular use of your product over time results in mechanical or electrical failure.

Zero Deductible

Zero Deductible

We will never charge you a deductible after the purchase of a plan.

Customer-Focused Support

Customer-Focused Support

Our claims process is simple & easy and our customer service team is happy to help.

Adorama Protect powered by Extend is available for purchase to customers in the United States. Not available for international or U.S. territories purchases. Plans on open box items do not cover pre-existing damage.
Adorama Protect plans are available for ABS clients. If you have any questions or require assistanse, please call 800-223-2500

Celestron NexImage Specifications

  • Power Requirements

    Powered by USB

  • USB

    USB 2.0, 5' cable length

  • Camera Housing Construction

    ABS with aluminum connection ring

  • Optical Window

    IR Cutoff Filter

  • Pixel Size

    2.2 micron square

  • A/D Conversion

    12 bit

  • Imaging Sensor

    Micron MT9P031 CMOS

  • Color or Monochrome?

    Color

  • Camera Resolution (in pixels)

    2592 x 1944

  • Total number of pixels

    5.0 Mp

  • Mounting

    1.25" barrel and C-thread

  • Sensor Size

    5.7 mm x 4.28 mm

  • Shutter

    Electronic Rolling Shutter

  • Software Compability

    iCap, IC Capture, DirectShow

  • Operating Enviroment

    -30½C to 70½C

  • Sub Framing

    Hardware Selectable

  • Exposure Range

    0.0001 to 30 seconds

  • Frames per Second

    6.23 to 52.37 at the lowest resolution, 0.71 to 5.99 at the highest resolution

  • Weight

    2.0 oz(57 g)

  • Recommended / Best Usage

    Getting started in lunar, solar, and planetary imaging

  • Key Features

    5.0 MP resolution at low cost. Larger sensor is great for lunar and solar imaging

  • UPC Code

    050234937115

3 Accessories for Celestron NexImage 5, Solar System Imager (5 Megapixel)

  • All Accessories (3)
  • Eyepieces & Accessories (2)
  • Suppresion Pads (1)

About Celestron NexImage

FEATURED REVIEWS

Great camera for the money

By MICHAEL R.

This is a complete Solar System imaging package. There is the normal learning curve, focus can be touchy, but learning the capturing process you'll capture some Great images. For me and my scopes this is a real performer.

Great little imager for just starting out.

By James H.

Great Imager for somebody just starting out like myself. Easy instructions to follow and not bad pictures. Nothing like someone who spends thousands on taking pictures of the skies but not bad for someone who is starting out.

elestron offers a wide array of high-quality, affordable, and user-friendly planetary imagers! Click here to learn more on how to choose an imager that's right for you.

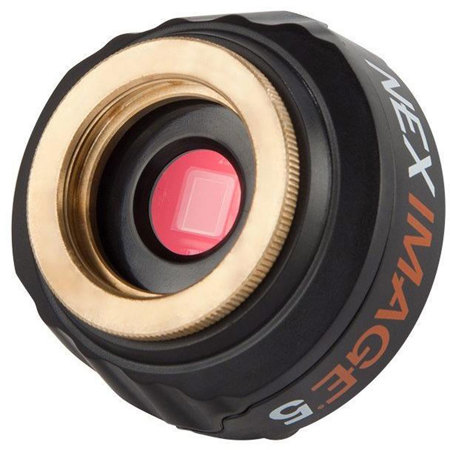
Capture high-resolution planetary, lunar and solar images with almost any telescope with the NexImage 5 Solar System Imager. Combined with the included software package, NexImage 5 brings out tremendous detail and produces images rivaling those taken with astronomical cameras costing hundreds more.

Simply point your telescope at the Moon or a planet and record a quick video. The included software analyzes each frame of video, throws away the fuzzy ones, and perfectly aligns the remaining images. The result is a bright, clear image with the maximum amount of color and detail. NexImage 5 is a great way to get started with astroimaging, especially if you live in a light-polluted area. If you can see the planet the sky, you can image it with NexImage 5!

• 5 Mega pixel color sensor with Micron½ DigitalClarity½ technology to dramatically reduce image noise levels
• Small pixel sizes provide sub arc-second planetary detail with most telescopes
• View and capture live video on your computer
• Software automatically filters out video frames most affected by poor atmospheric conditions, leaving only the sharpest, clea rest frames to be stacked and aligned into one high-quality image
• Camera control software allows you to manually change the gain, contrast, exposure time, frame rate and color saturation usin g your PC
• Selectable "region of interest" sub-framing
• Machined aluminum 1.25" adapter barrel with C-threads for direct threaded connection to almost any telescope
• Can be used with standard 1.25" eyepiece filters
• Integrated IR-cut optical window
• 2x2 and 4x4 binning capability in color
• Progressive scan
• Includes USB 2.0 cable

Celestron NexImage Features

  • 5 Mega pixel color sensor with Micron DigitalClarity½ technology to dramatically reduce image noise levels
  • Software automatically filters out video frames most affected by poor atmospheric conditions, leaving only the sharpest, clearest frames to be stacked and aligned into one high-quality image
  • View and capture live video on your computer
  • Machined aluminum 1.25" adapter barrel makes NexImage compatible with most any telescope
  • Manually adjust gain, contrast, exposure time, frame rate and color saturation using your PC

Warranty Information

This product has a limited warranty of 24 months for parts and 24 months for labor.

Key Features

  • 5 Mega pixel color sensor with Micron DigitalClarity technology to dramatically reduce image noise
  • Software automatically filters out video frames most affected by poor atmospheric conditions,
  • View and capture live video on your computer
  • Manually adjust gain, contrast, exposure time, frame rate and color saturation using your PC
  • Machined aluminum 1.25" adapter barrel with C-threads for direct threaded connection to almost any t
  • elescope

What's in the box:

  • USB 2.0 Cable
  • Software
  • 2-Year Warranty