Ahh the economy. It has driven many of us insane trying to figure out how to do more with less. Clients constantly approach us asking for miracles with shoestring budgets. A fine example is shooting anything fashion related. Editorial work these days pays almost nothing if you are lucky or nothing at all for the most part.
How do you shoot such a thing without taking a major loss financially? Yes. it will look great in your portfolio, but the rental cost of a Phase Back, all that Profoto gear and so forth will set you back a pretty penny.
How can I do this without losing my shirt in the process? How could I shoot such a project for a budget of, say, $500 or less?
Let’s look at a few things first. Most portfolio prints and in truth magazine prints don’t require 45 to 65 megapixels. Even 18 MP is overkill. The 12-16MP resolution of most mirrorless cameras, with careful use, will provide more than enough resolution. Since many of us have a small camera that is well within these margins, let’s see what we can do with such a limited budget to shoot a Fashion Editorial. While the camera I will be using is the Pentax Q with it’s equivalent 47/1.9 lens, these techniques apply to practically any mirrorless unit with little to no modification. So let us look at what equipment we can use and stay within budget.
First, the lighting:
Adorama RS-F18 Manual Flash Unit with PC Cord, GN 50 at ISO 100

The Adorama F-18 flash is a good choice here for two reasons. First, it’s fairly powerful at GN50, and of course at a retail cost of $19.95 it is very inexpensive. Since this unit doesn’t have a thrytistor it always outputs at full power making the use of light modifiers much easier when used with a meter. In other words, the output is consistent. We will use two of these for the shoot. Total cost: $39.90
Flashpoint Soft Box for Shoe Mount Flashes, 16″ With mounting hardware

I like my light a bit diffuse and soft. Flashpoint makes this useful small soft box for shoe-mounted flashes, complete with mounting grip. When used with the Adorama – Boom Arm with Weight Bag for Studio Lights I can have my assistant move about to adjust both the position and intensity of the light (via the famed inverse square law). Total cost of soft box and boom arm is $77.90 bringing us to a grand total for the shoot so far to $117.80.
Flashpoint Q Series 6″ Beauty Dish Reflector

I love using a beauty dish along with a soft box. It just makes the face pop, and provides a unique catch light. The Flashpoint model shown can also accept additional modifiers such as the Flashpoint Q Series Accessory Kit, providing me with grids, gels and additional reflectors along with the Adorama Strobo-Socks to add additional diffusion. Total cost of this bit of kit with the sock and accessories is $101.85, and our running total is $219.65.
Flashpoint 16 Channel, Radio Remote Control Set

To trigger all of the lighting off camera we need something. The most reliable method is via radio slave and the 16 channel Flashpoint model is perfect for our needs. Add an additional reciever and a roll of gaffer’s tape (you always need gaffer’s tape) and we are set. The transmitter set with additional receiver and a roll of tape runs us $72.85 bringing our total for this shoot to $292.50 giving us an additional $207.50 for emergencies, coffee and sandwiches! So let’s see the results as I discuss each shot.
First off some basics. There are some tools I used that should be standard in any photographer’s kit. Items such as the Flashpoint 42″ 5-in-1 Collapsible Disc Reflector or a tripod such as the Flashpoint F-1228 Version II Carbon Fiber Tripod. Also helpful is a flip bracket such as the Flashpoint Digital Camera Folding Flash Bracket. These items should be standard in every kit. Now here is the first shot, a beauty shot.

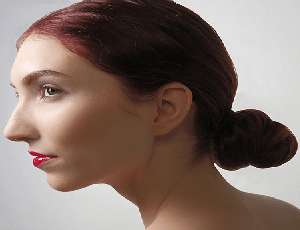
Shot with a Pentax Q 01 and Standard Prime lens. ISO 250; exposure, 1/250th sec. at f/8.
A beauty shot is a tight head and shoulder or face shot designed to either sell some specific beauty product (skin cleanser, foundation, etc) or as a model’s head shot and of course as a standard portfolio piece for make up artist and fashion photographers. Here I used a very standard lighting set up for this type a shot as shown in the diagram below.

To camera left is the Flashpoint softbox with one receiver and one flash. This was mounted to the boom arm and held above the model facing down at a 45 degree angle. To camera right is a 42” reflector using the silver side to bounce some of the light into the shadow area as I shot this shot “short” i.e. into the shadow area. On camera is the Flashpoint 6” beauty dish gaffered onto the small flash using the 10 grid and a sock to provide a light fill to the eyes. Since the transmitter occupied the hot shoe, the beauty dish and grid was mounted onto the flip bracket along with a receiver for it.
Not all mirrorless units have hot shoes. If your camera lacks a hot shoe, you can use the pop-up flash dialed down to a bare minimum so it doesn’t add significantly to the image and optical slaves such as the Adorama Electronic Slave Unit to trigger the other lights. In the case of the Sony NEX-7, you will need the Sony Hotshoe Adapter to use this or most any radio trigger. Now let’s try something more akin to a look book or catalog shot.

Shot with a Pentax Q and 01 Standard Prime. ISO 250, exposure: 1/250th sec at f/5.
Look book and catalog shots tend to use plain and simple backgrounds to bring focus to the clothing or “look” being shown. The poses are usually not too dramatic and at times quite static. The idea here is not that different than that of a product shot, even lighting with a little shadow to bring out fine detail. Here I shot “broad” i.e. into the area lit by our key light which was camera left as shown in the diagram below.

One challenge is that the model was posing in a small alcove in the studio. This required having our key, the Flashpoint softbox, high above the model with the light coming down at about a 60 degree angle. The alcove walls acted as a reflector, helping mix the light around her. To complete the lighting the small beauty dish with a 10 grid was used, this time with the sock removed to add just a small kick to ensure even lighting. This is all well and good you may say, but what about one of those slick shots you may see in a fashion magazine used for major advertising campaigns or those fancy editorials? Let’s take a look and the next image and discuss this.

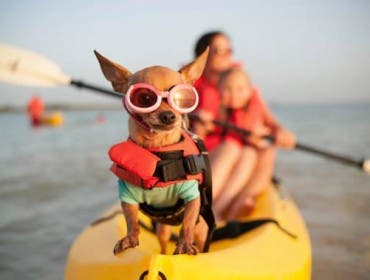
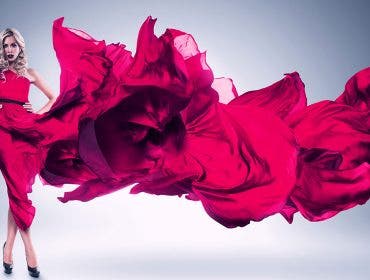
Shot with a Pentax Q 01 and Standard Prime lens; ISO 250; exposure, 1/160th second at f/5.
The idea of an editorial or advertising shot is not just to sell a product, but sell a lifestyle that is promoted by either the magazine or brand. To create the drama seen here I used a technique called “American Midnight” where instead of balancing the flash with the ambient light for a soft fill, the flash is the main light purposely underexposing the ambient by, as in the case of this photo, three stops.
Here we set up our key light in a slight cross lighting position to create strong deep shadows that add drama off to camera right. Also to camera right is our 42” reflector using the silver side to bounce some of the sunlight back into the model’s face. On camera we have the beauty dish with no grid or sock to provide a final fill that helps to keep the shadows from getting too deep.

Using nothing more than a couple of flashes and a little creativity any one can get results like this. Please feel free to ask questions in the comment space below. Also keep an eye on the Adorama Facebook page to tell us what you want to see next in this series of “How to Do Anything on a Budget”.
Many thanks to Alyssa Young of Major, makeup artist Orietta Leva and the award winning designer Loris Diran for their assistance in shooting this article.