In underwater photography, packing efficiently is half the battle. Between camera gear, dive equipment, and the inevitable tangle of accessories, every inch of space counts. Over the years, I’ve refined my setup into something that’s compact, durable, and ready to travel. Whether I’m scuba diving in Hawaii, freediving in French Polynesia, or chasing the Sardine Run in South Africa.
Here’s a look inside my current underwater photography kit and how I pack it. Also, read about why these particular pieces have earned their place in my bag.
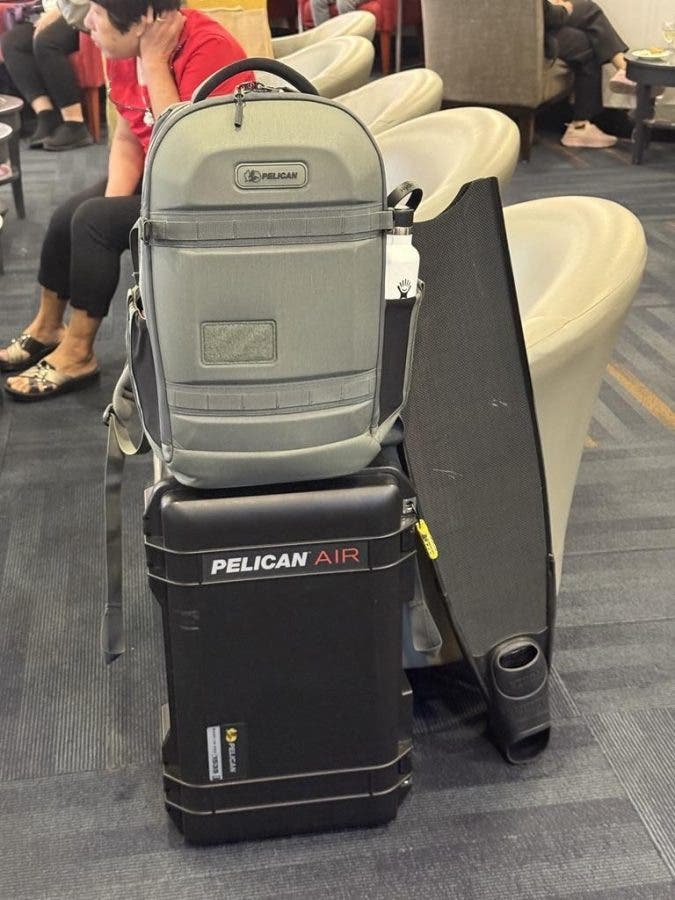
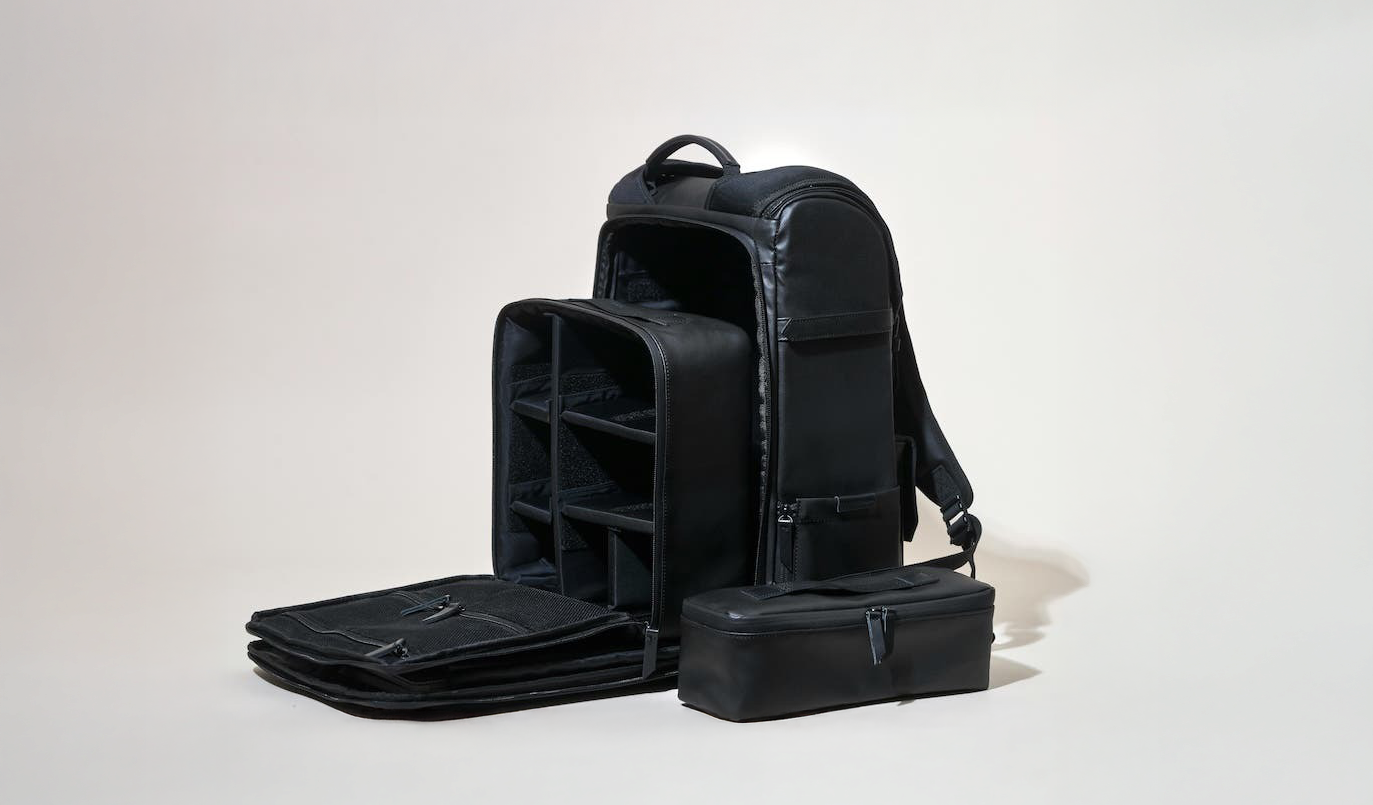
The Cases: Pelican 1535 Air & Pelican Aegis Backpack
When it comes to protecting expensive camera gear, I don’t take chances. My go-to setup includes the Pelican 1535 Air Case for hard protection. Then, the Pelican Aegis Backpack for flexibility and carry-on convenience.
The 1535 Air is the perfect size for air travel. It’s extremely durable, lightweight, and still small enough to fit in most overhead bins. Inside, I pack my Marelux underwater housing, snugly padded with TrekPak dividers to keep it secure. After the housing, there’s stil plenty of room for my gear. That’s my cameras, a few lenses, extra batteries, mounts, and smaller accessories. All things I like to keep easily accessible. I also installed this lid organizer to hold little things that would usually go in my camera backpack.
The Aegis Backpack is my companion for everything else. Mainly housing my topside cameras, lenses, memory cards, hard drives, batteries, and straps. It’s weather-resistant, sleek, and surprisingly roomy for its size. Plus, I love that I can wear it on hikes or boat rides. All without worrying about water exposure or weight distribution. The backpack being a hard-shell is something I had to get used to. However, now it’s hard to imagine going back to a fully soft backpack.
The Underwater Setup
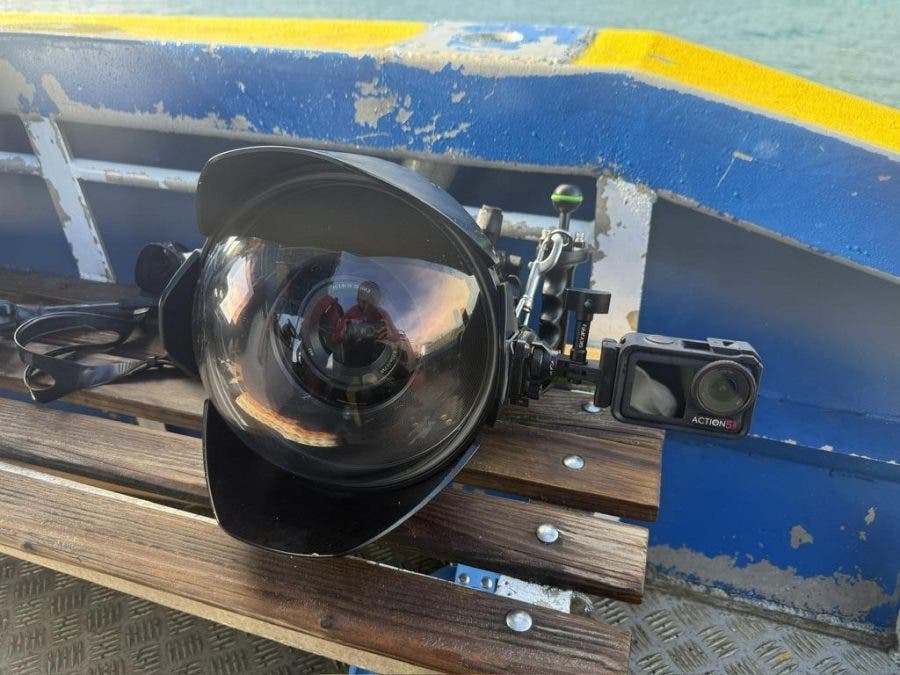
My primary underwater setup is built around my Marelux underwater housing, which I pair with my Sony A7R V and most often the Sony 16–35mm f/2.8 GM II. This combination gives me the flexibility I need underwater, being wide enough for reef scenes, big animals, and environmental portraits. All while still maintaining incredible sharpness and image quality.
The Marelux housing is a relatively new addition to my kit this year. However, it’s quickly become one of my favorite pieces of gear. What immediately stood out to me is how much control it gives me underwater. Every button and dial I rely on while shooting is easily accessible, which means I’m never fighting my housing or missing moments because I can’t change a setting fast enough.
Despite being robust and confidence-inspiring underwater, the housing itself is surprisingly compact and thoughtfully designed. It breaks down easily for travel, which makes a huge difference when packing for dive trips where space and weight are always at a premium. Most importantly, it’s performed flawlessly underwater so far. No leaks, no quirks. Just a solid, reliable system that lets me focus entirely on making images.
Extra Camera
Mounted directly to my housing/dome is the DJI Osmo Action 5 Pro, which I use to capture behind-the-scenes video while I’m shooting stills on my main camera. I love this setup because it allows me to document the process — the dives, the conditions, the moments between shots — without pulling focus away from photography. The action cam quietly runs in the background while my main camera stays dedicated to what it does best: capturing the final image. The DJI Osmo Action 5 Pro is my favorite action camera for underwater shooting right now because the footage that comes straight out of the camera is crisp, balanced, and vibrant in the best ways.
The Land Setup
In my Aegis backpack, I carry my Sony A7R V and Sony A7C II, which are my go-to cameras for everything above water. The A7R V is my high-resolution workhorse for detail-heavy shots, while the A7C II is my lighter, travel-friendly option for video and everyday shooting.
I bring a small selection of lenses to cover everything I need:
- Sony 16-35mm f/2.8 GM II: a wide-angle zoom for landscapes and underwater scenes
- Sony 50mm f/1.2 GM: a fast prime for portraits and low light
- Sony 24-70mm f/2.8 GM II: a compact zoom for general travel and BTS
For my most recent trips, I’ve also been bringing along the OM System OM-3 with a few lenses as a compact land camera that I can grab when I don’t feel like using my larger Sony setup. I’ve loved having a small-yet-capable camera that I can throw in my sling bag for daytime adventures. Also, I’ve been playing around with its built-in film-like color simulations too.
Add a few memory cards, cleaning cloths, extra batteries, and a few SSDs, and that’s my full creative setup. Small enough to carry onto planes, sturdy enough for ocean adventures, and flexible enough to cover both land and sea.

Final Thoughts
The key to any underwater setup is balance — between protection, portability, and creative potential. My Pelican cases have survived countless flights, salt spray, and sandy beaches. They continue to be my trusted travel companions.
Whether you’re diving into underwater photography for the first time or just looking to streamline your setup, investing in reliable protection and packing smart makes all the difference. After all, the less you worry about your gear, the more you can focus on the moments that matter.