For this final segment we’re going to take the information of part 1 (Planning a Studio Shoot 101) and part 2 (Key & Fill Lighting 101) and put them to practical use for three styles of shooting: full length portraiture or fashion, beauty, and motion.
Full-length fashion & portraiture
Assignments like these place an emphasis on texture and detail, though the light should also impart a mood on the photo. The goal is in creating light which is evocative and not just clinically descriptive of the subject.
With simplicity in mind, the strategy for each of these examples is to make the light sources do double duty — lighting the subject and, at the same time, using the size and distances of the light to provide a consistent and pleasing exposure on the background. We’re changing the size and distances of the light sources with the intention of providing a small or large region of consistent exposure as needed.
For this example, this is the gear used:
- 2 eVOLV200s in the Twin Head as the Key, XPro-N trigger included, ()
- 1 Xplor600 as Fill ()
- 2 large Silver Umbrellas – I used a mix of 6ft umbrellas, but these 7ft offerings from Westcott () will be just as good
- 2 diffusers for the umbrellas ()
- 2 Avenger C stands ()
- 1 background stand system ()
- Savage Grey Seamless in 9ft ()
- 4x sandbags ()
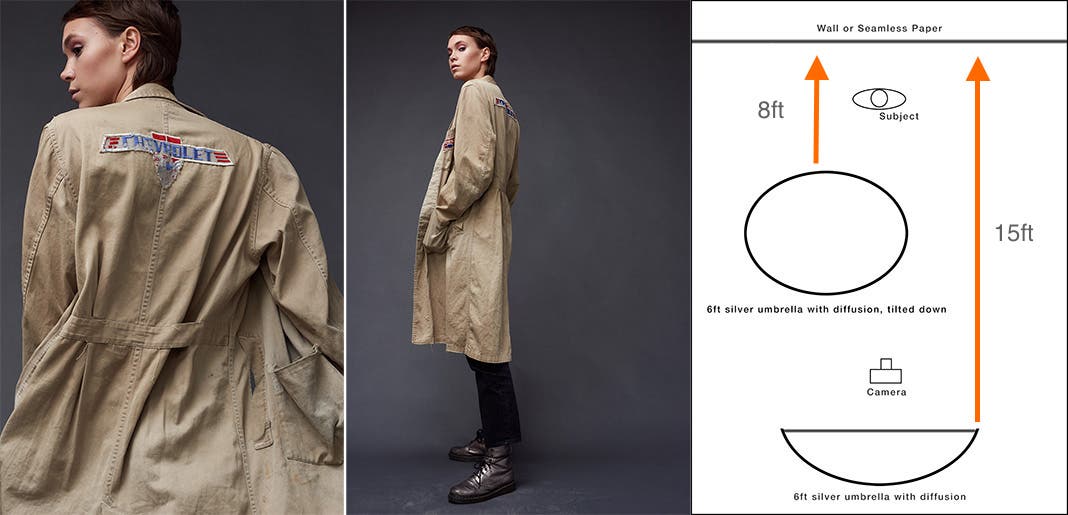
Parking the subject close to the background and lighting with these large, soft sources guarantees that the tone of the background will be relatively consistent, both with its original color as well as corner-to-corner in the frame. The large, diffused nature of the lights will also make it so the shadow projected onto the background is less evident, and less evident still if we increase the power of the fill.
The large area of relatively consistent exposure allows the photographer to take their mind off the light and the model or subject can move freely. Keeping the key light within a 30- to 45-degree angle from the camera axis offers a lot of freedom of flattering light to work in.
The key light is pitched down, at about 30 to 45 degrees relative to the floor, to provide coverage head to toe. As you set your lights up, have the model stand on their mark and look into the camera for a test frame — their eyes will tell you if the light is too high (no catchlight in the eyes), and their chin will tell you if it’s too low (no defining shadow running under the chin). Adjust and experiment as needed.
Beauty
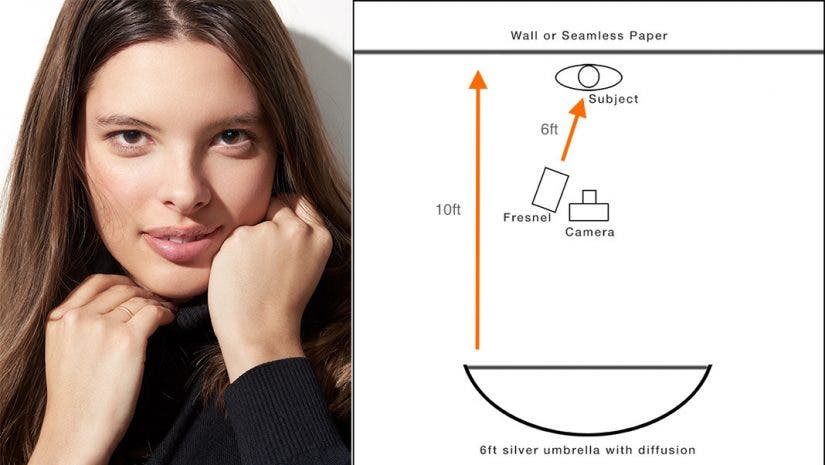
Where the above example gets its power from keeping highlights somewhat muted, and mid and low tones pushed to the left of the histogram, creating a low key, rich atmosphere, beauty gets its pop using small, specular sources.
A fresnel is a great choice for a key, and used here, but the high key interior of a silver beauty dish, a small Octa with the diffusion panel removed, or a high output reflector are all good choices. Even a standard bare reflector can get the job done at the right distances and right output ratio relative to the fill.
To drive home the power of choosing the right sources for the job, here’s an interesting fact: the key and fill lights metered for both the fashion and beauty examples here at exactly the same ratio (key was f/9.0 and fill f/4.0 in both). Putting them side by side you can see how a collection of choices radically changes the feel of these photos – character of the key light; size of the sources relative to the subject; even distance of subject to the wall as well as the color of the background, all affect the mood and intent of the images.

For this example, this is the gear used:
- 2x eVOLV200s in the Twin Head as the Key, XPro-N trigger included ()
- 1x fresnel attachment
- 1x Xplor600 as Fill ()
- 1x large Silver Umbrella ()
- 1x diffuser for the umbrella ()
- 2x Avenger C stands ()
- 2x sandbags ()
Action, motion & dance
A few things come to mind when I have the collaborative talents of a dancer in front of me: how do I use the light to bring clarity to their athleticism, form and musculature; how do I create a space of relatively consistent exposure which permits them to move freely; how do I keep the recycle times of my strobes low or non-existent; and lastly, how do I leverage my tools to freeze motion, capturing tack sharp detail down to the finest details?
Rendering musculature with depth is the product of moving the light off-axis relative to the line of the camera. Here it’s between 45 and 70 degrees, and as I set up to test my lights I confirm this by having the dancer stand on their mark and face the camera — if you get Rembrandt lighting, you’re starting in a good place, but I’ll often push it to Split lighting (90 degrees) and sometimes beyond for Short lighting.
Creating a broad space of consistent exposure is about modifier size and distances — and for this kind of work, the bigger the better. I used what I had available at the time, but going forward I’ve done this same kind of work in the same way with two 6-foot umbrellas. Taken together the lights act as a single massive source, but I will still have the key light meter 2/3rd to a full stop over the fill, so it creates an area of subtle pop to the face/torso of the dancer.
Recycle times are a function of keeping the power of the strobes as low as my exposure settings at camera permit, and adjusting those camera settings to meet recycle times as needed. As a general rule of thumb with the Flashpoint R2 system, instant recycle times start happening at ¼-3, so knowing this, you can then work your way back to which strobe produces the output needed for you to hit exposure goals. Need full body coverage, f/8 at ISO100-200? You’re going to have to work with Xplors. But if you can open up to ISO400-1000, you move into Streaklight and eVOLV territory.
Freezing motion is the result of two factors — flash duration, or sync speed — and here the Flashpoint R2 system offers a pretty forgiving degree of creative freedom:
Flash duration is a term describing peak flash exposure and fall-off taken together as a unit of time expressed as t.1. The short of it is, if your t.1 times are faster than 1/4000 a second, and your strobe exposure is well above ambient, shutter speed becomes irrelevant to freezing motion. A dancer at 1/30th shutter speed or 1/200th shutter speed will look equally frozen provided the dominant light reaching them is shorter than 1/4000th. In most circumstances, this will require you to shoot at powers 1/16th and below on the Flashpoint system, possibly lower as your tolerances become tighter for freezing refined detail and edges. And naturally, you will have to adjust exposure at camera to compensate — raising ISO being an available solution.
The other option is taking advantage of the R2’s High Speed Sync, a.k.a. “HSS”. When this is engaged, the strobe fires a series of micro-pulses, in effect becoming a high powered constant light source for a short period of time. The transmitter/receiver system then syncs to allow the passage of the shutter’s opening and closing within the period of time covered by the micro pulses, making flash sync possible all the way down to 1/8000th!
The compromises here, however: doing so places a lot of strain on the light, increasing recycle times and after 30-70 of such pops (output and light model depending), the light’s thermal protect kicks in, forcing you to pause shooting while heat buildup from the discharges dissipates; in addition, exposure for a given power setting is cut in half or more — 1/4 power in HSS is similar to 1/8th or 1/16th power in the standard sync manual mode.
One saving grace of the R2 strobes is that their standard sync, 1/1 power is actually long enough that HSS can be achieved, tucking the passage of the shutter across the sensor within the broad peak of the strobe’s discharge. Set this way, you’ll achieve clean edge-to-edge exposures down to 1/8000th again! This way, if you find that 1/1 in HSS mode isn’t powerful enough for your desired exposure, switch to manual 1/1, and use a creative combination of distance, diffusion and even ND gel to achieve a balanced exposure. Taken together, the three options — short flash duration, HSS, manual HSS at 1/1 — make for truly exciting possibilities.
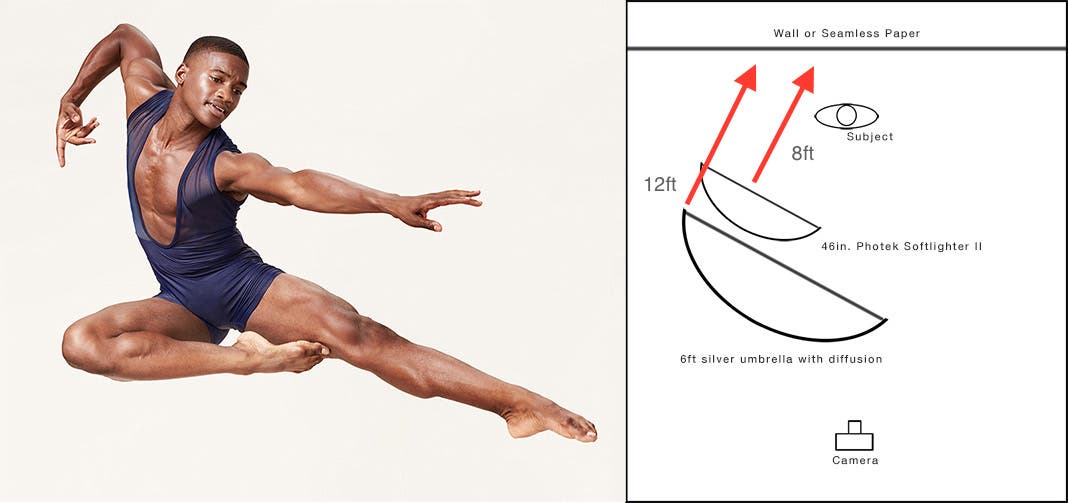
On that note, as a challenge to myself and proof-of-concept, I created the image above in the style of a large scale dance promotional poster using just three small, easily transported Streaklight 360 TTLs. The image was made on a Nikon D810, 50mm 1.4 lens, aperture f/6.3, ISO 400, shutter speed 1/2500. The lights were arranged as shown in the diagram, set to 1/1 manual mode, and a third light was peaking above the seamless, reflected off the white ceiling of my studio, providing the subtle rim light most evident on the tops of the dancer’s arms.
For this example, this is the gear used:
- 3x Streaklight 360TTLs ()
- 3x Streaklight twin power cables ()
- 3x mounting clamps ()
- 3x bulb covers for transit (
- 3x Glow Bowens adapters ()
- 1x R2 trigger () (you can also use the XPro-N)
- 1x 46” Photek Softlighter II as Key (), but in similar shoots since, I’ve used and really love the 38” Glow Parapop as my Key ()
- 1x large Silver Umbrella as Fill ()
- 1x diffuser for the umbrella ()
- 2x Avenger C stands ()
- 1x Avenger Heavy Duty “kit stand” ()
- 1x background stand system ()
- Savage Light Grey Seamless in 9ft ()
- 5x sandbags, 3 of these kits ()
Next, check out my upcoming series on the Flashpoint eVOLV 200, coming soon.