Make 2015 your BEST photography year yet! #AdoramaU is a year-long tour through twelve essential photography topics. This lesson will summarize the three factors that effect exposure and help demystify the histogram.
By: Adorama Learning Center Editors
Welcome to Lesson 4: Getting the Right Exposure
As we’ve reviewed in prior lessons, the camera uses a combination of shutter speed, aperture and ISO to determine the amount of light that reaches the sensor or film. Although these three factors are what technically combine to create exposure, today we offer a more elequent analogy to put it in practical terms.Instead of light, let’s envision capturingrain, and instead of a sensor, a bucket will be our medium for collecting the rain. The three variables you can control arethe width of the bucket (your aperture), the duration you leave it in the rain (your shutter speed), and the amount of rain you want to collect (your preferred exposure). Much like light, the one thing you can’t control is the rate of rainfall. In this scenario, not collecting enough water is the equivalent of underexposing. Conversely, collecting too much water would be overexposing, and unlike in the bucket analogy, one can’t just remove light from the sensor after a shot is taken.

Aperture, shutter speed, and ISO are the foundational pillars of the Exposure Triangle. Most moderncameras have built-in light meters thattake all the guesswork out of determining an average exposure, and serious photographers need manual control in order to capture images that express a creative vision. Some examples of manipulating these exposure variables for creative effect are: blurring the motion of a waterfall with a slow shutter speed, freezing a basketball player in mid-air with fast shutter speed, capturing an expansive landscape where everything from near to far is exquisitely sharp, or shooting a classic portrait where the subject is sharp but the background is pleasantly soft and creamy. Creating these stunning effects entails a more in-depth knowledge of not justexposure, but the variables behind it and what “the right exposure” really means.

This image shows a well-balanced exposure, maintaining detail even in the highlights of the clouds.
Like Inseparable Friends
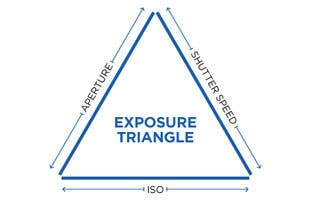
These numbers and effects have been thoroughly covered individually, but it’s much easier to understand when viewed as a whole. Below is a more comprehensive version of the exposure triangle, showing the three variables and what effect each will have by changing their value.What’s important to understand is that it’s possible to change two of the three factors and still get the same exposure. For example, ifyou want the same exposure but with a one-stopsmaller aperture, you simply increase your shutter speed by one whole stop. Alternatively, if you need the same shutter speed but smaller aperture, you can increase the ISO sensitivity. The apertureand shutter speedwork in conjunction with ISO and are absolutely inseperable when it comes to getting the results you need.

This modified version of the Exposure Triangle includes effects that can be achieved by changing a corresponding value.
ISO: Effecting amount of noise
Shutter Speed: Effecting sharpness or blur of a moving subject
Aperture: Effecting ‘shallow’ or ‘deep’Depth of Field

This image is intentionally underexposed to maintain the vibrance and saturation of a sunset over Napa Valley.
Getting the right exposure: It’s a personal decision
The good news is that the metering systems built into today’s cameras are pretty darn good at delivering accurate exposures well over 90% of the time — if you define an accurate exposure as what you see with your naked eye. However, shooting with a digital camera is analogous to shooting color transparency film in a film camera—the brightness range that can be captured by the sensor is a lot more limited that what you may encounter in the great outdoors. Most digital cameras have a greater tendency to blow out the highlights than to block up the shadows. The best way to be assured that any particular exposure captures what you want is to assess it on your camera’s LCD and make a subjective judgment. Today’s LCDs will usually give you an accurate representation of the captured image and enable you to adjust the exposure to get what you want. If you’re looking for a more accurate way to monitor your exposure, then you’ll want to turn to your camera’s histogram.

What’s a histogram and how do you use it?
A histogram is a map of your image’s exposure and reading it is really easy. Let’s look at three areas of the above histograms- the far left, middle, and far right. All information that registers in the shadows or darker areas of your image will show on the left hand side of the histogram. Conversely, the area that shows highlights and blown out areas or areas that are pure white and have no information, will show on the far right. That area in the middle is the sweet spot for your camera’s sensor and where most of the mid-tones live. The ideal histogram of an accurately exposed subject with a long tonal range looks kind of like a curved-top mound that extends completely from left to right with a rounded peak in the middle. However even histograms of accurately exposed frames seldom look like that.
Example of an underexposed imageand histogram:


There are two things to look for in a histogram that may indicate a problematic exposure: clipping on the left or “dark side” and clipping on the right or “highlight” side indicating blown out highlights.In general, histograms biased toward the dark end will need additional exposure to light, either manually set or using the exposure compensation control. Modern digital cameras benefit from having a higher dynamic range than film was ever capable of, and the shadows are an area where editing software can pull a lot of information and recover some of those underexposed areas.
Example of an overexposed image and histogram:


Despite higher dynamic range in digital cameras, there are still limitations when recovering the highlights from a blown out picture. Typically, if an image is too overexposed and you see that huge spike in the histogram on the far right, that means you’re losing your highlights and what you’re left with are pure whites. This can be seenin the above image, where even the best editing software will struggle to pull it back to a usable exposure. If too much of your image is blown out, or spiking in the highlights of your histogram, consider compensating for this in your exposure by closing down your aperture or increasing your shutter speed.
The best practice for getting the most out of your images is shooting in a RAW or TIF format, as opposed to JPEG. They may belarger files, but all that extra information will help alot when you need to save morehighlight or shadow detail. Since RAW files need converting if you want to share or print them, you’ll alsowant to invest in a program such as Lightroom6 or CaptureOnePro 8to manage and edit your files.The important thing to remember about histograms and exposure is that there is no such thing as a “correct exposure”—it all depends upon the subject itself and the effect you want to achieve. As with all aspects of photography, you, and your eyes, are ultimately what determines what’s “correct” and what you want to achieve.
To give you some practice with exposure and reward your participation, check back each week in Mayfor our weekly #AdoramaU assignments.
May Assignments:
Week 1: Share an imagethat achieves a well balanced exposure; including detail in the highlights and shadows.