Music, sound effects, and voices are integral to the viewer’s experience when watching a film, documentary, or short-form content like reels, shorts, and TikToks. Video quality makes up the other half of the experience. A viewer might overlook a slightly out-of-focus shot. However, poor audio is immediately noticeable. Therefore, it leads viewers to swipe away from your video.
To deliver an immersive experience, filmmakers must be adept at both recording techniques and audio cuts, learning to capture clean sound on location and then using it creatively in the edit to evoke emotion.
In this article, we will start with essential audio terminology, then learn about a selection of audio recording devices for different production scenarios, learn what audio cuts are, and then watch a few examples of audio cuts to illustrate an engaging audio-visual experience.
Essential Audio Terms Every Creator Should Know
The following are frequently used terms by creators.
| Term | Description |
| SFX | Sound effects such as footsteps, a slamming door, or sounds that gradually increase in volume, pitch, or intensity create tension. Imaginary rising sounds can include wooshes, risers, and swishes. |
| Spot Sounds | Similar to SFX, but has to happen at the same time as the action, such as knocking on a door. |
| Reference Audio | A low-quality audio track recorded directly into the camera serves solely as a reference to help synchronize higher-quality external audio later on. Eg. hiding a microphone under the shirt while the camera is simultaneously recording the voice (the reference track). During editing, the microphone audio is synchronized with the camera audio. The camera’s audio track, or reference track, is then muted because it often captures excessive ambient noise. |
| Ambient Sounds | Continuous background noises, such as the hum of an air conditioner, distant birds, or artificially created sounds, set a mood. |
| Talking Head Video | Videos in which a person either speaks directly into the camera, such as an interview or tutorial. |
| Plant Mic | A microphone hidden in the scene to capture sound. |
| Scratch Audio | A temporary audio track used during the initial edit, eventually replaced with SFX. It is common to keep the original recorded camera audio as scratch audio. |
Best Recording Techniques for YouTubers and Solo Creators
Choosing the right tool for the job is the first step in successful audio. Additionally, your microphone choice dictates the quality of your final edit.
| Item | Primary Uses | Client Work | Vlogging | Filmmaking | SFX Recording |
| Wireless Clip-on System (ex. Rode Wireless PRO) | Vlogging, “talking head” videos. | High convenience. Great for fast-paced shoots. | Best choice. Light and easy to use while on the move. | Good for backup sound. | Not recommended. |
| Shotgun / NTG Mic (ex. Rode NTG using a boom pole) | Pro interviews, studio tutorials. | Top Tier. Provides a professional broadcast sound. | Good for stationary studio setups. | Essential. Captures clean dialogue on set. | Great for spot sounds. |
| On-Camera Shotgun (ex. Shure VP89S) | Run-and-gun vlogging, backup audio. | Limited. Best used only in very quiet rooms. | Very Good. Ideal for environmental sound. | Used for Reference Audio. | Good for general ambiance. |
| Handy Recorder (Small) (ex. Zoom H6studio) | Use with a lapel mic or as a plant mic. | Reliable Backup. Can be hidden in a pocket. | Good for voice-overs on the go. | Perfect for hiding in a scene. | Good for basic sound capturing. |
| Field Recorder (Multi-Input) (ex. Zoom F6) | High-quality SFX, multicamera interviews. | Professional. Allows for multiple XLR inputs. | Overkill for simple vlogs. | Excellent. Can record multiple people. | Best Choice. |

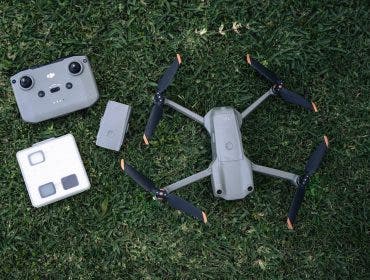
Options for audio recording devices for documentary films and vlogs
What Are Audio Cuts in Filmmaking and YouTube Video Editing?
An audio cut is the exact point where one sound clip ends and another begins, or where a sound is removed entirely. Although certain audio needs to match the video, for example, a person talking, or the clicking of a pen, the creativity with music, SFX, and ambient noises has many possibilities where the audio can continue or fade from one scene to another, or even start earlier than a video clip for which it is intended.
So, this is where you need to understand the various audio cuts and how they keep the video’s momentum flowing. Here are my top 5 ways to transition audio clips:
1. The J-Cut
This audio cut is by far my favorite. With this method, the audio for the upcoming scene starts playing before the video transitions.
- Why use it: To prepare the audience for a change in location or mood

Audio Cut Example: J-Cut
2. The L-Cut
This is the opposite of the J-Cut. In this technique, when the video changes to a new shot, you still hear the audio from the previous shot.
- Why use it: To ease a smooth visual and emotional transition, allowing the feelings from the previous scene to linger for a few extra seconds after entering the environment of the new scene.

Audio Cut Example: L-Cut
3. The Hard Cut
As the name suggests, using a hard cut means that the audio and video from the first clip end at the exact same time.
- Why we use it: To show a clear, definitive end to a moment. It brings you abruptly into the present moment.

Audio Cut Example: Hard-Cut
4. Pre-lapping Dialogue
I often use this technique in documentaries where a character’s voice begins before they are seen. This helps the viewer understand that the voice belongs to the film’s main characters.
- Why use it: To link a character’s thoughts to their actions in the upcoming visuals and determine the story’s direction.

Audio Cut Example: Pre-lapping Dialog
5. The Audio Bridge
Ambient sounds and music serve as an effective bridge between scenes. They are transitions that continue until they gradually fade away, helping to establish the mood. For instance, I prefer to use ambient sounds at the beginning of a film to create anticipation and mentally prepare the audience for upcoming action, romance, fun, or seriousness. A bridge can also be a music track and a sound effect running from one clip to another. There are two options: either using your real sound from location using a field recorder, or using artificially created sounds (your own or online subscriptions).
- Why we use it: To create or maintain a consistent mood throughout a montage of related clips.

Audio Cut Example: The Audio Bridge
Final Remarks
It is worth learning some common techniques like those discussed above to enhance your recording techniques and audio cuts. This aspect of editing allows for enormous personal creativity and style that one can explore. Be deliberate about watching the techniques of other masters to learn from them – it requires intent. Cuts and audio recording can elevate an ordinary story to a truly engaging one that evokes emotions that linger with the viewer long after the film concludes.